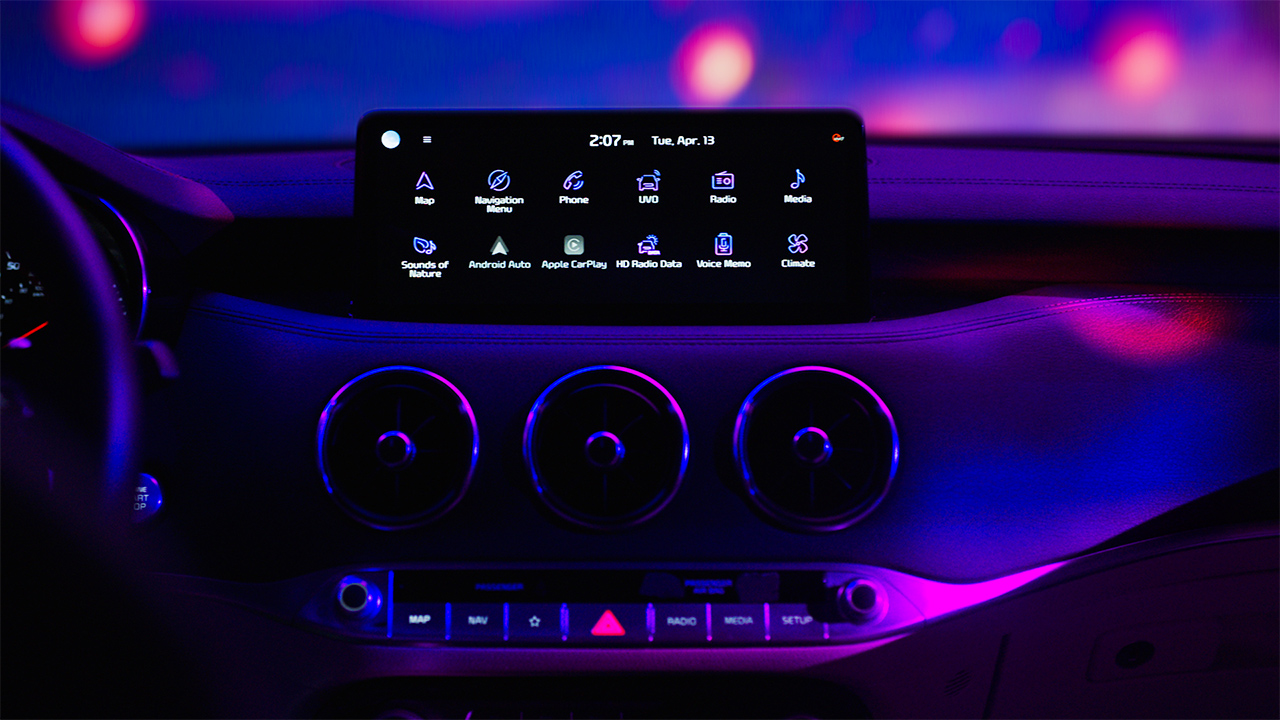
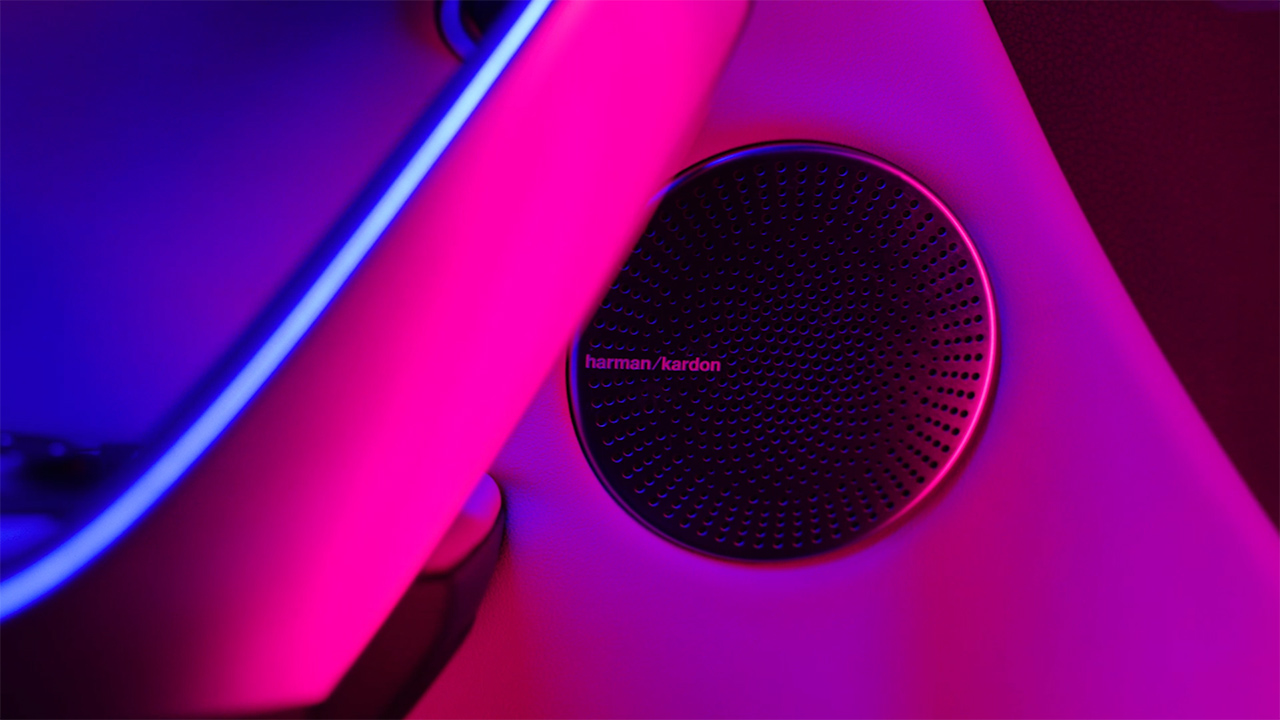
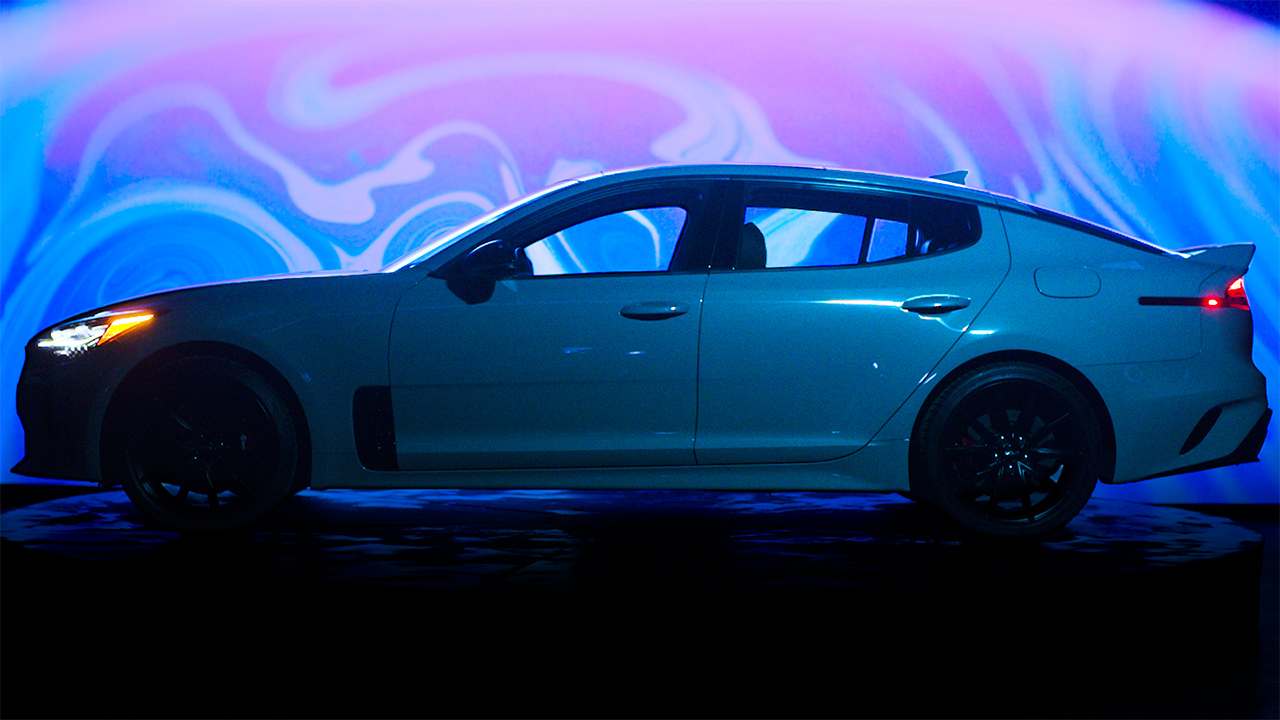
Kia Stinger Spots
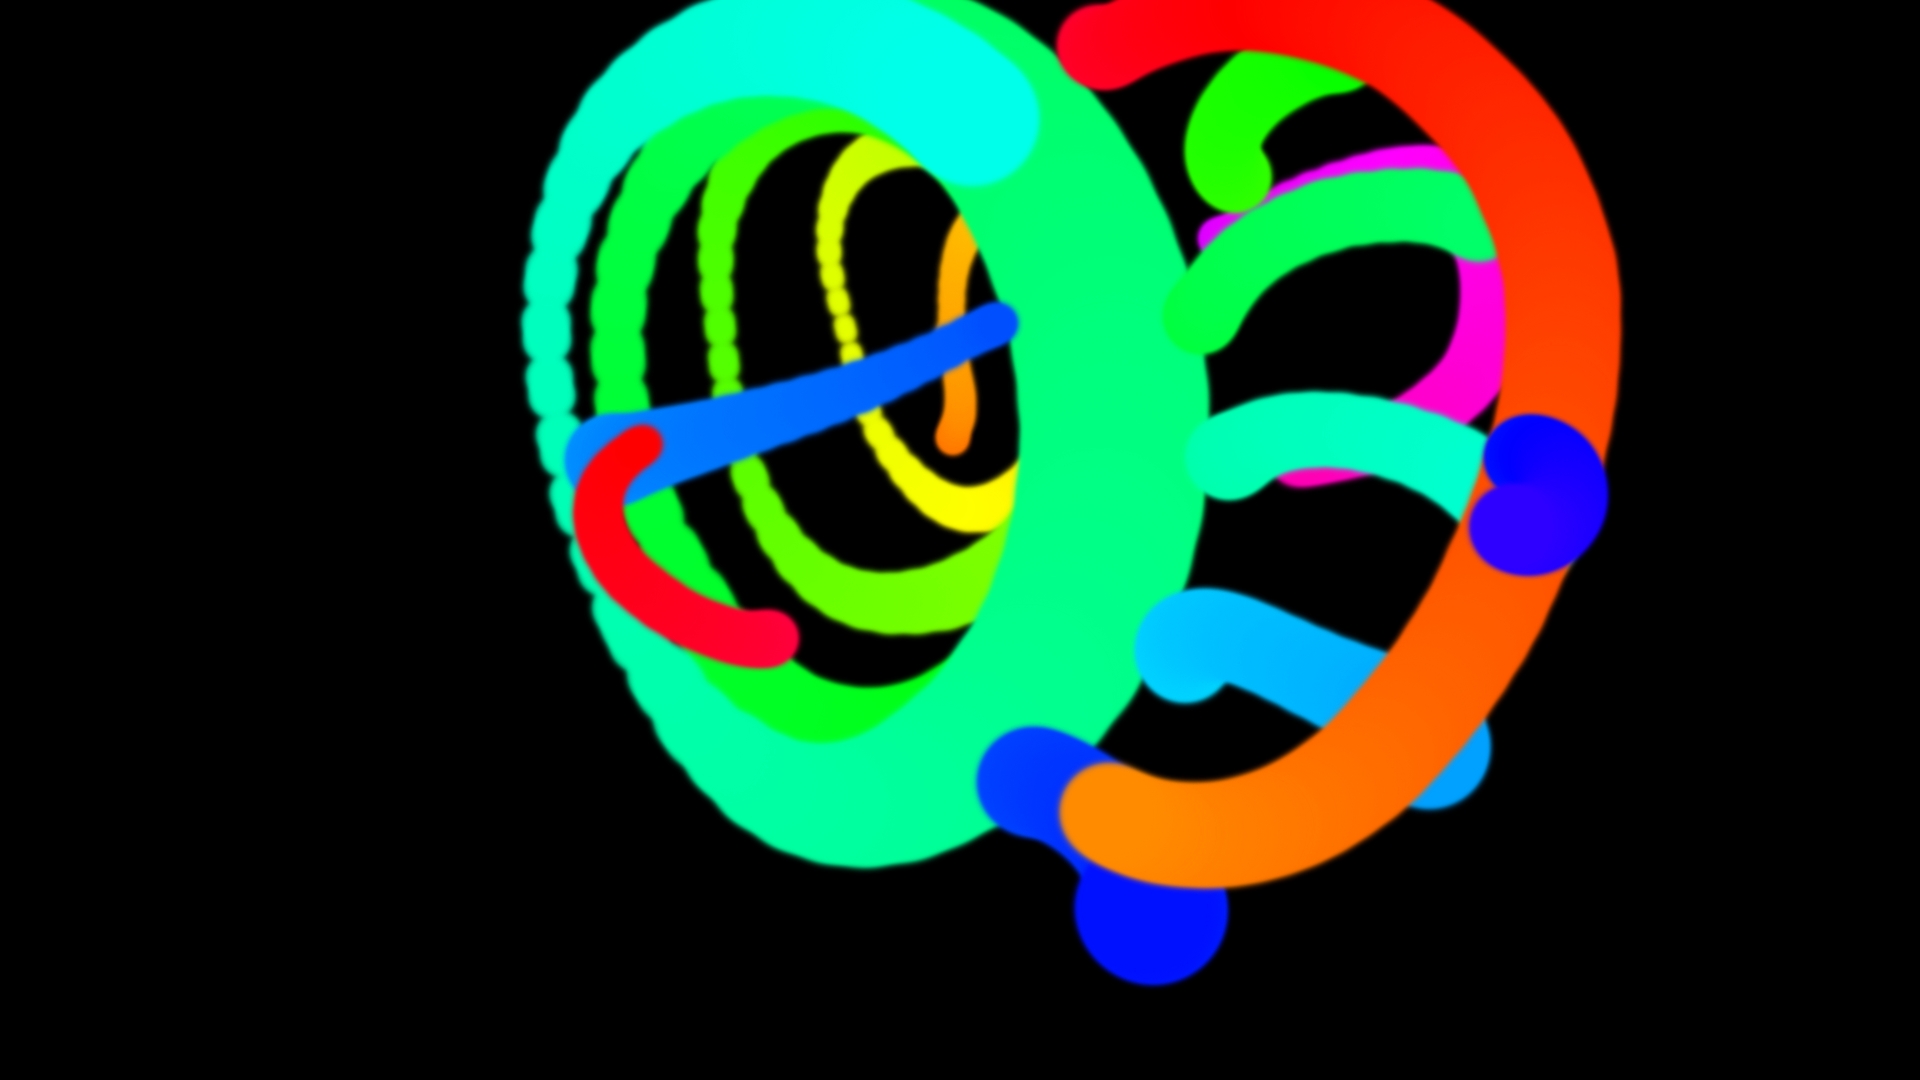
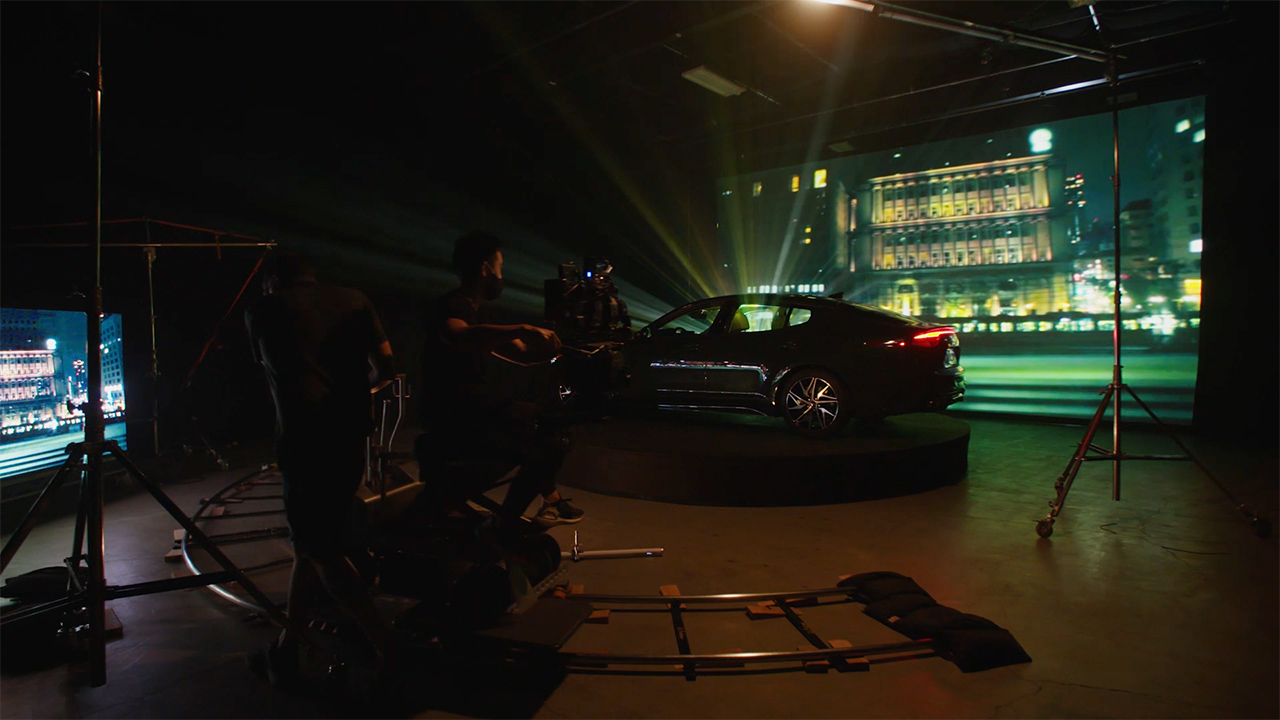
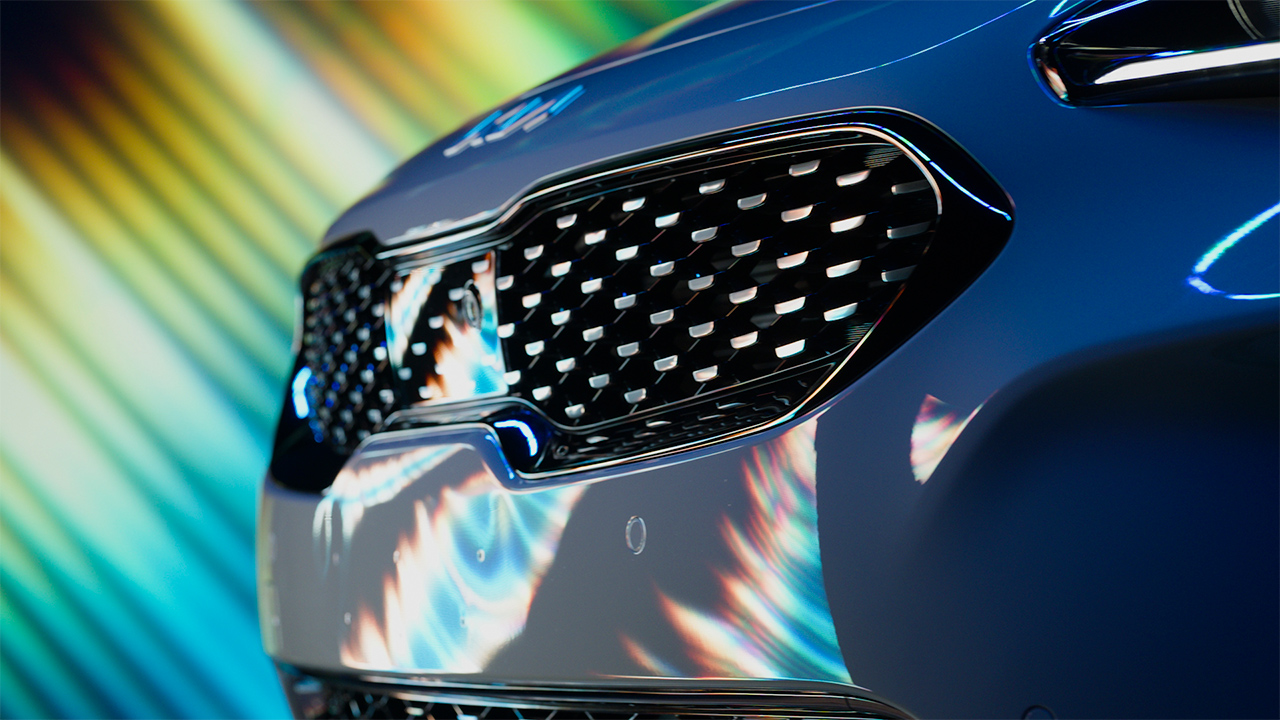
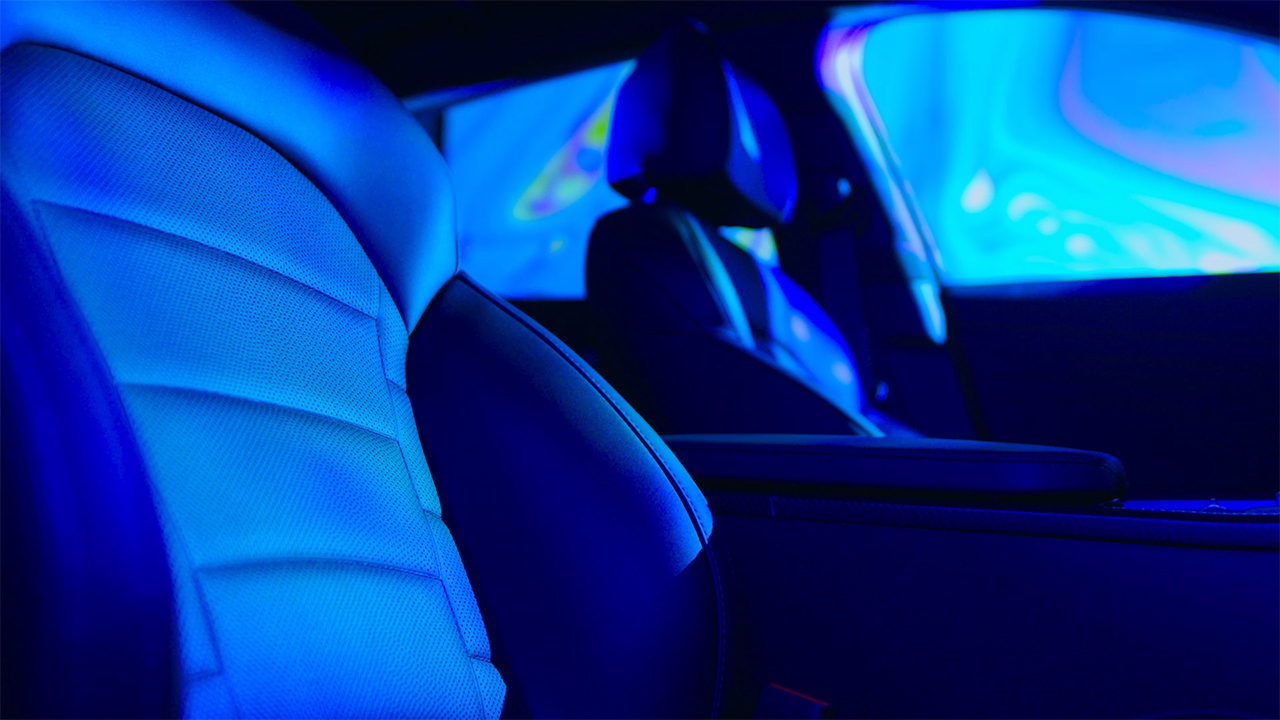
July 5, 2021We were approached by INNOCEAN to direct 3 spots for the all new Kia Stinger. When we first saw this project, we jumped at the idea of telling a different kind of feature story. One that focuses on the feeling and the excitement related to the technology that is at the heart of the Kia Stinger. Using two 40k lumen projectors, volumetric light and some surreal DMT vibes we crafted 3 spots to highlight the Kia Stinger
BTS
THE SPOT
SELECT STILLS:


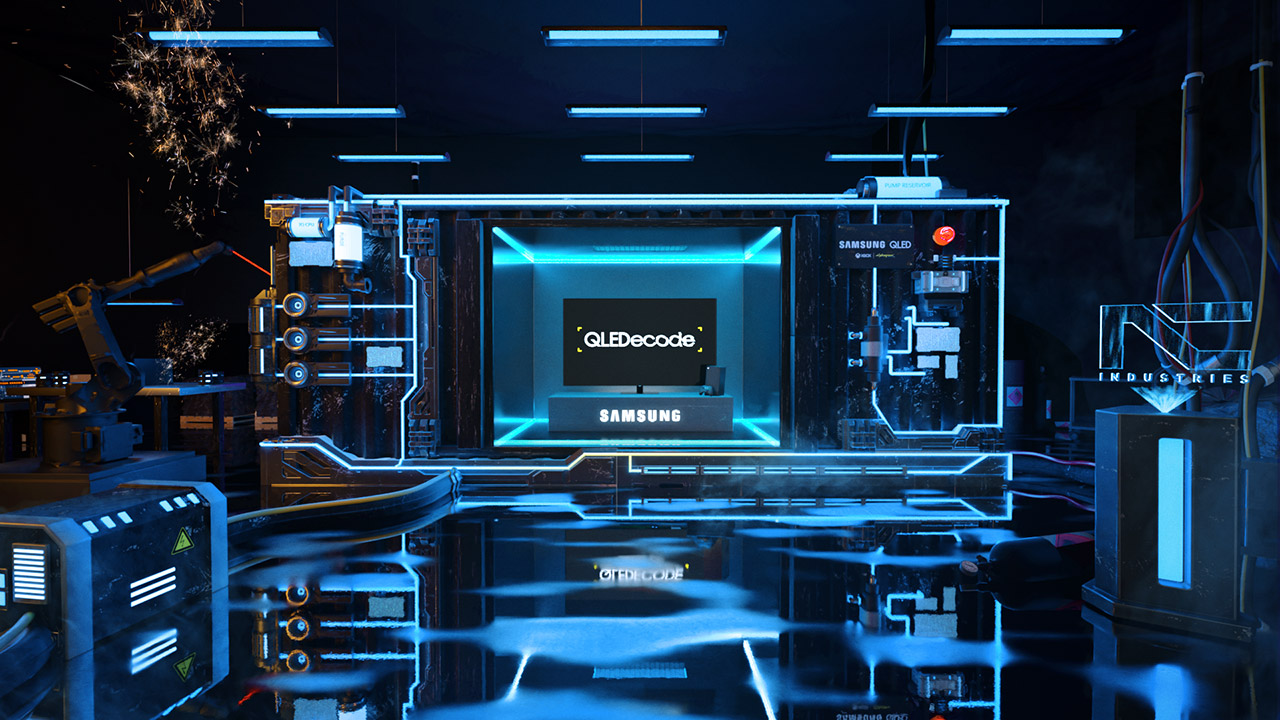
Cyber Punk 2077 ARG
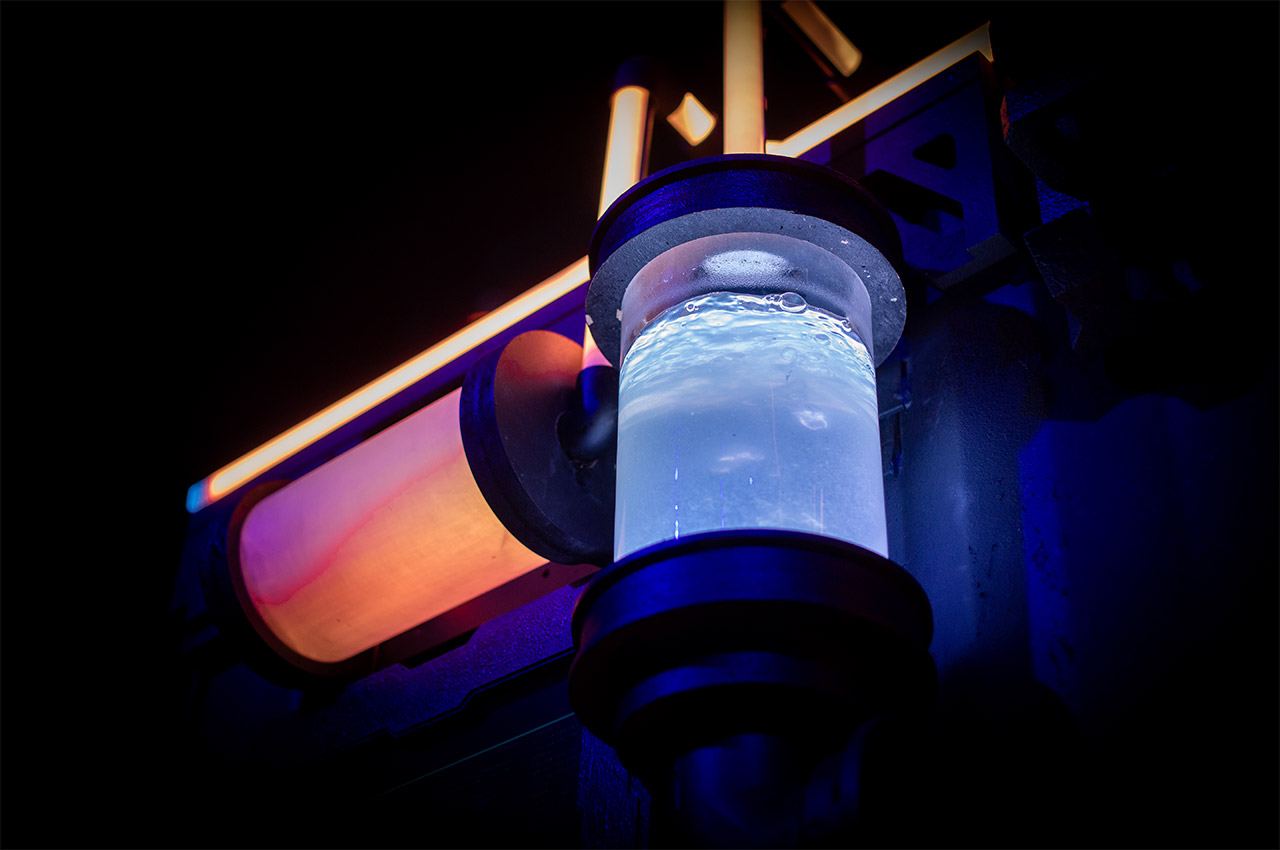
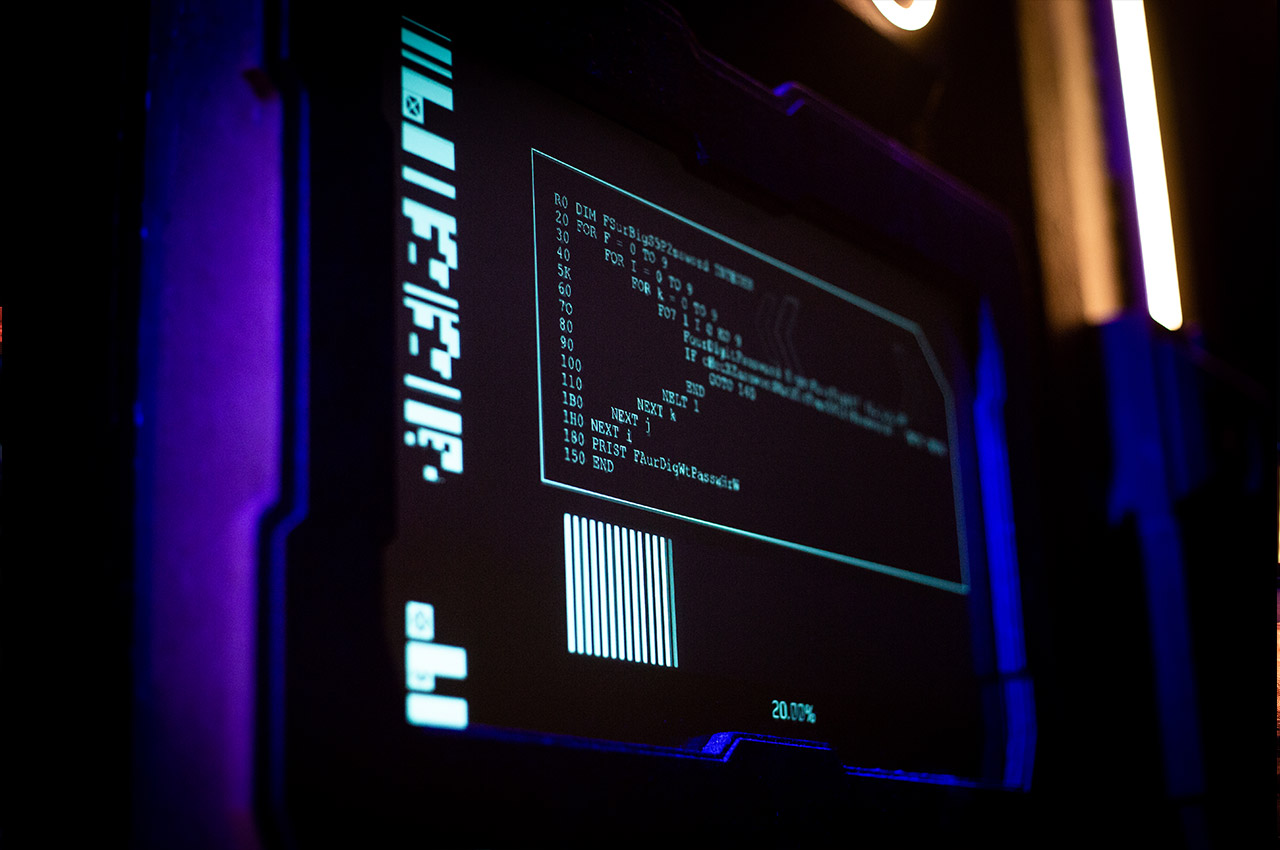
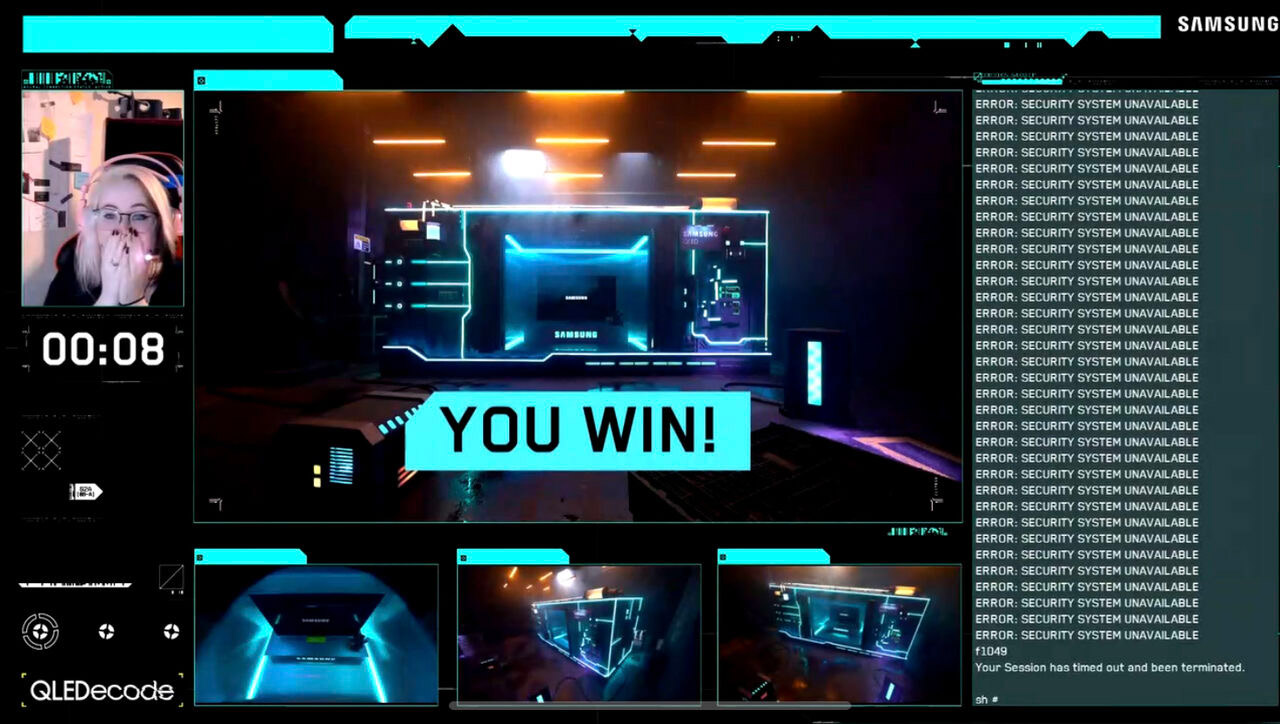
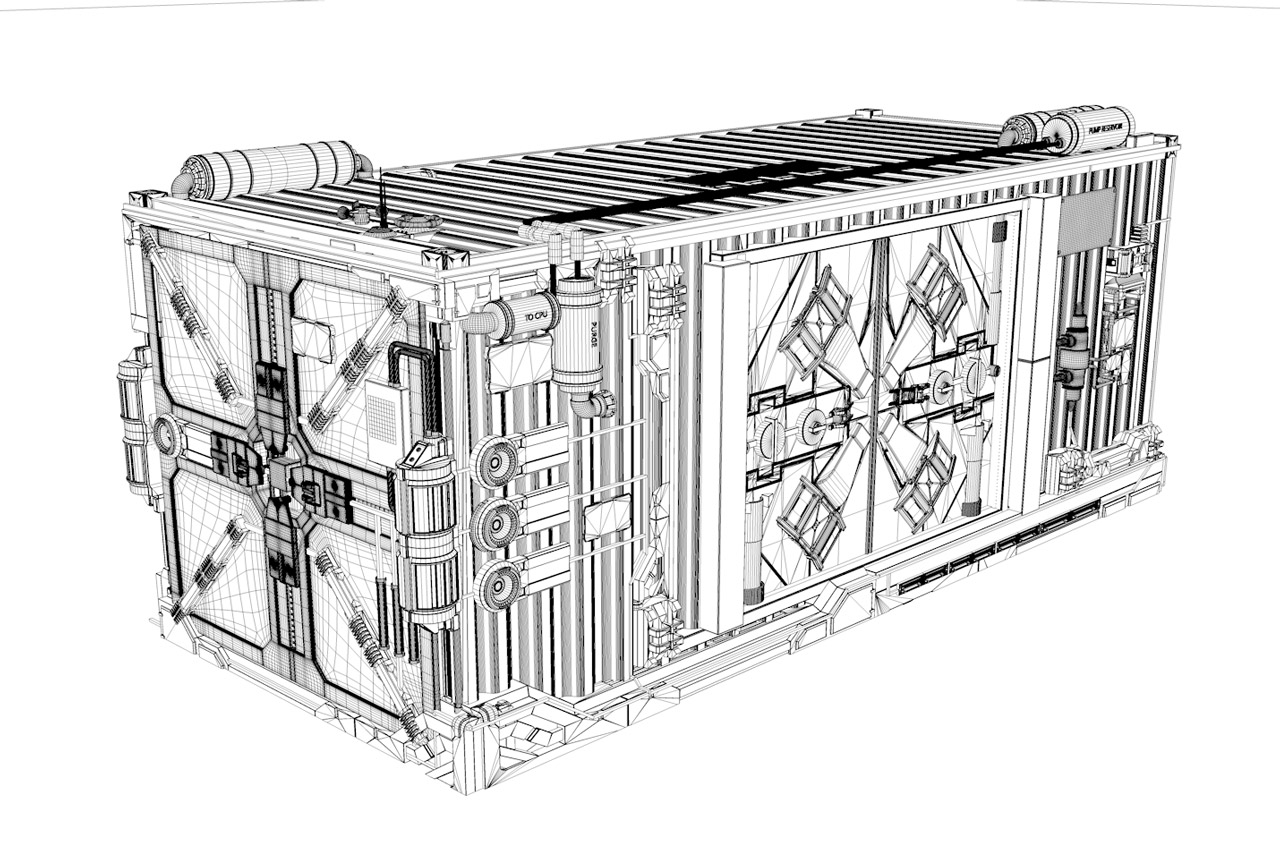
February 3, 2021For the Cyberpunk 2077 release we crafted up an alternate reality gaming experience that let contestants hack into a high tech shipping container to unlock real prizes (all from the comfort of home). Working alongside the amazing VTprodesign team this physical + digital experience challenged users to disable laser security grids, activate thermal cameras, and even control a robot plasma cutter to win the challenge. It was wild to see this one go from design to reality.
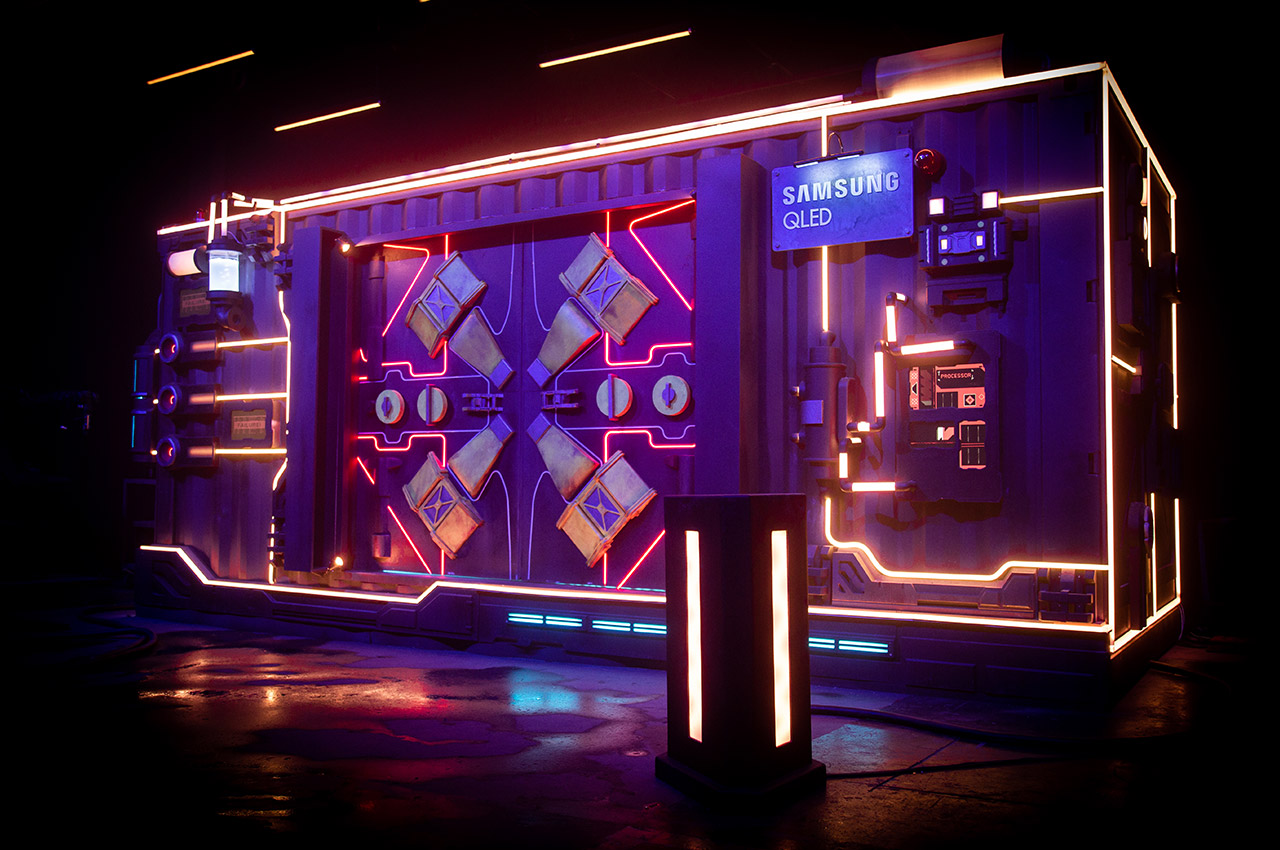
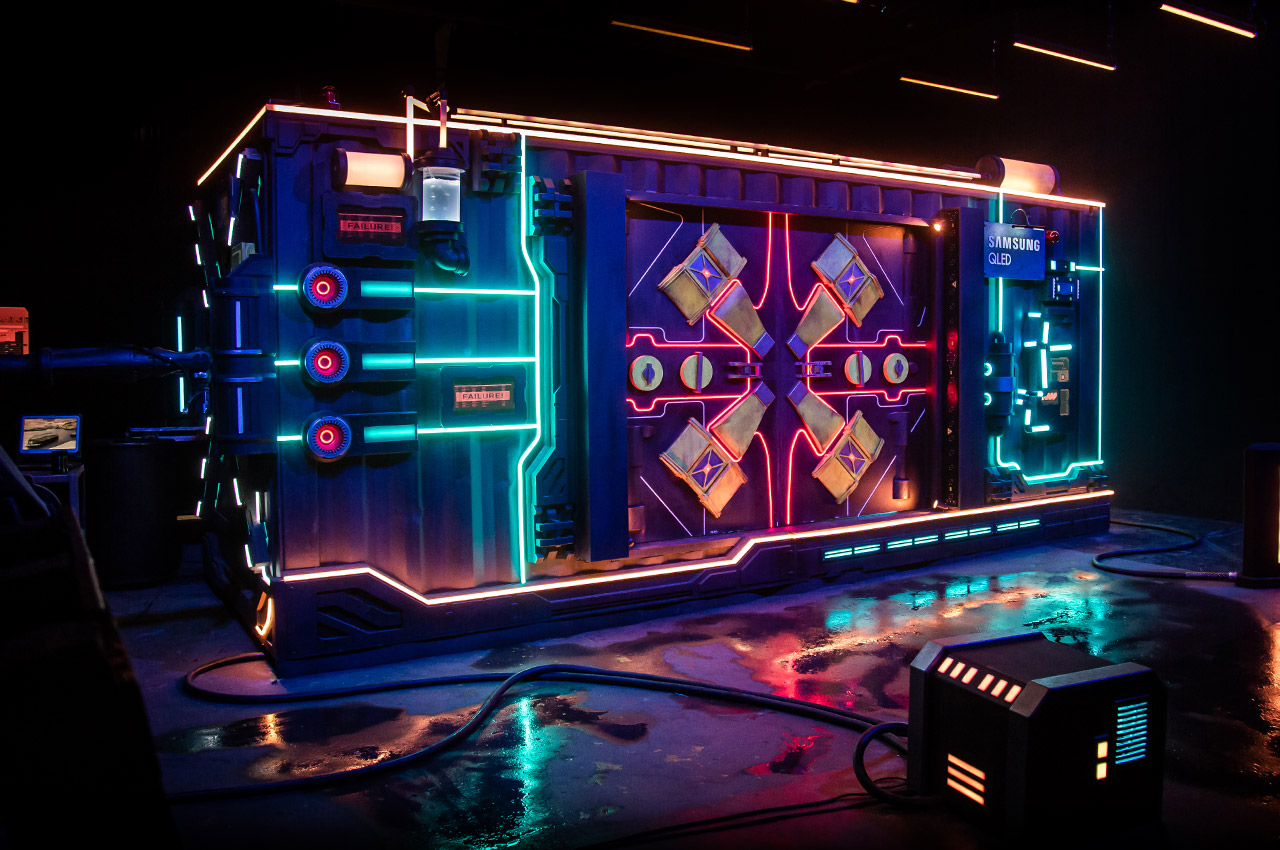

Initial 3D designs
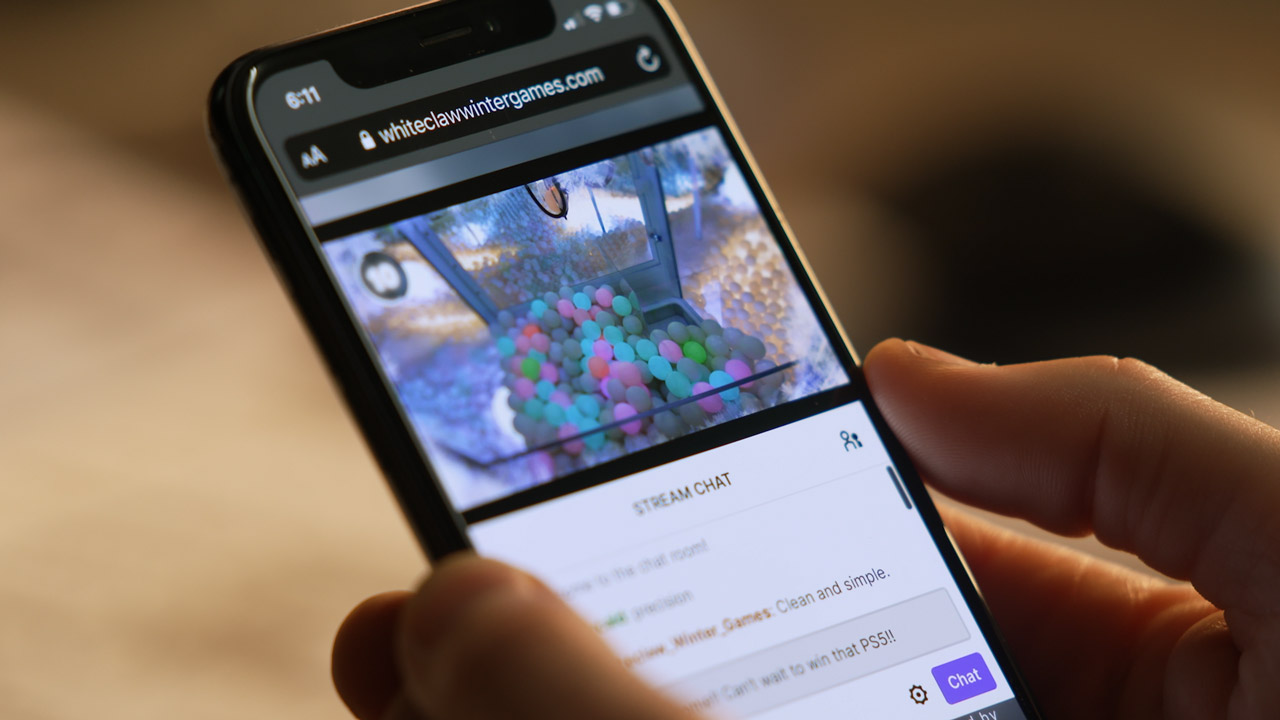
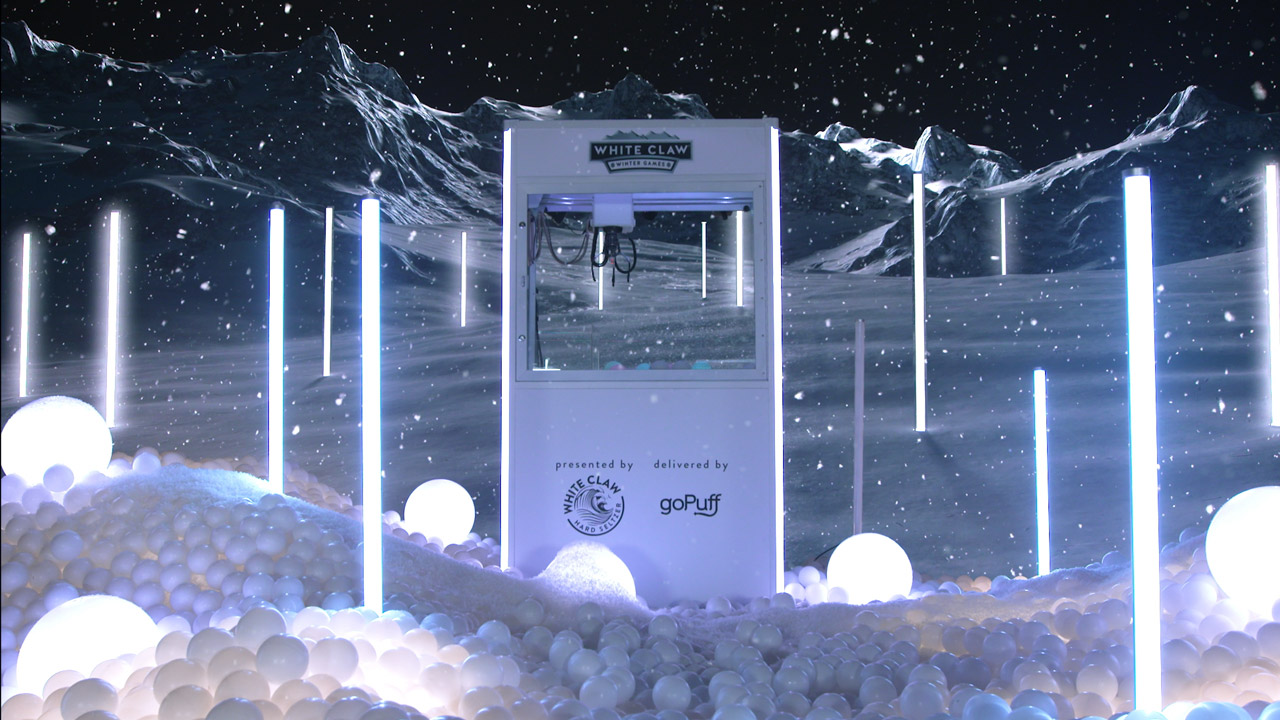
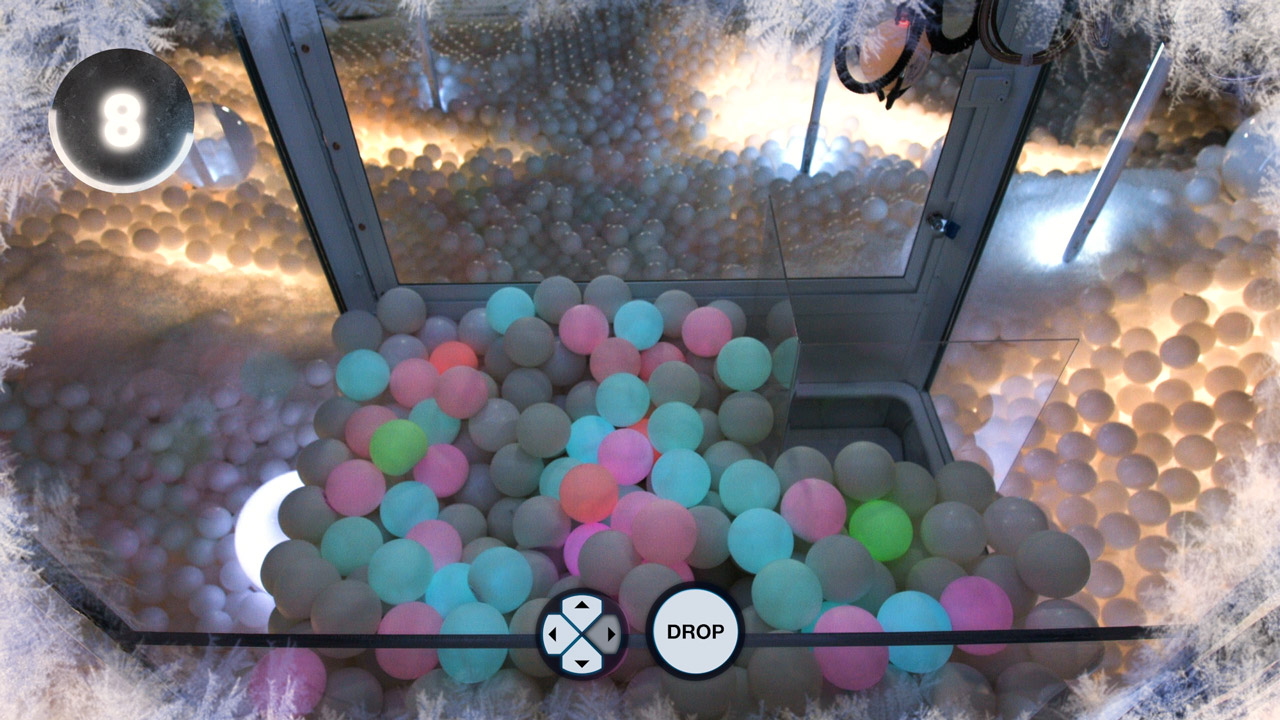
White Claw Winter Games
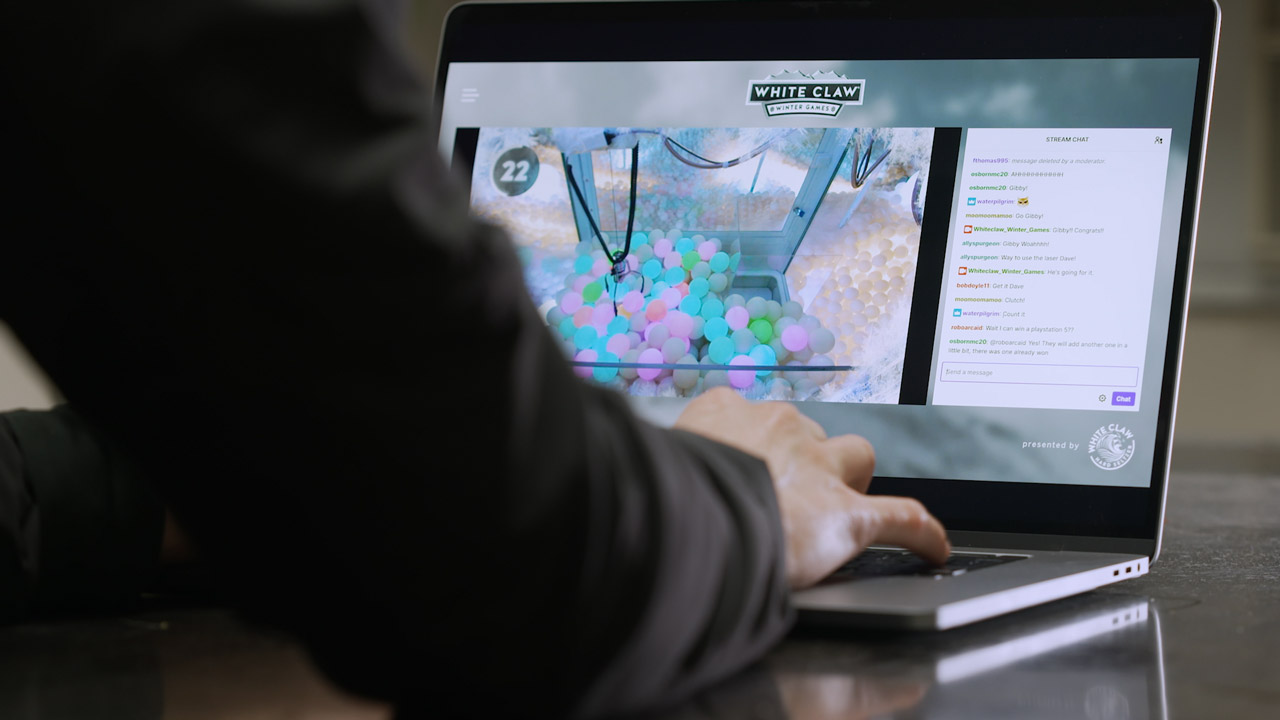
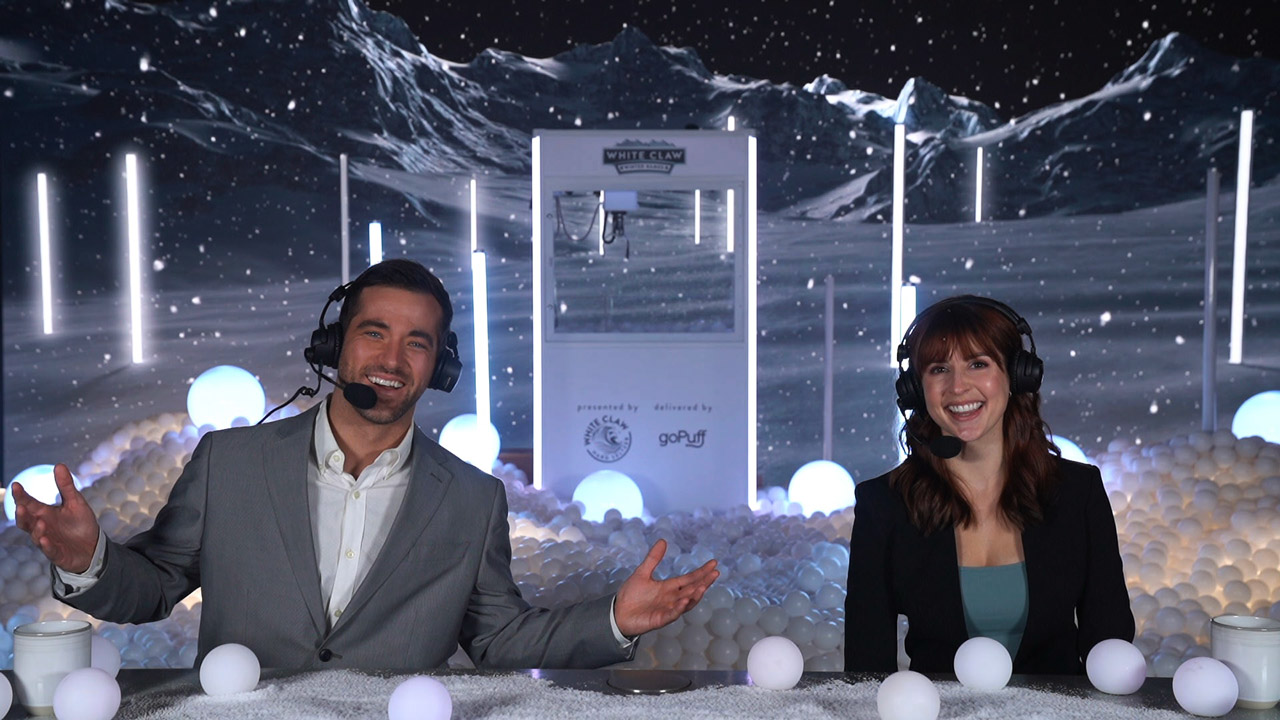
January 11, 2021During these pandemic times we have been coming up with new ways to help makes audiences feel more engaged with digital experiences. For the White Claw Winter Games we created a Claw machine that you could control over the internet to win prizes that get delivered to your door instantly! Fun one with our friends at VTProdesign.

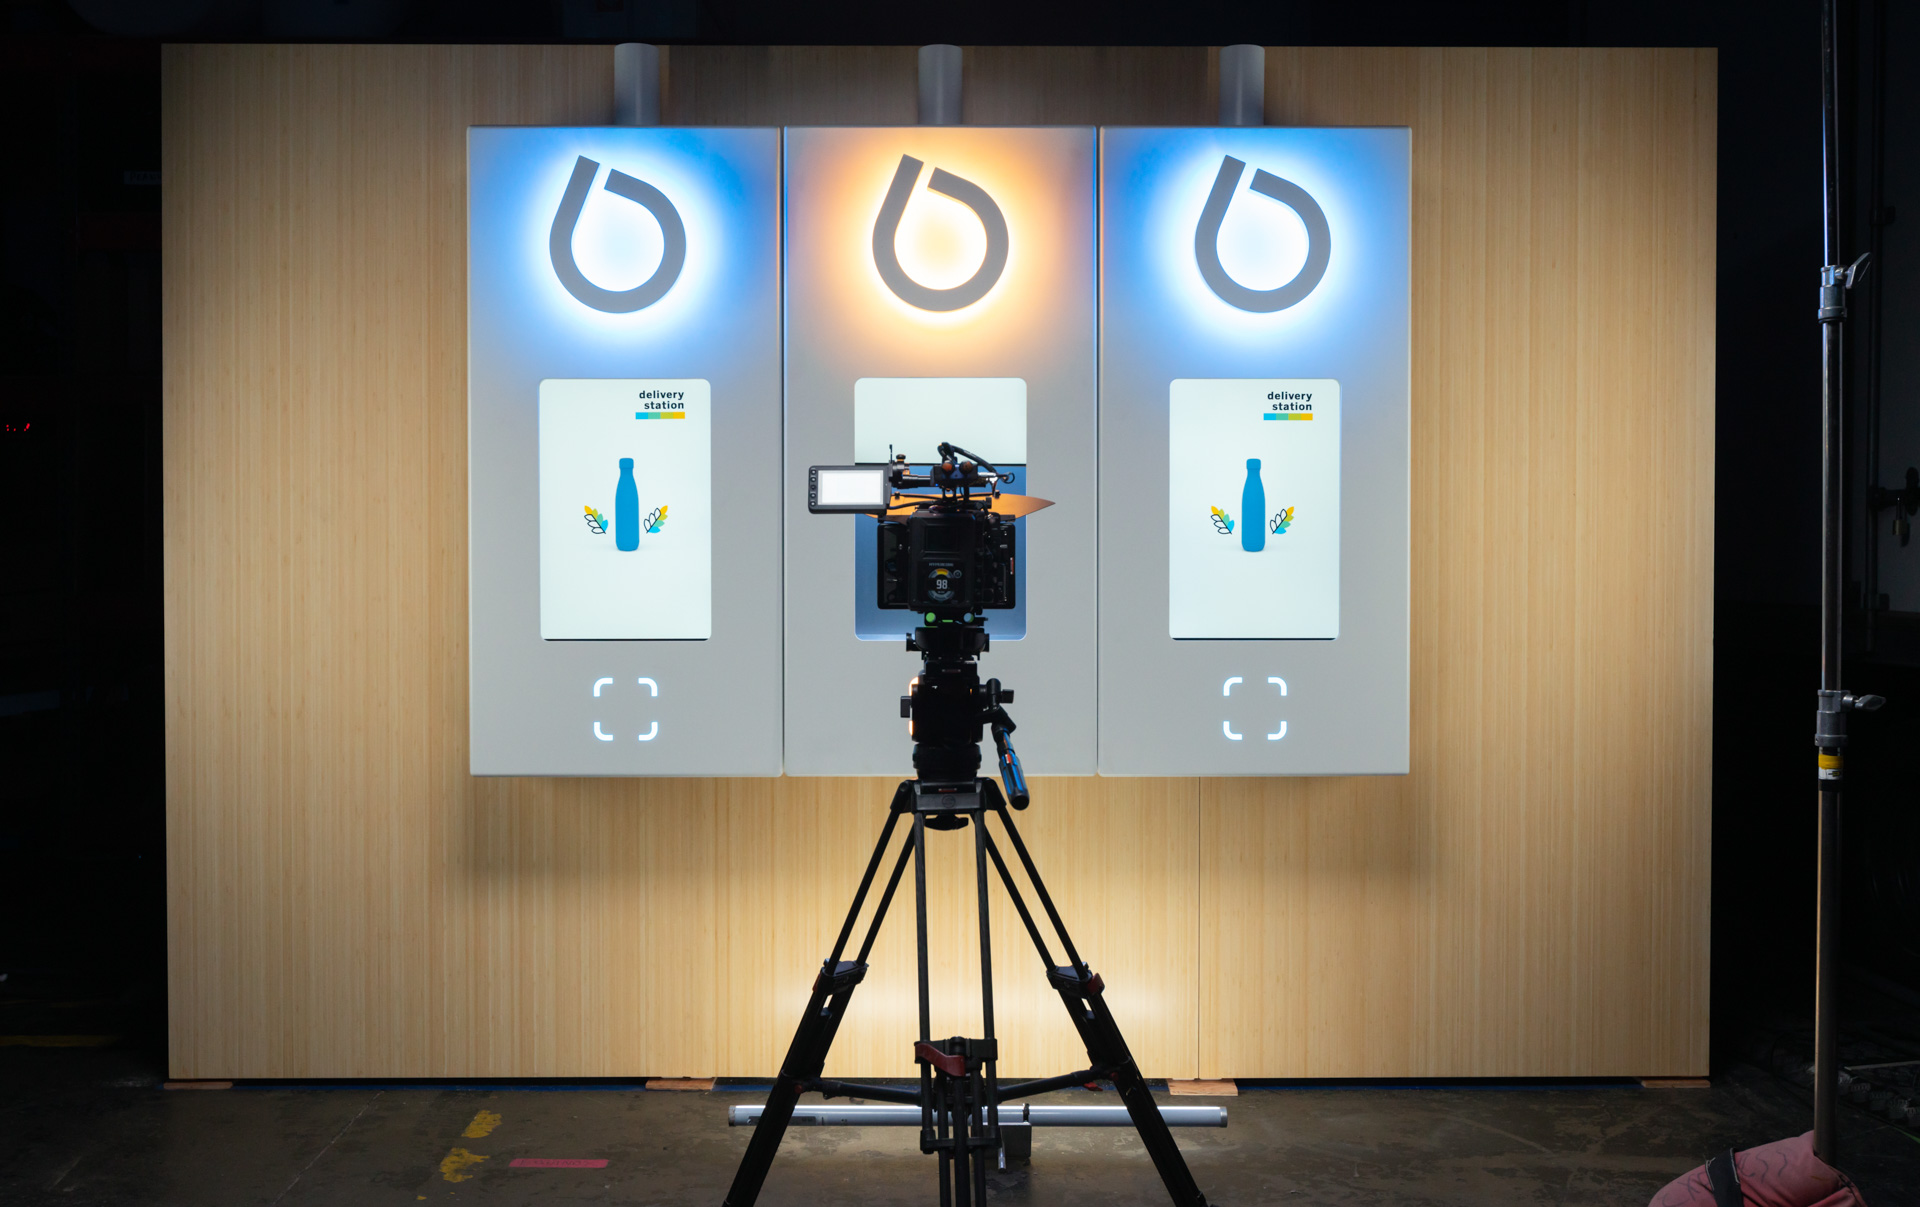
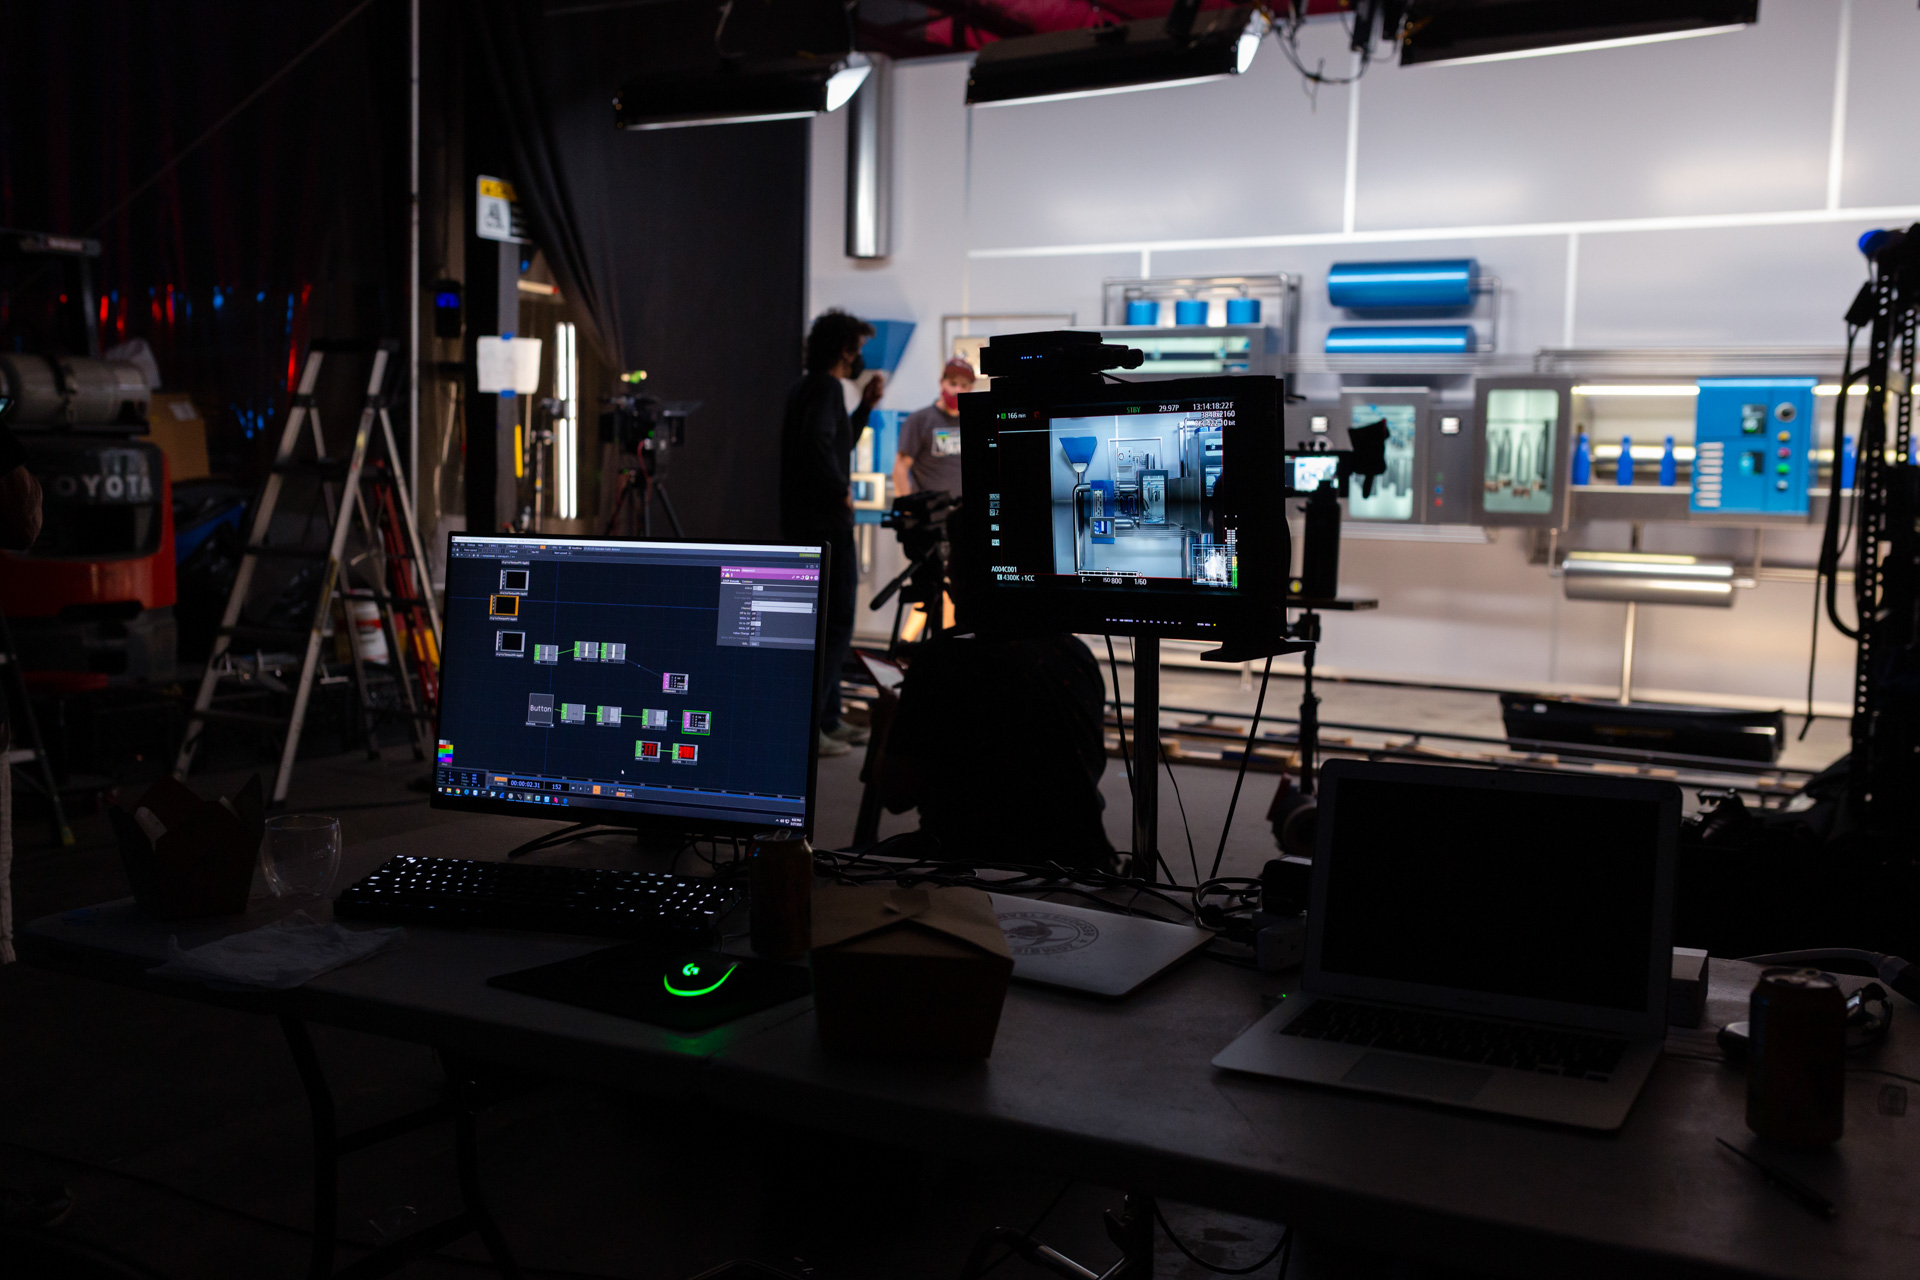
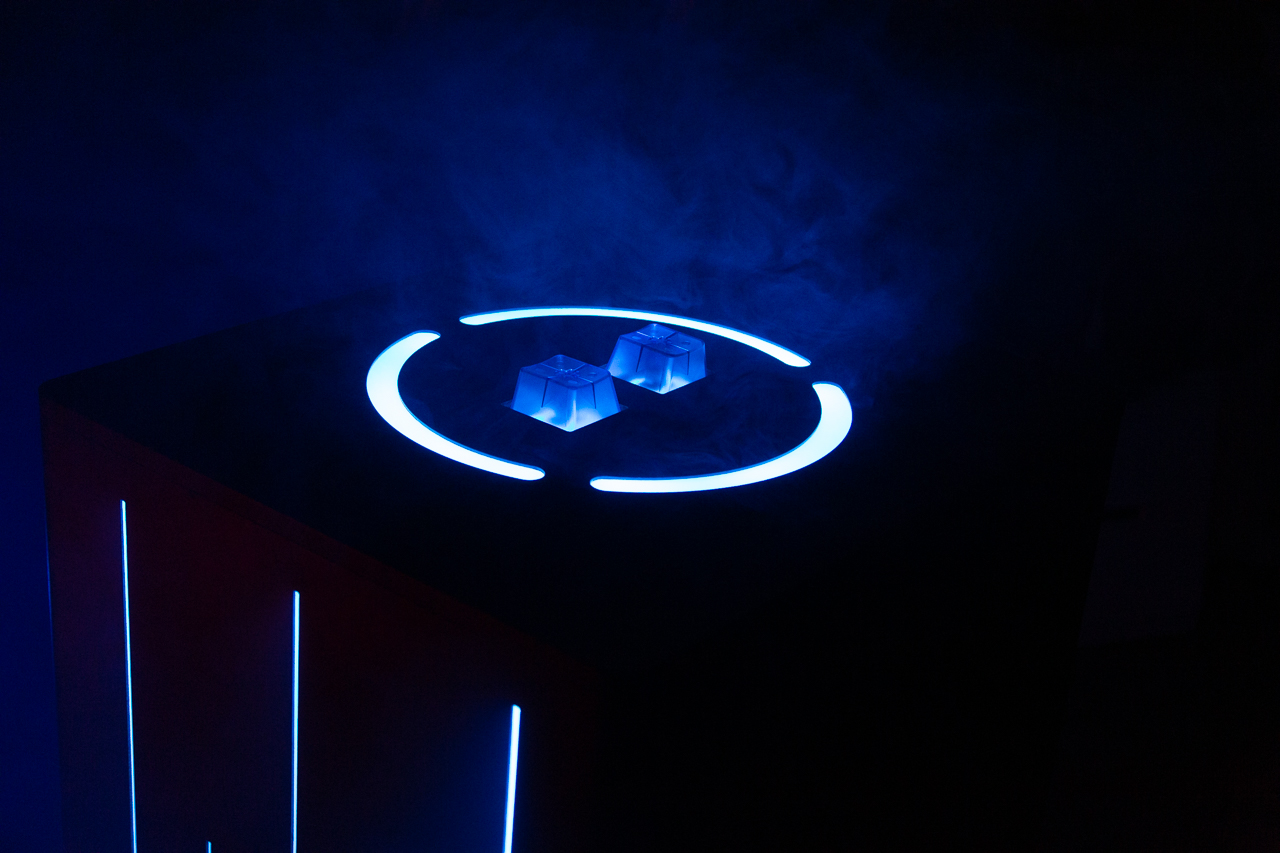
SAP Virtual Showcase
June 17, 2020We were tasked to design and build the central showcase for SAP Sapphire event. Typically Sapphire is a 3 day annual summit attended by 26,000 customers, partners, and employees from 180 countries. But with a global pandemic the event was canceled. This is the story of how we transformed a physical activation to an interactive online experience.
You can try out the experience for yourself at commitwater.com
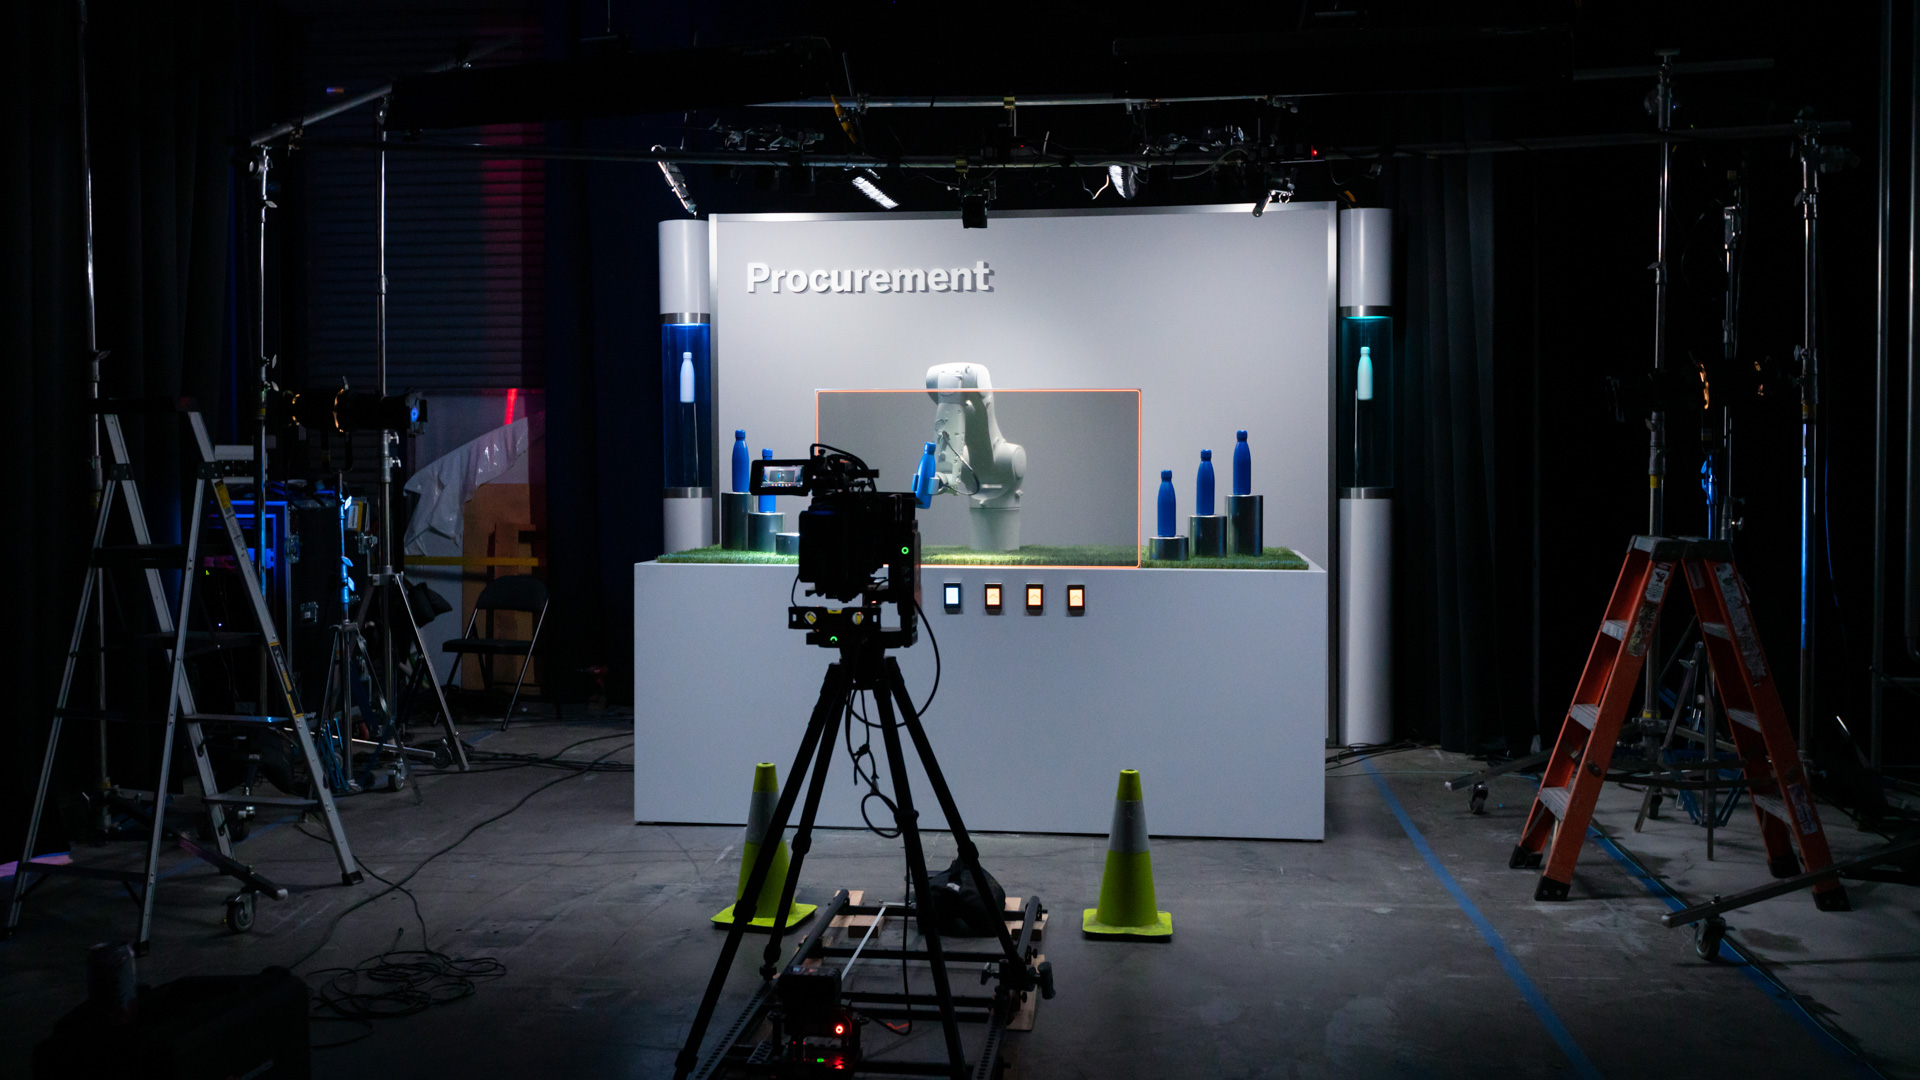
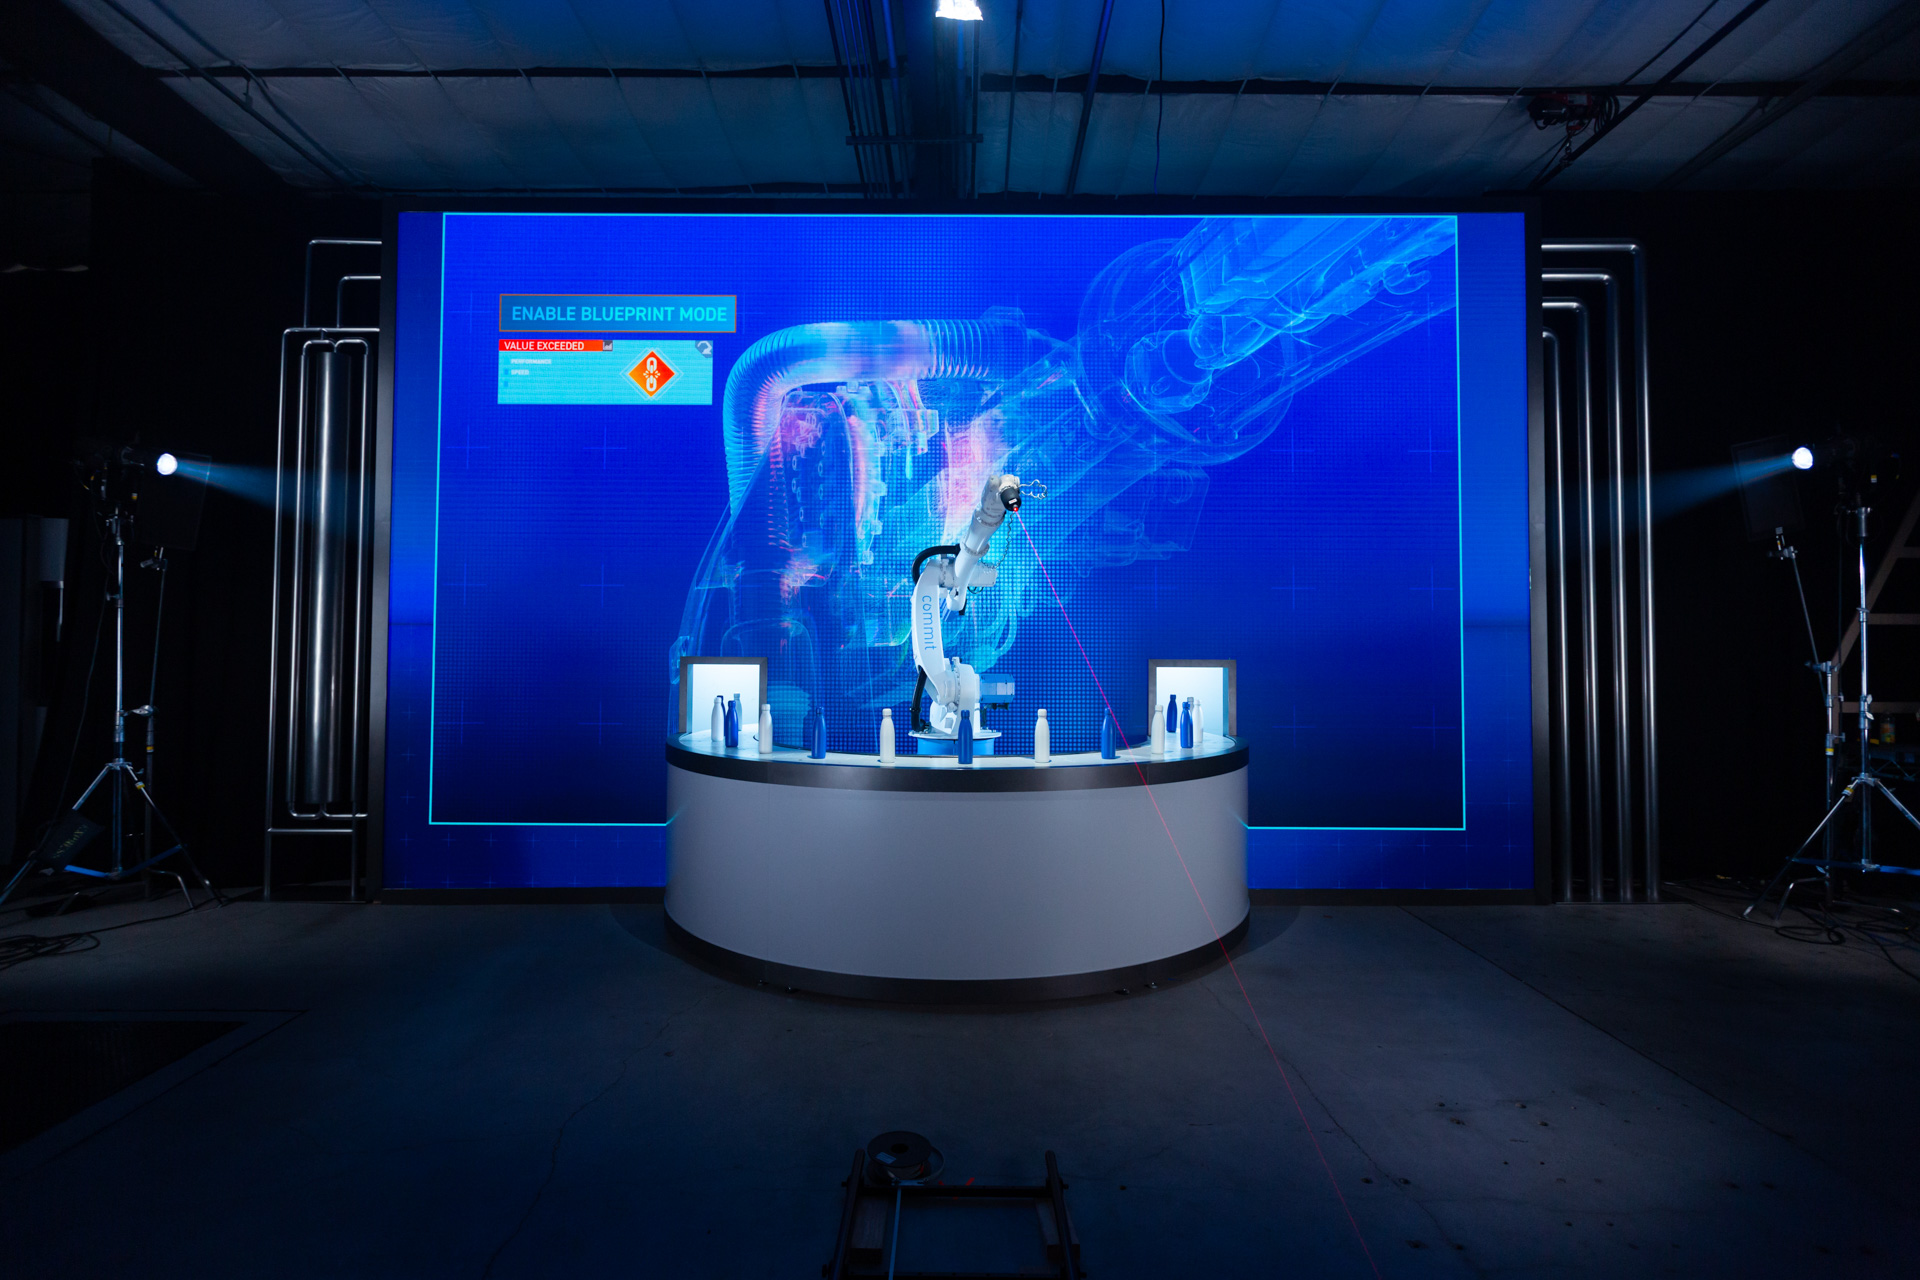
A unique thing about this project was it utilized multiple disciplines that all came together to make something cohesive and engaging. SAP is behind the scenes the backbone of alot of companies but its hard to tell that story without showing an example. So for this project we created a fictitious brand called “Commit” that uses SAP to power their intelligent enterprise.
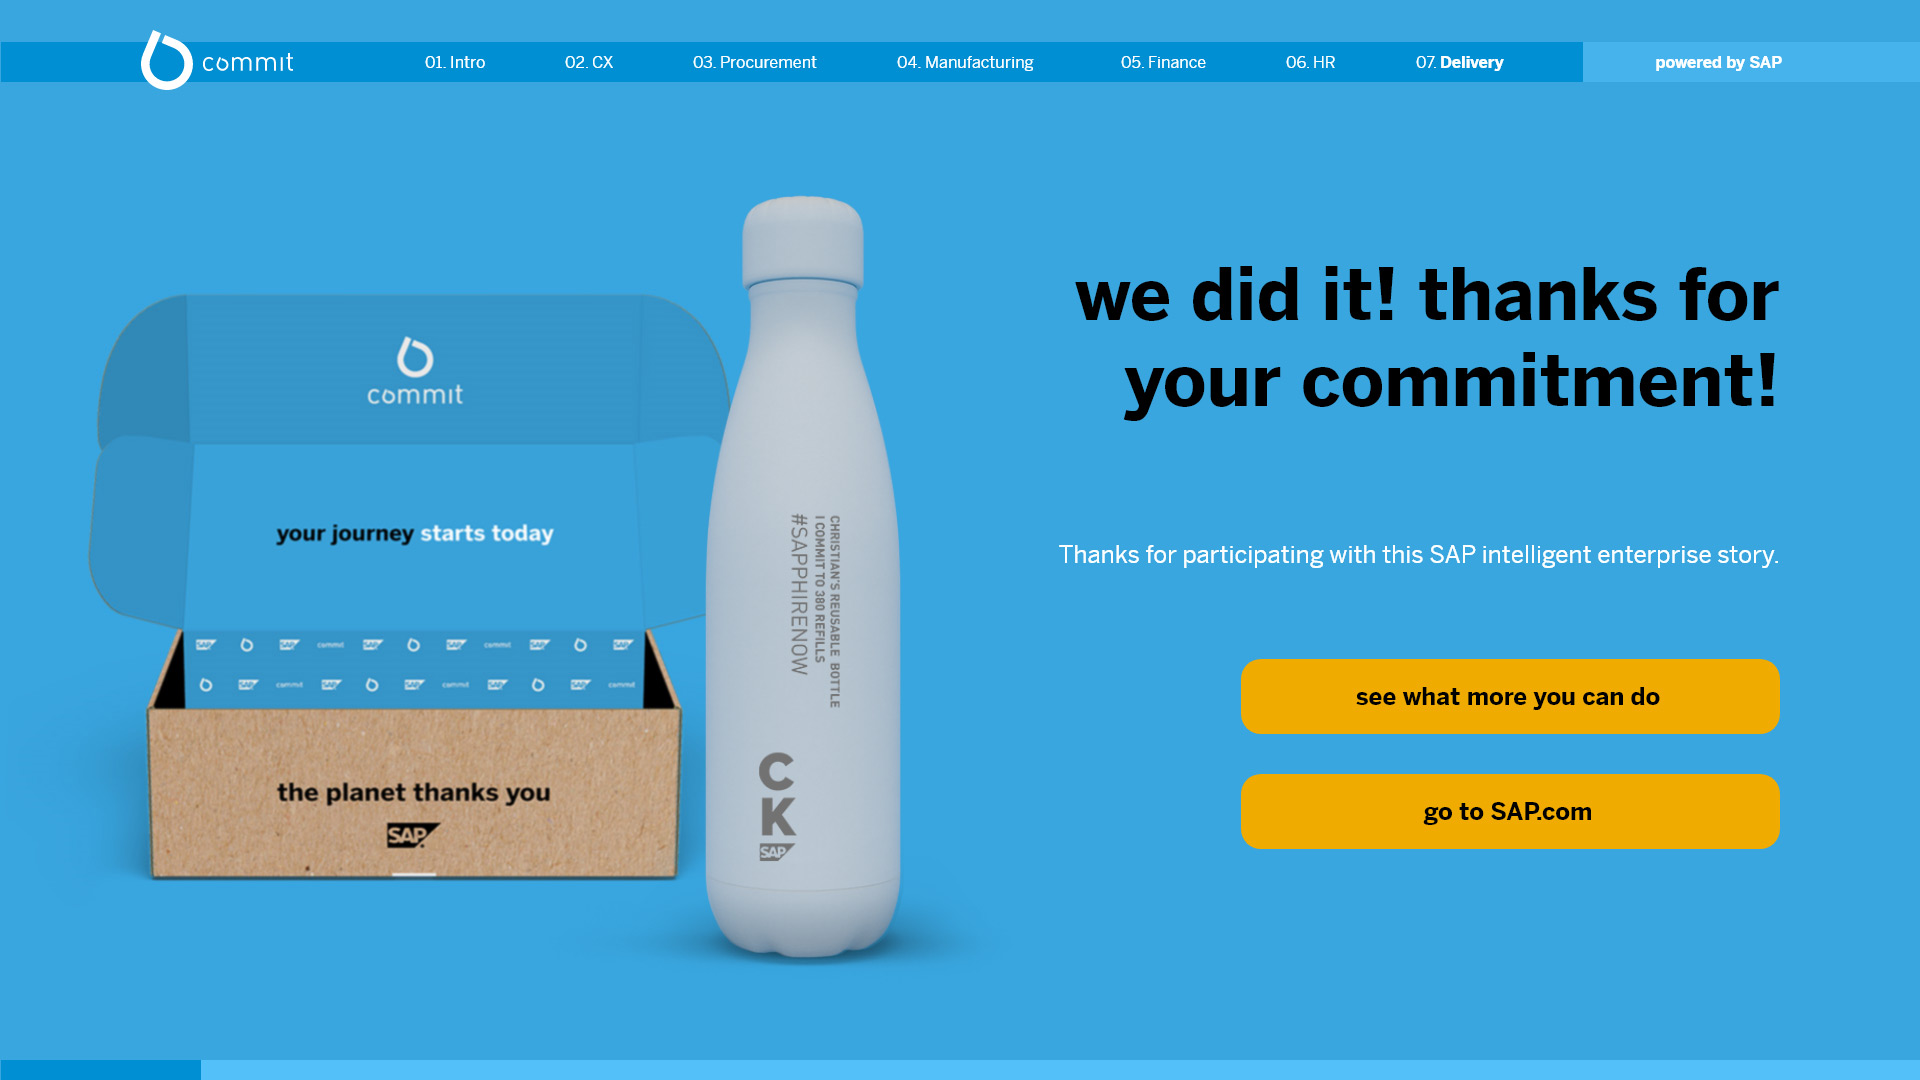
We designed Commit from the ground up, creating logos, branding, and product design. Then we designed physical installations that show how Commit uses SAP to power their business.
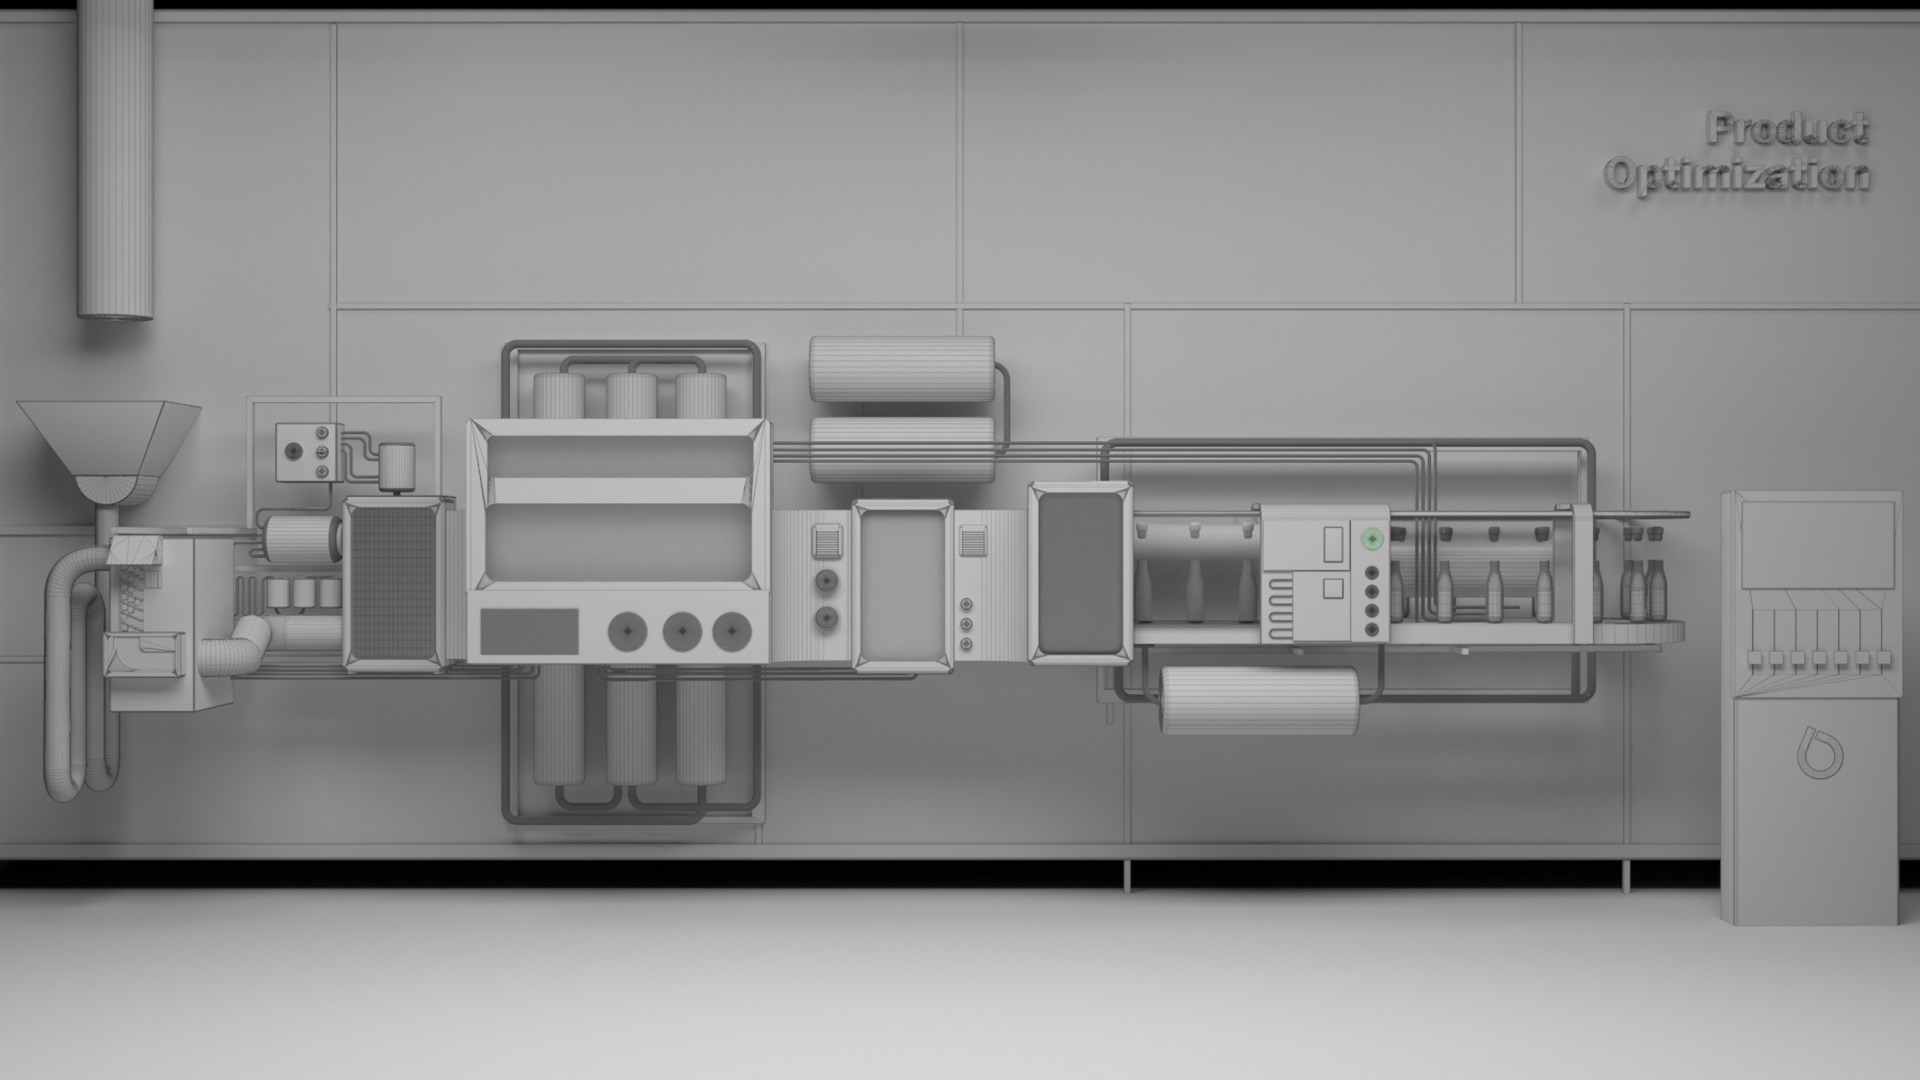
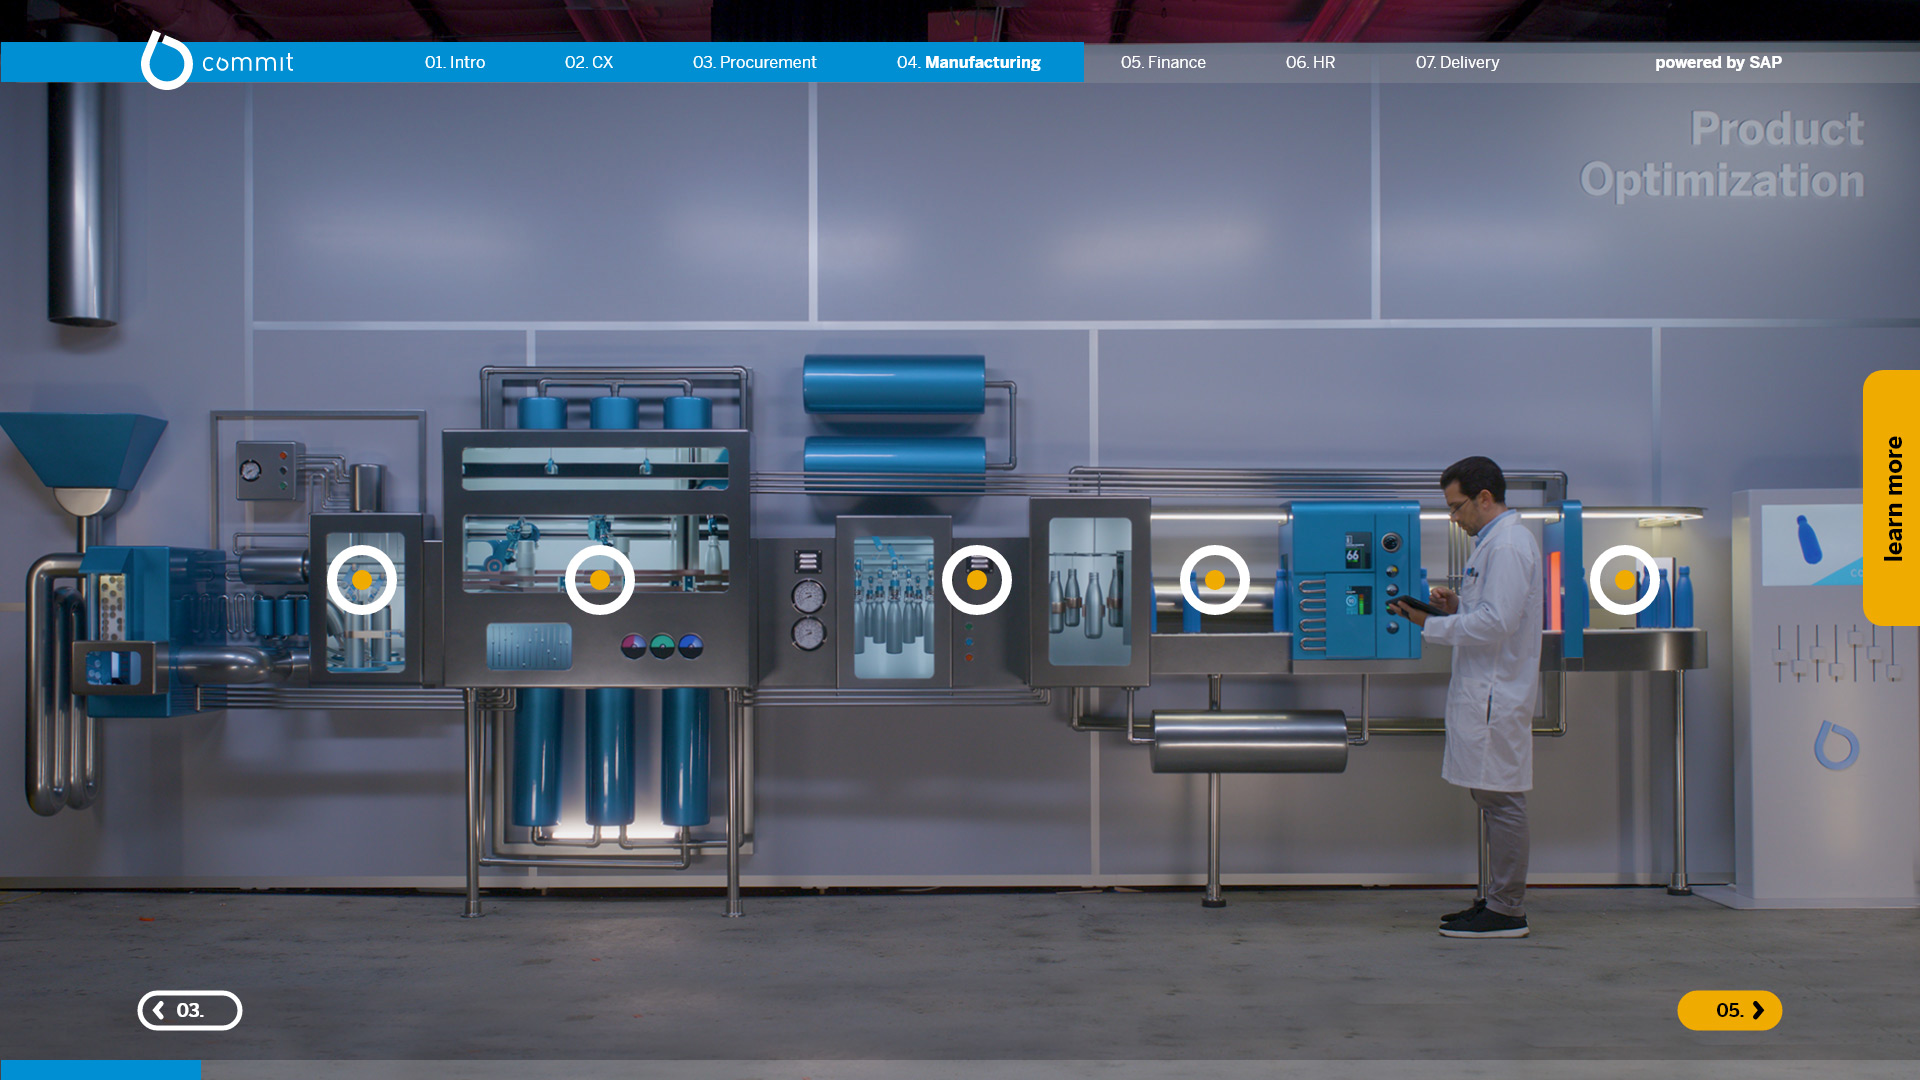
The physical installations involved clear OLED tvs, giant led walls, dmx controlled lighting and multiple industrial robots.
The physical installations were filmed then brought to life on an interactive website.
The web experience lets users design their very own bottle and actually get it shipped to their home. So even though people couldn’t experience the event they were able to interact and then receive an actual physical product.
ROBOARCAID
May 6, 2020Even with quarantine we still wanted to make something awesome for our friends to experience. So we created RoboArcaid. Collaborating with our good friends VTProDesign we created a custom live streamed video game that lets you control giant robots all through a website. Custom power ups and physical effects can be triggered all from the comfort of your home.
The game was built from scratch in unreal engine to take in inputs from the robot controllers. In the game you battle corona virus from the comfort of your couch, so we created this animated trailer to explain.
This interactive live streaming, robot controlled game hopefully will bring a little joy during these quarantine times.
PRESS:
FWA site of the day
Motionographer Feature
Live Design
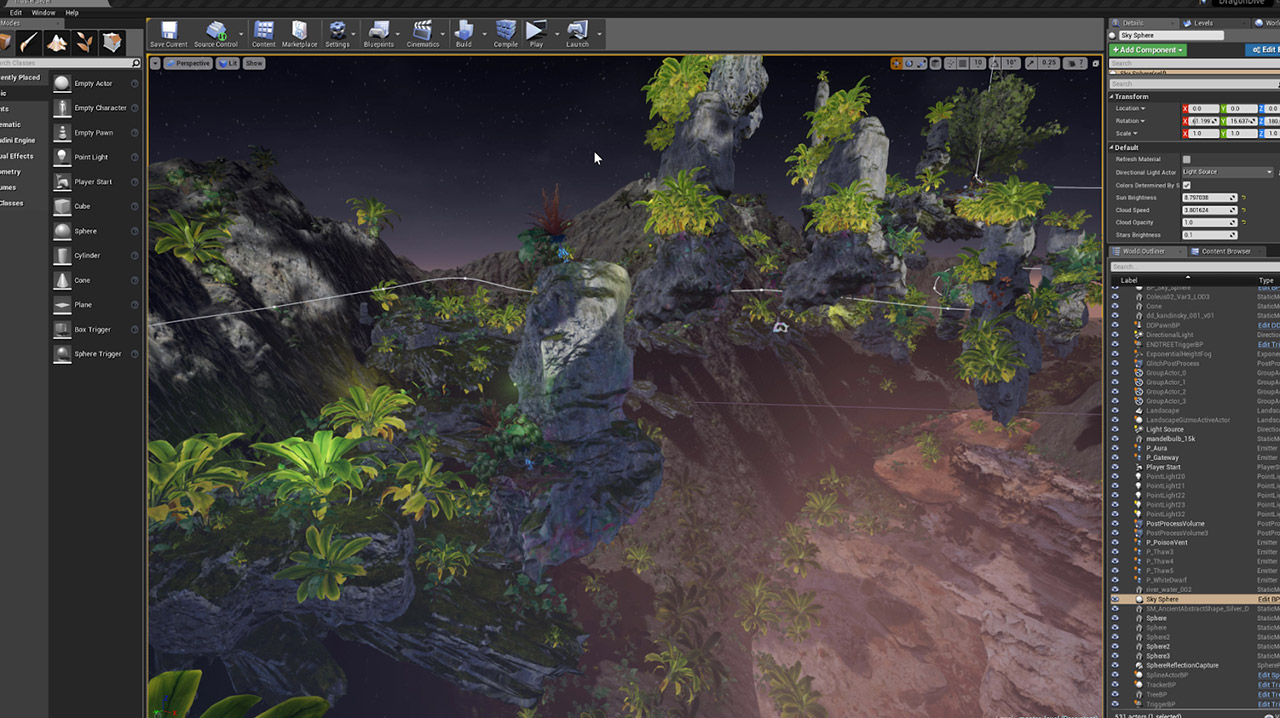
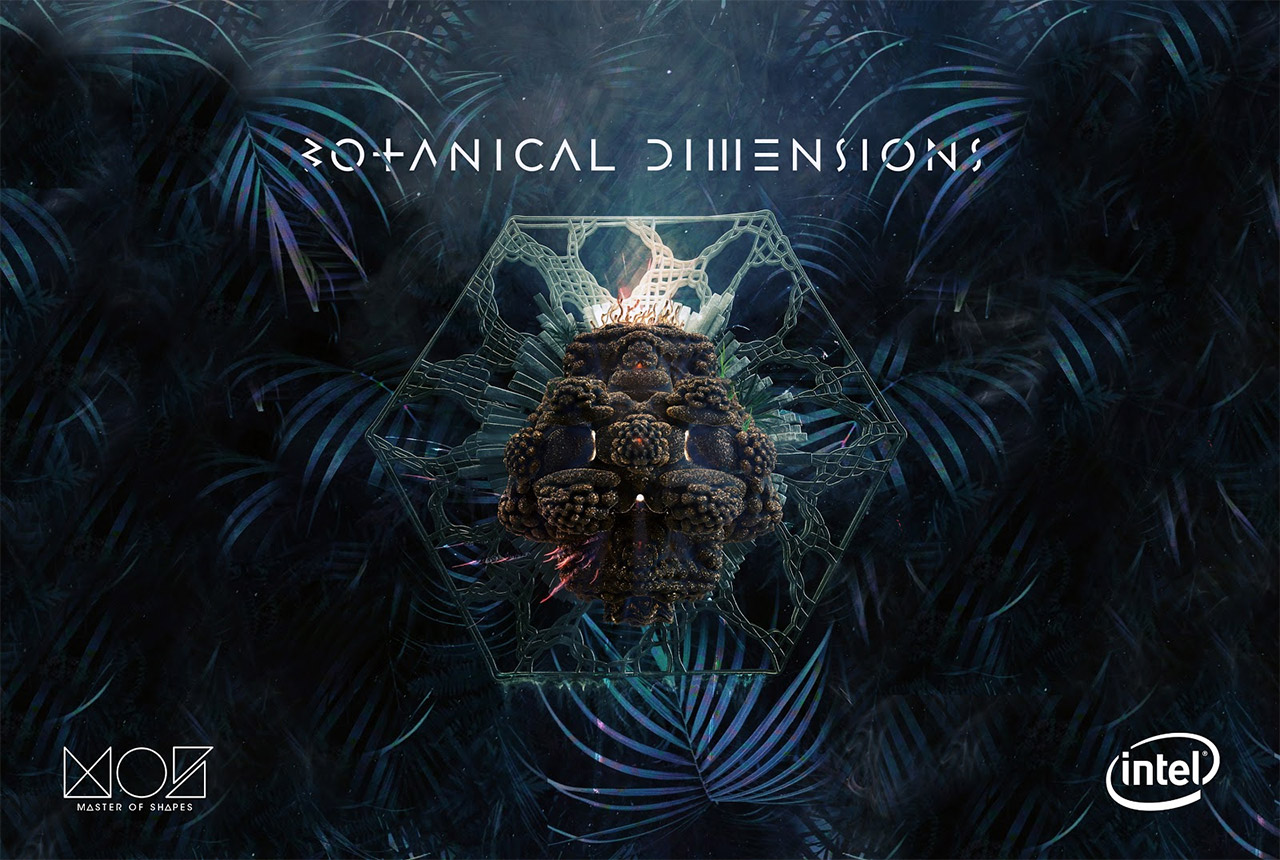
Botanical Dimensions
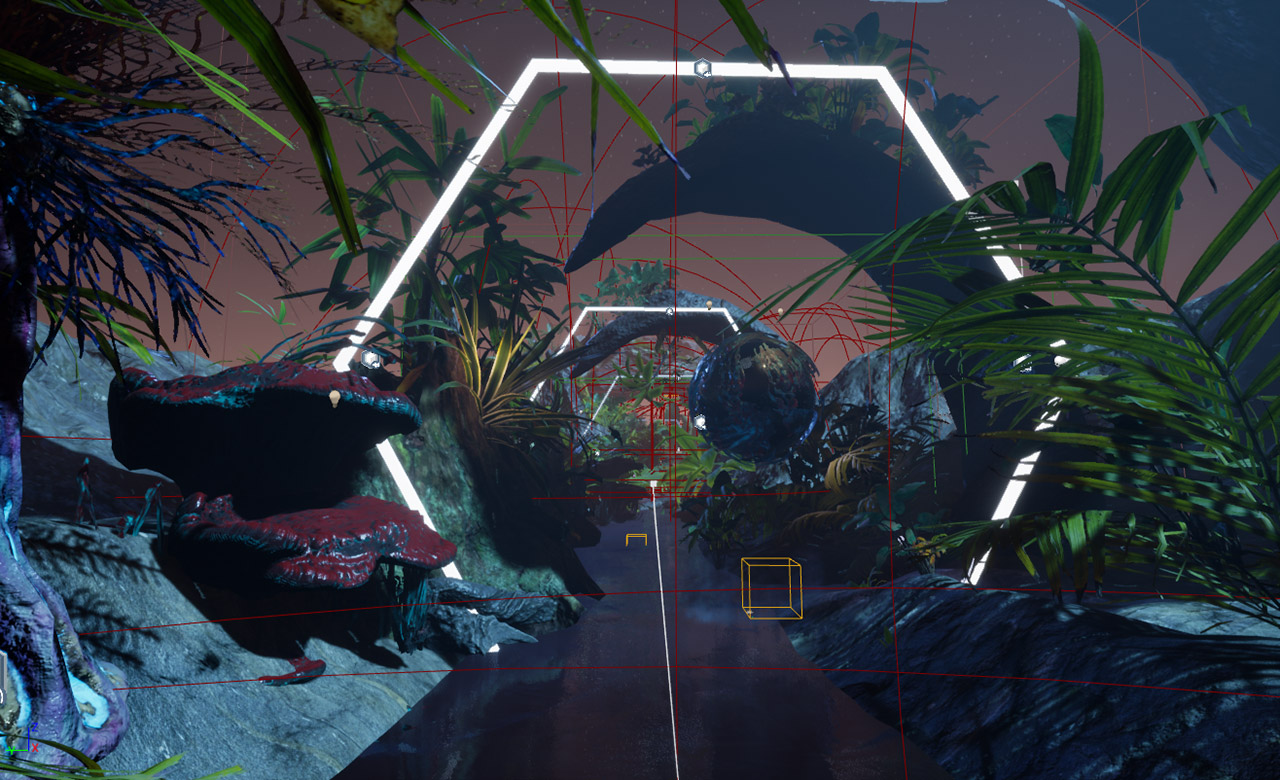
February 11, 2020We love taking people out of their normal reality and immersing them with interactive installations. So when Intel reached out to us to make a new experience that leverages the power of the multi core i9 chipset and dolby atmos spatial audio we were excited to see how far we could push it. We decided to make botanical dimensions. An immersive experience that takes place in a real jungle (in downtown LA)
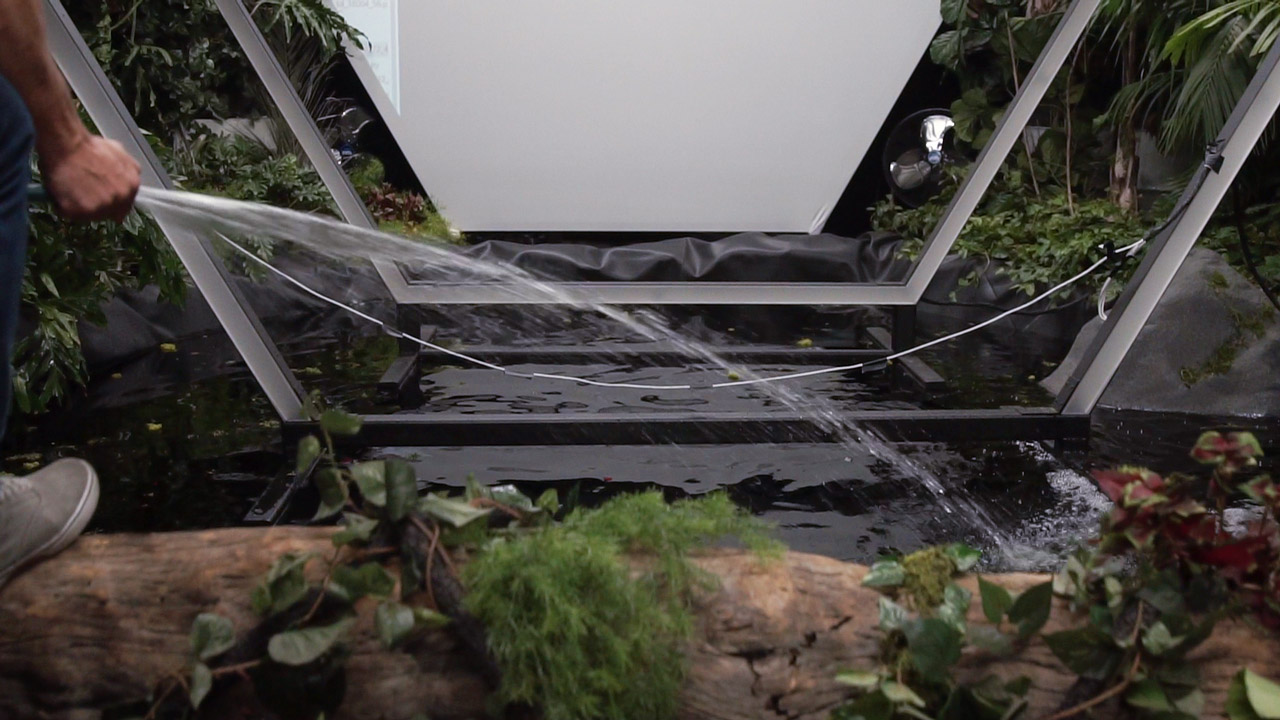
We combined spatial audio, giant hexagon LEDs, rear projected screen, haptic fans and a custom controller that allowed you to fly through a generative botanical world. Here is a quick video recap and some pictures of the setup that went into making this one happen.
We rented out a warehouse space in south LA to serve as the canvas for our jungle.
![]()
Then brought in a bunch of plants
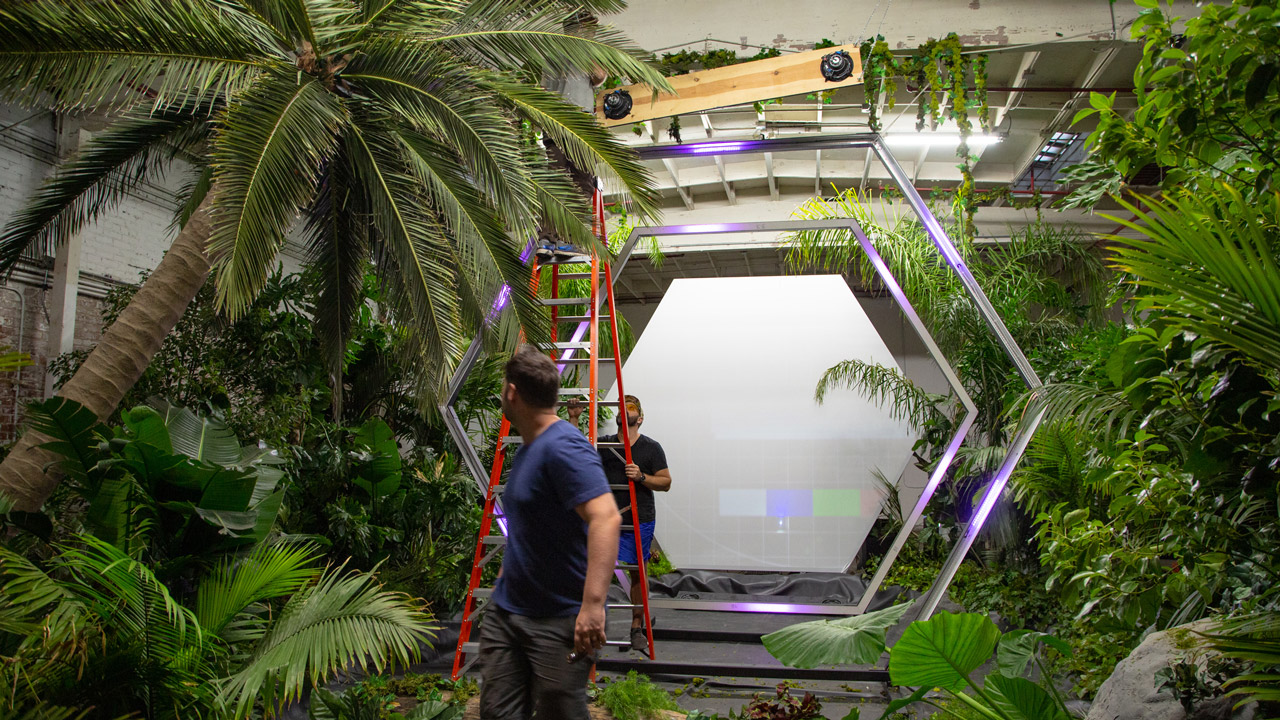
And even added a lake
Via RSVP people could come experience this rare solo experience. Where they walked into a warehouse in LA and entered a full on jungle complete with real dirt, plants and immersive audio.
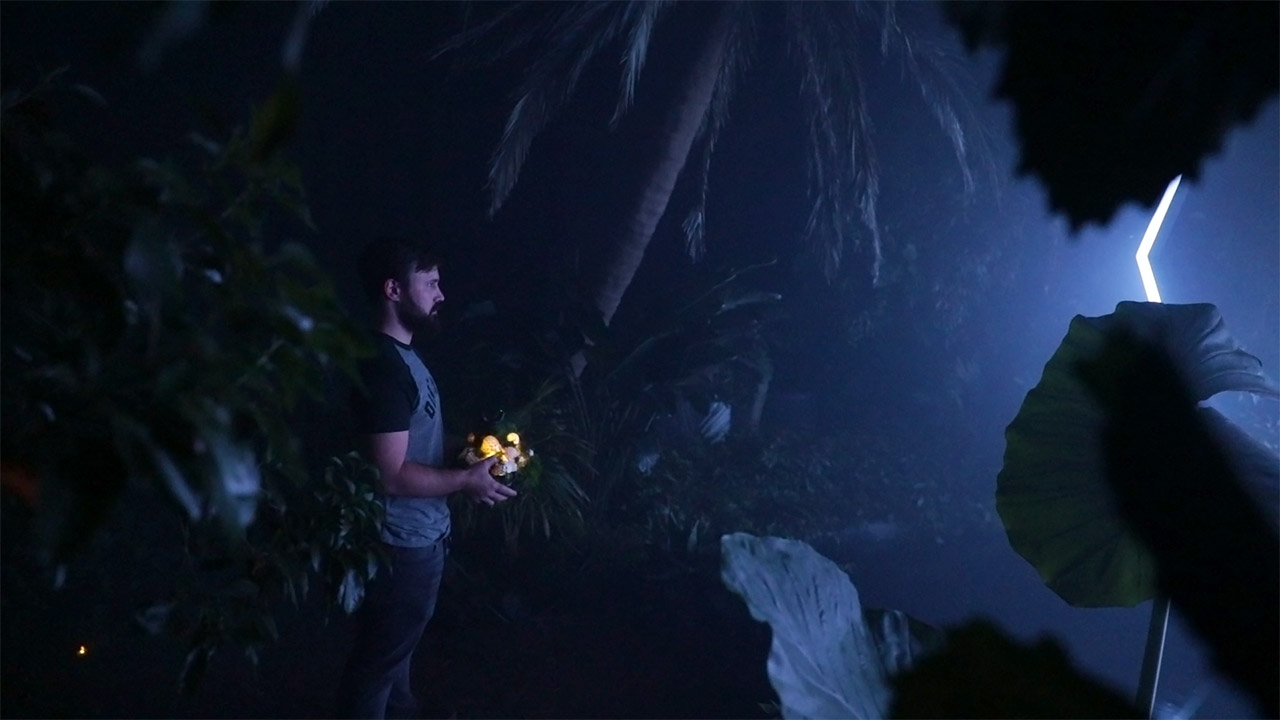
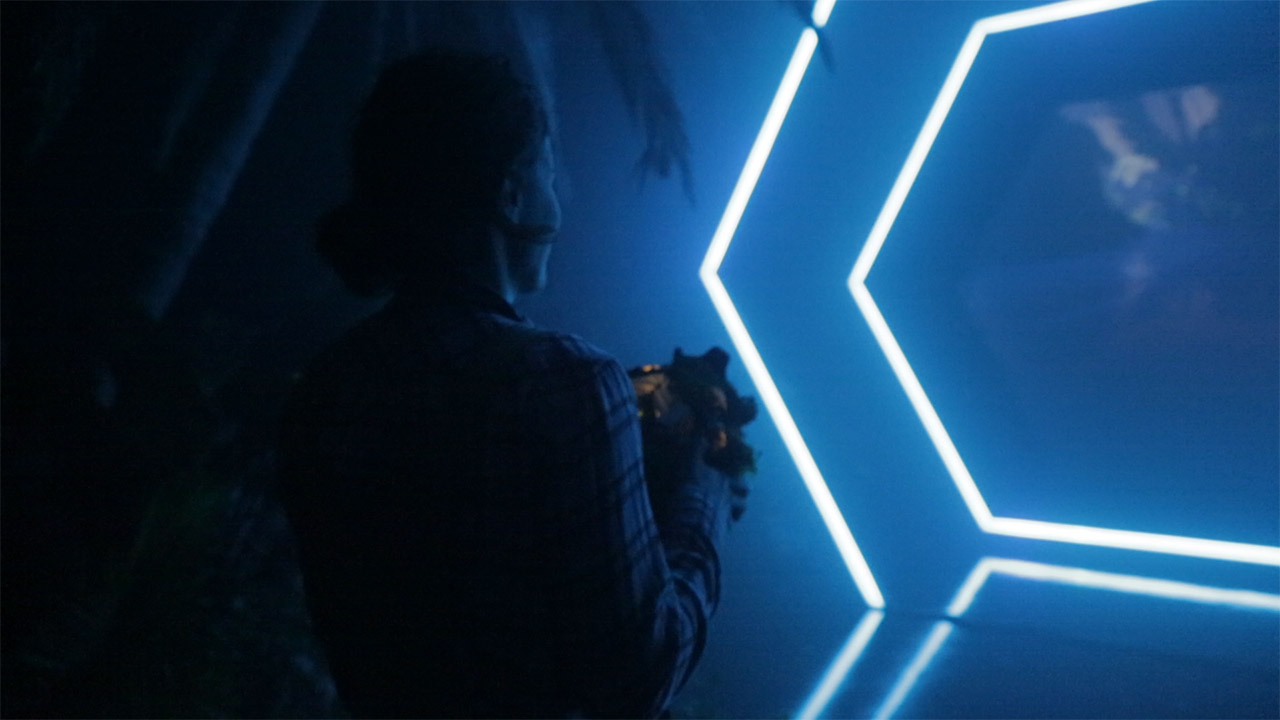
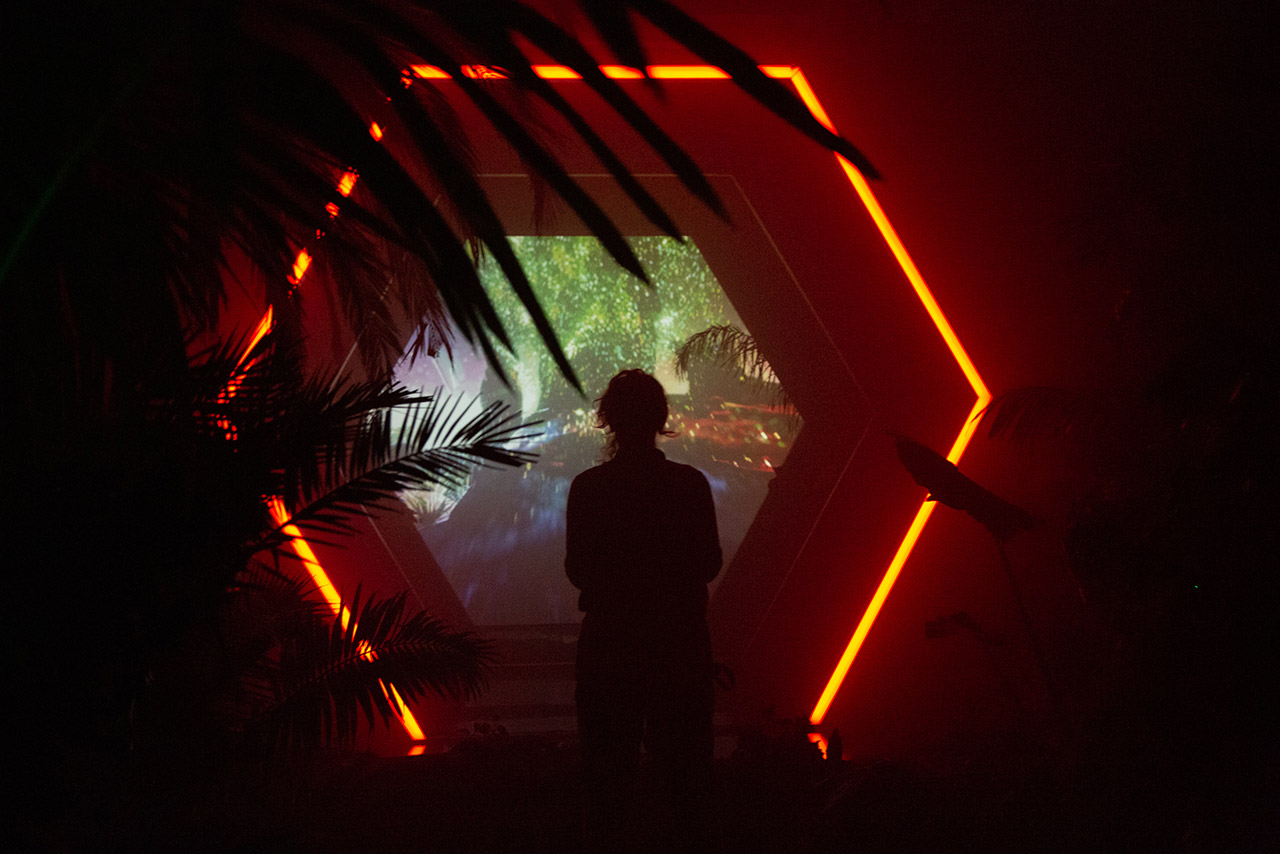
We designed a generative world using unreal engine, that visitors were able to fly through using the custom controller all while feeling insane spatial audio whip past them in the jungle.
Poster design for the event:
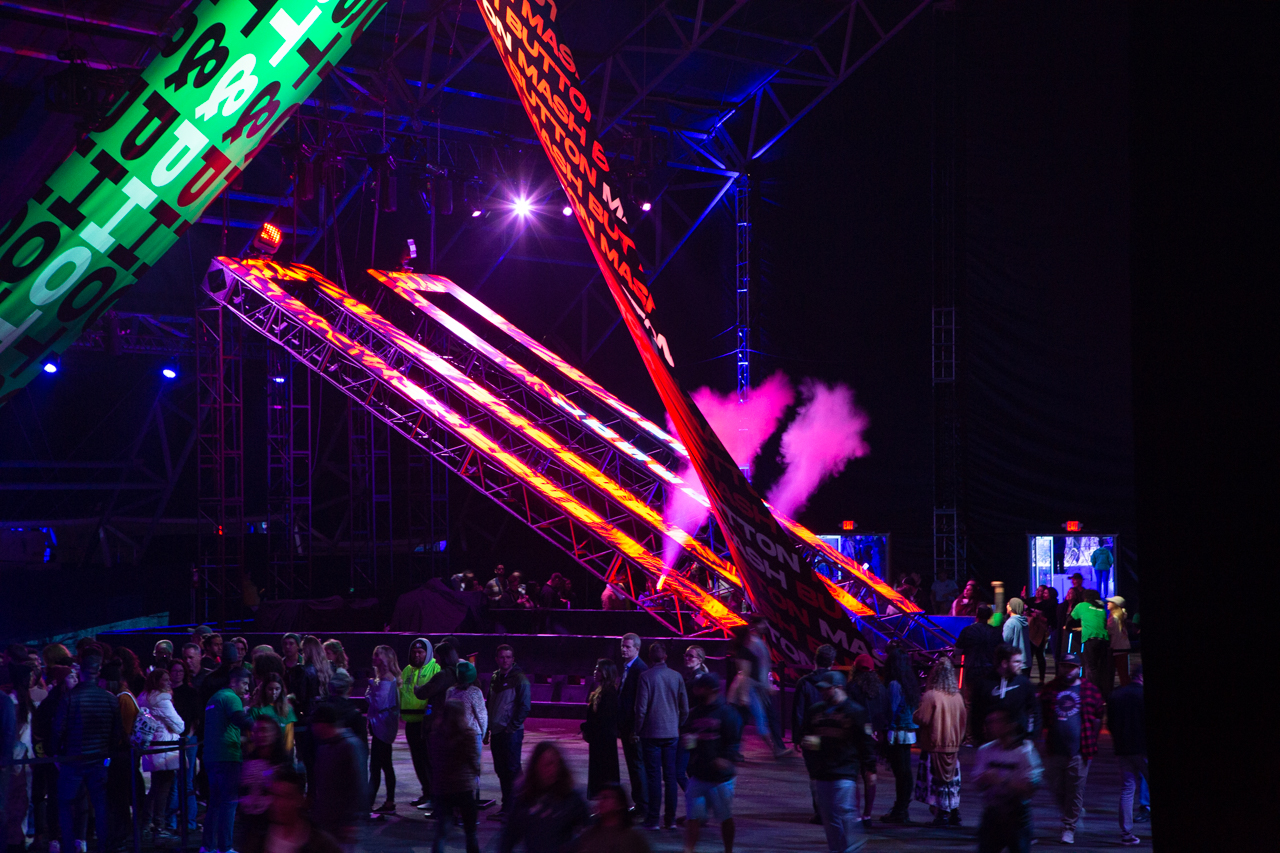
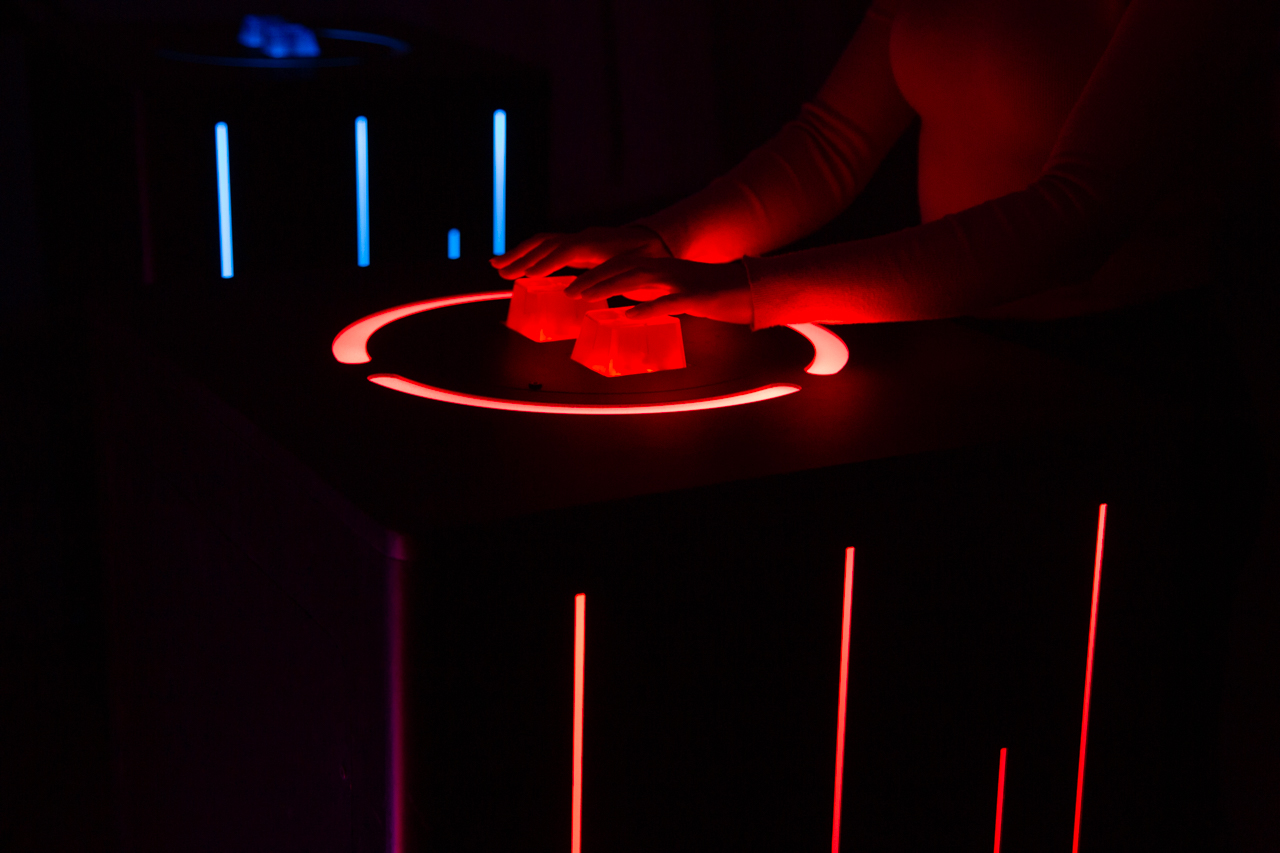
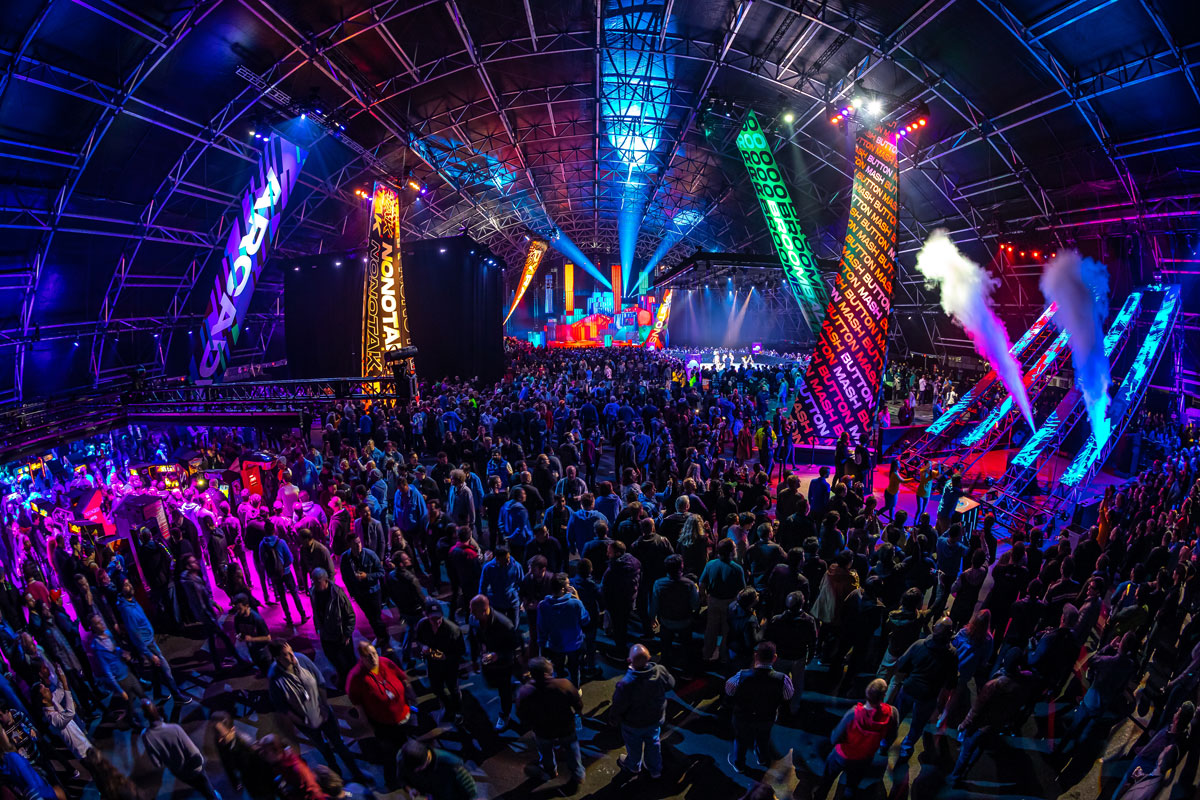
Button Mash
January 28, 2020Interactive button mashing game created for AWS Intersect festival. The event was led by Production Club, who reached out to MOS to create a fast paced button mashing game that would be rock solid underneath the immense pressure of excited (possibly inebriated) guests. MOS was responsible for designing, fabricating and programming the LED reactive podiums as well as programming the game logic and triggering dmx lights and co2 blast.
SXSW Under Armour Experiences
March 19, 2019Interactive Basketball and Running experiences we created for SXSW.
We toured the event around the US and to Brazil and Europe.
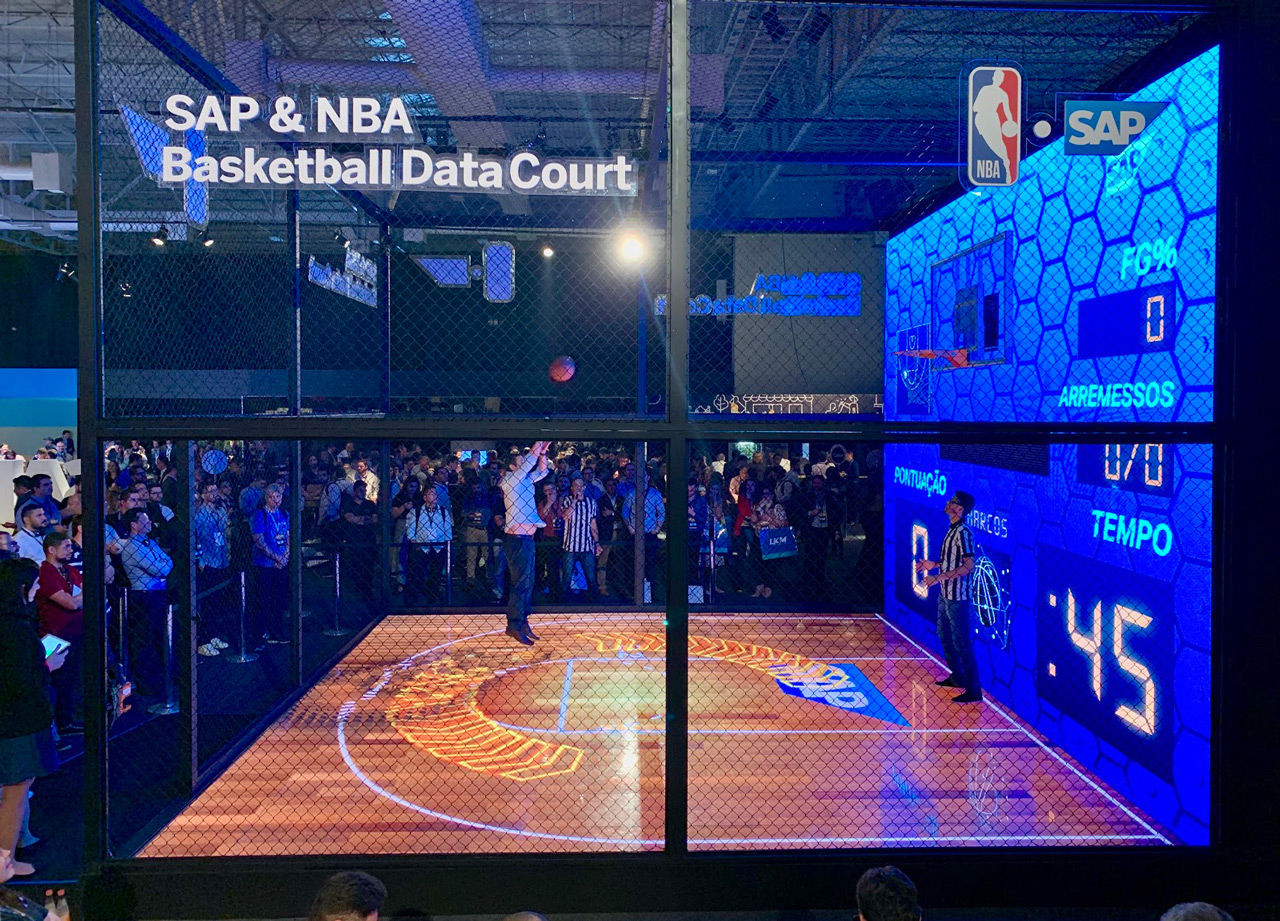
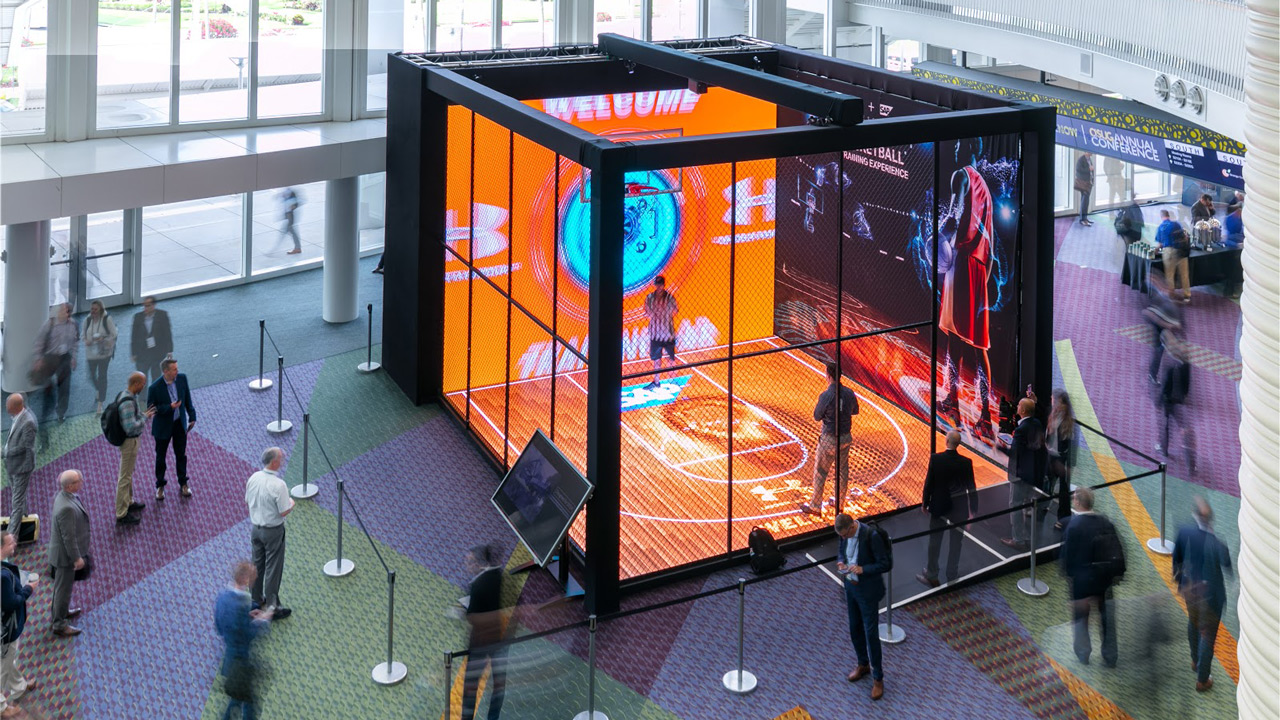
Raw footage of the basketball experience:
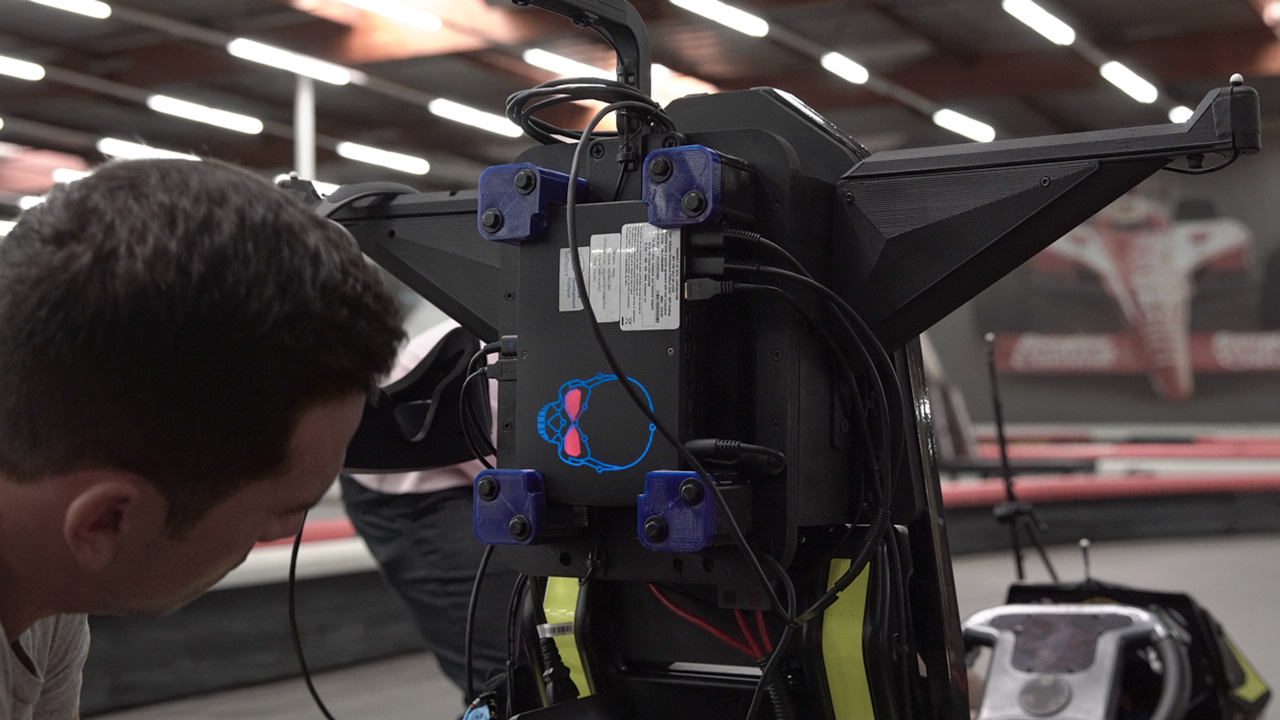
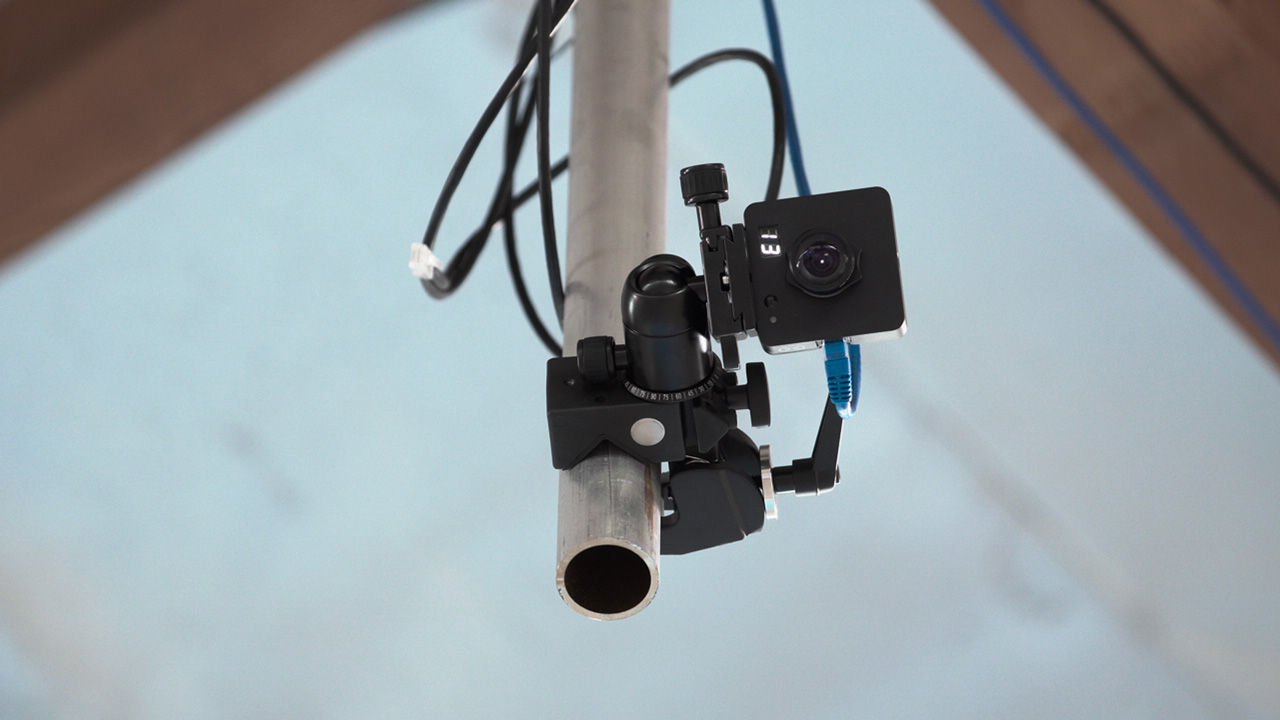
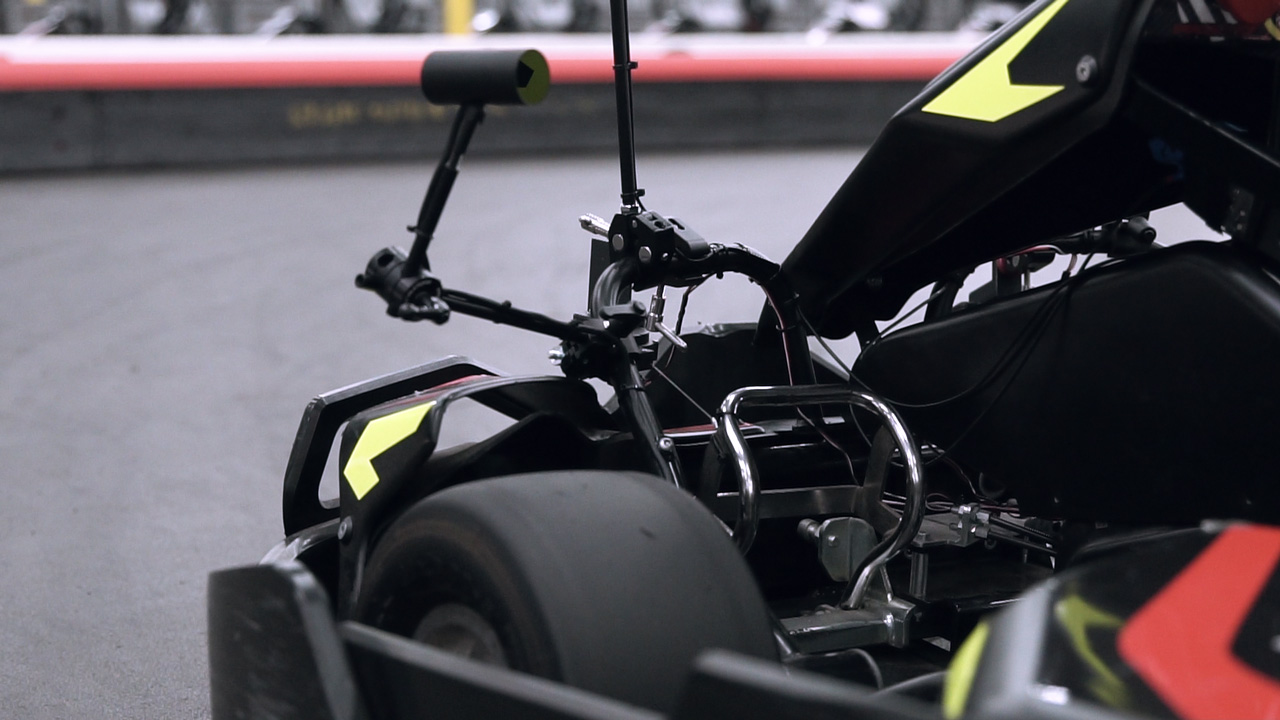
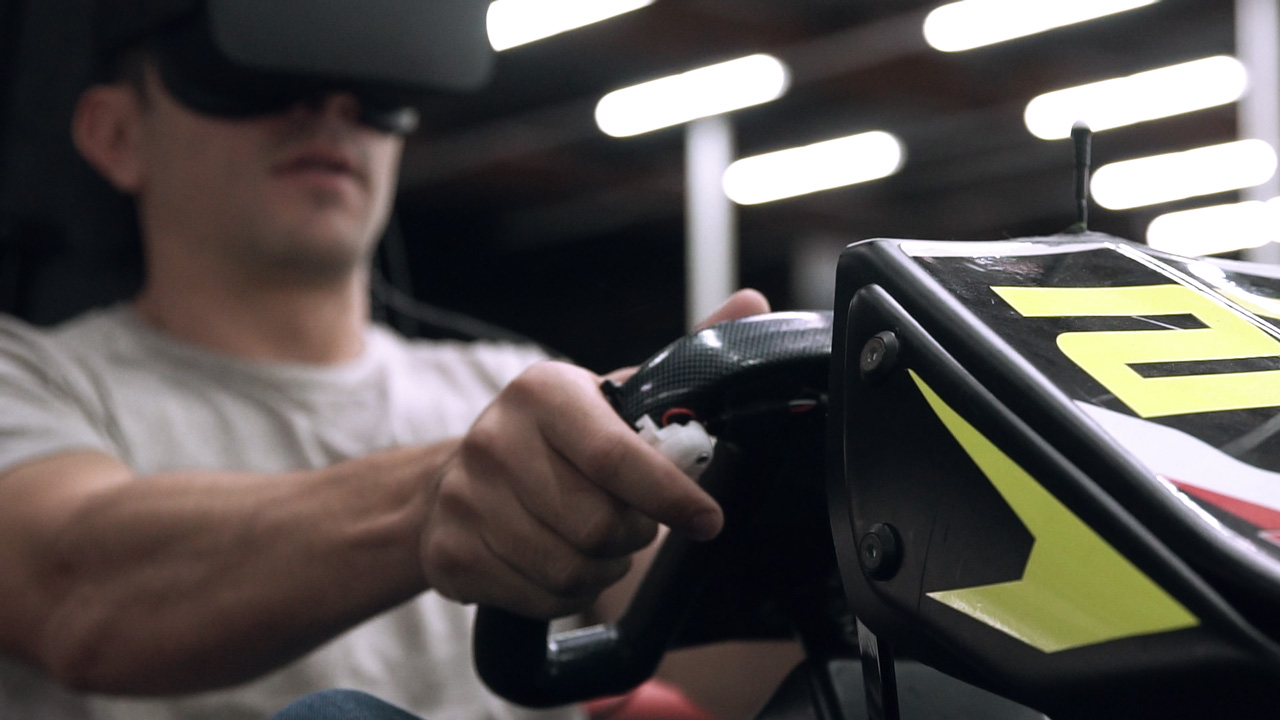
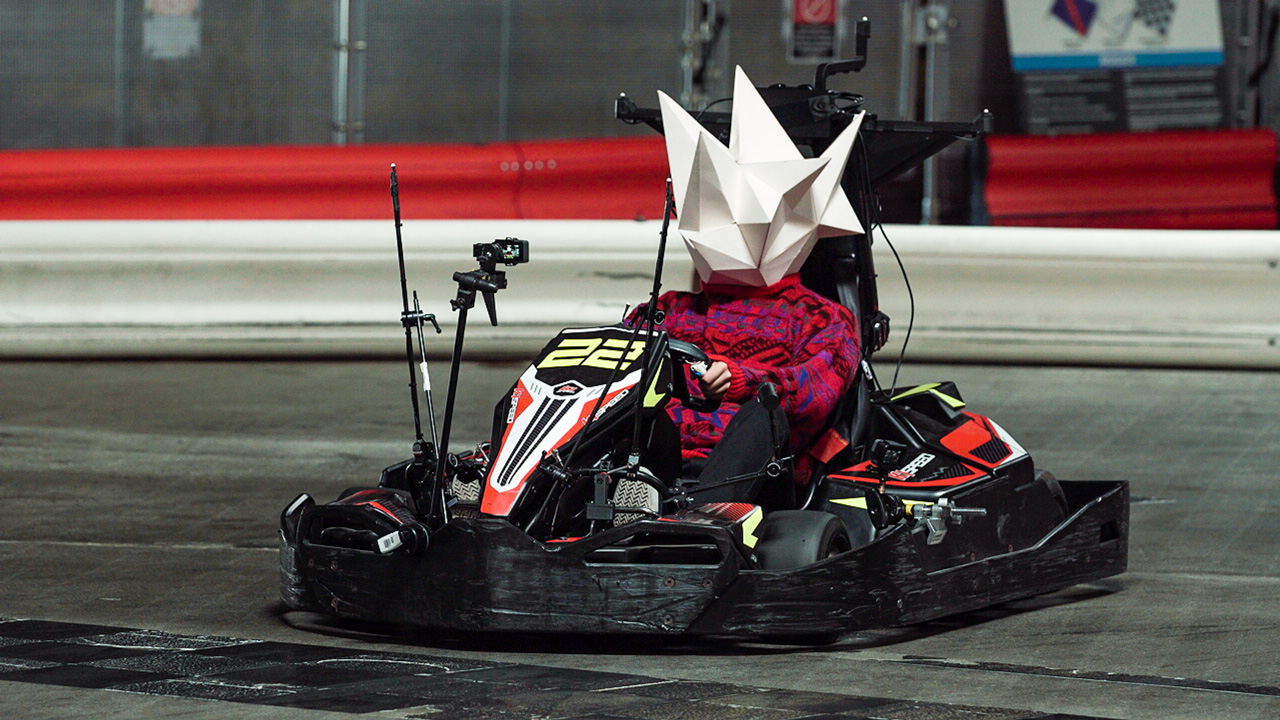
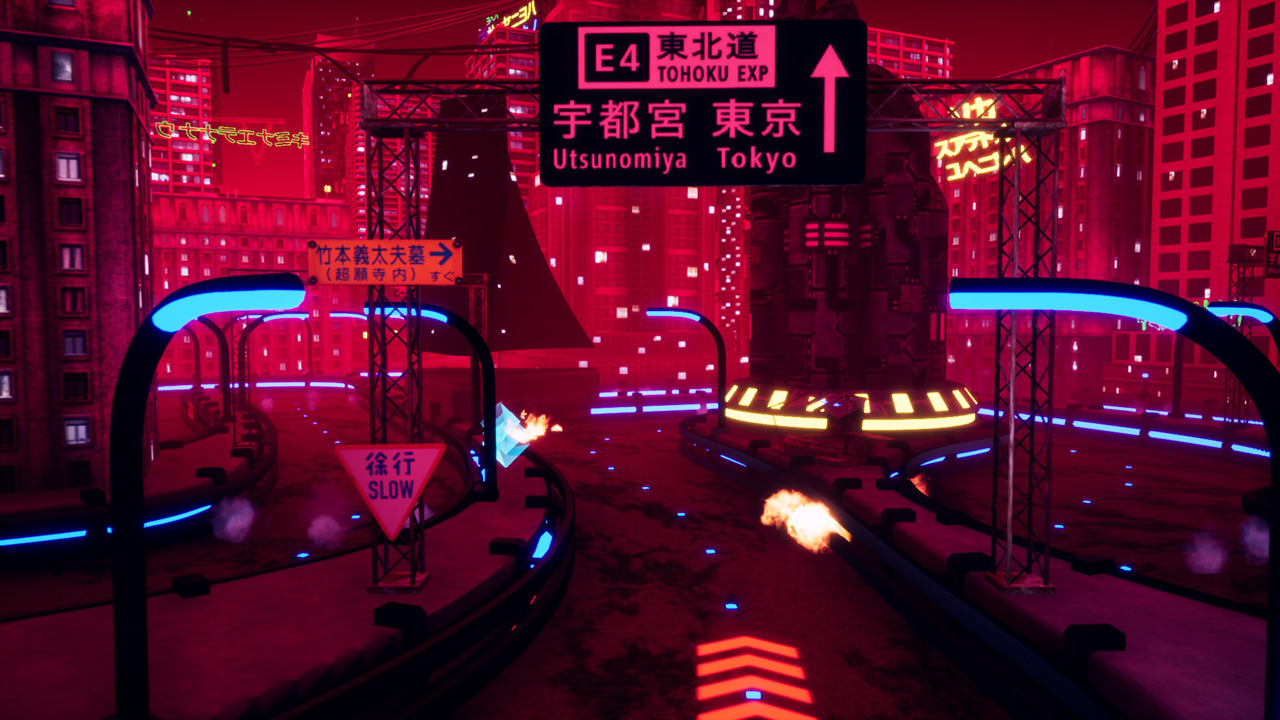
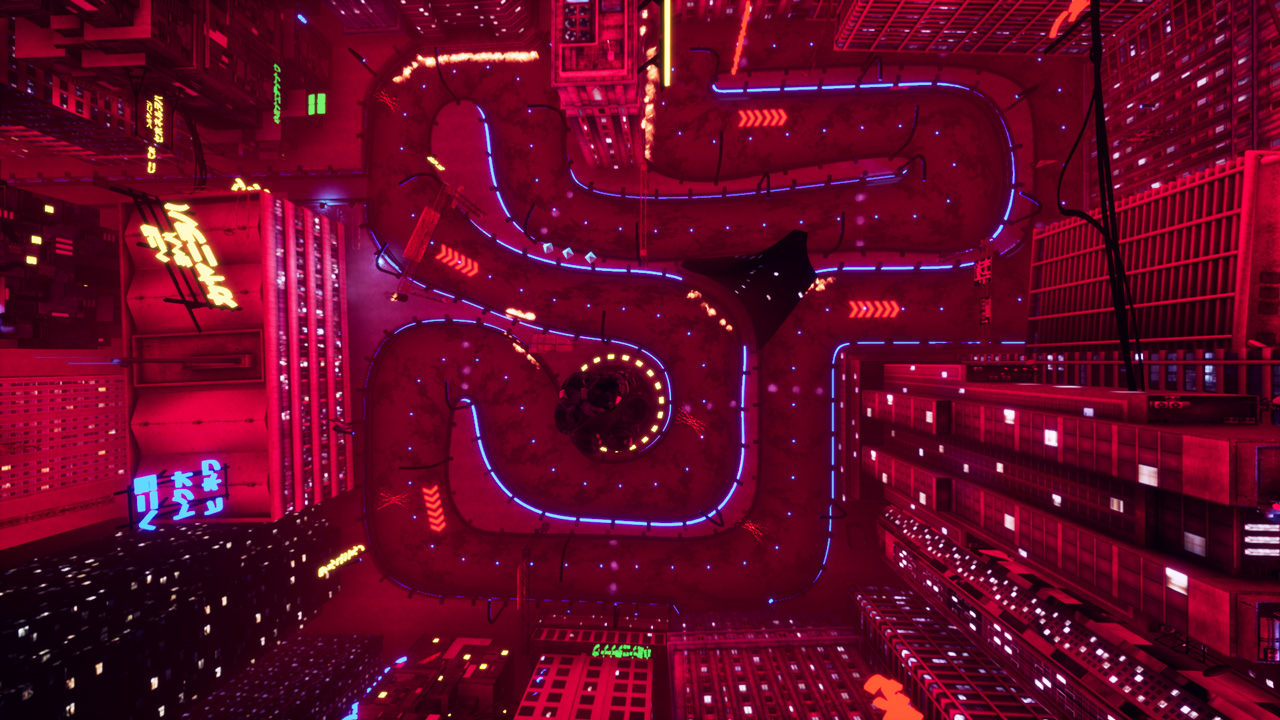
Posted in Design, Motion, Work | Leave a commentVR Go Karts
November 2, 2018If you ever wanted to play Mario Kart in real life now is your chance! We partnered with intel and k1 speed to put together a worlds first virtual reality go kart experience!
BTS
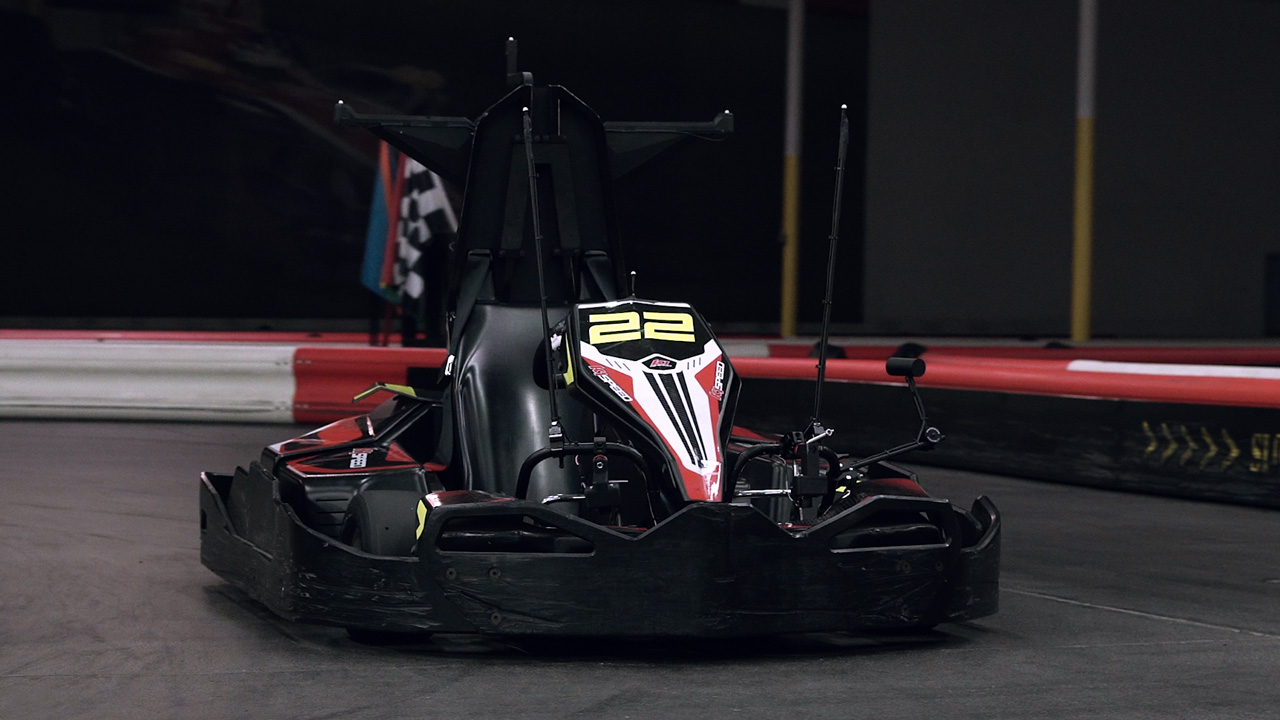
In Game
Posted in Work | Leave a comment
SAP EBC
April 26, 2018Permanent interactive installation installed at SAP’s new york offices located at 10 hudson yard. MOS was responsible for installing and creating a interactive installation that responded to users movement and constantly evolved with live data.
Posted in Design, Motion, Work | Leave a commentPrimeknit Reactive Dance Floor
April 11, 2018MOS created a Reactive dance floor for Primeknit event in Venice, CA. Using a combination of Zed camera, touchdesigner and projection mapping to create a projected floor that tracked the dancers movements and created real-time visuals.
Posted in Design, Motion, Work | Leave a commentBadgley Mischka
January 31, 2018Installation we created for Badgley Mischka at SAP Sapphire event. Users were able to vote for their favorite dress and trigger reactive visuals and realtime data on what others had chosen at the event.
Posted in Design, Motion, Work | Leave a commentSnapchat Lens Studio
December 15, 2017We were asked by Snap Chat to be an early developer for there new Snap Chat Lens Studio. So we decided to make this chill Zen Shapehead.
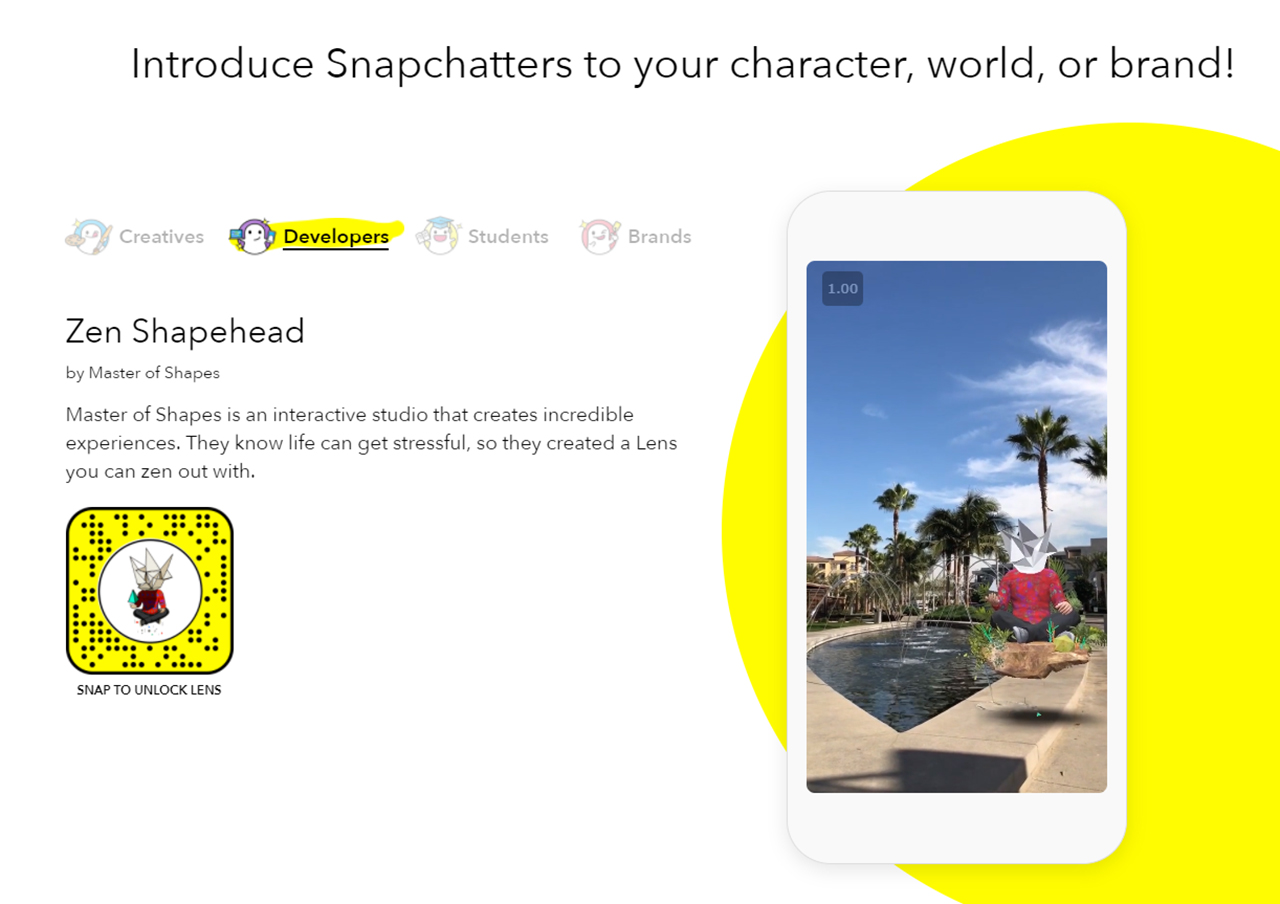
Essentially the new tool Snap Lens Studio is like a simplified Unity and it makes it quite easy and user friendly to make an AR “lens”
The character was modeled, textured and animated in our 3d program of choice then exported as FBX where you then relink the textures and animations and add some simple logic even sounds in Snap Lens Studio. Its easy to push to your phone for testing because they have a built in wifi pairing. The last step in the process was making the snap icon which was just as fun as making the AR filter itself.
And here it is out in the wild:
Go ahead and check it out for yourselves with this link or snap code above
Try out Zen Shapehead AR Lens
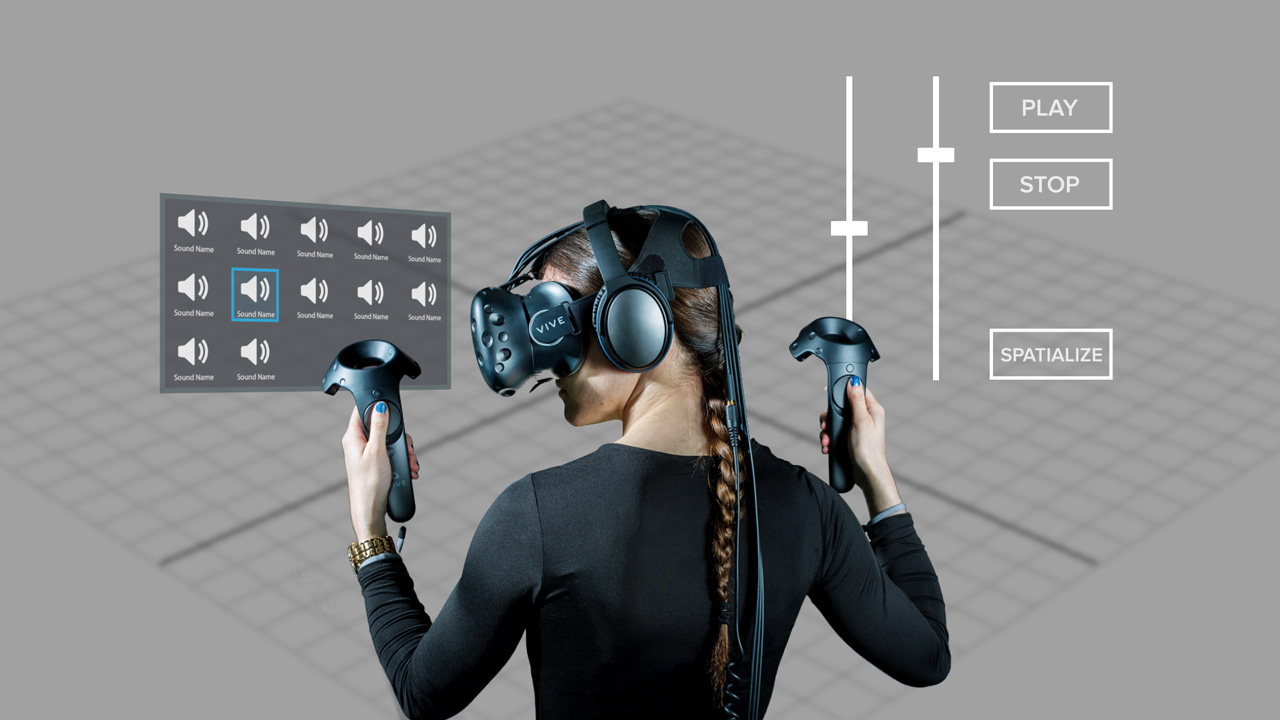
Intel VR Audio Editor Tutorial
October 19, 2017We were asked by Intel to create a useful tool for VR devs that leverages the power of intel CPU’s. Unreal Engine has a powerful virtual reality editor option, but something they did not include is the ability to edit and place sounds while inside VR. It can be troublesome constantly having to restart the editor after adjusting a sound to test what it sounds like in VR. So we decided to create a sound editor that allows game devs and sound designers alike to quickly place, edit, and test spatialized sound inside VR! This will prevent the user from having to constantly enter and exit the editor.
Requires:
-Unreal engine 4.18.1 or greater
-Visual Studio 2017
-HTC Vive
What you’ll learn:
-Motion Controller interaction
-How to create custom C++ class
-VR UI
-Saving editor changes
-Sound spatialization parameters
Below is a step by step tutorial outlining the details of how we made this from start to finish:
After you have downloaded and unzipped the project folder, you will have to do a couple of things to get started. We’re assuming you have at least version 4.18.1 of Unreal Engine installed.
First, right click on Intel_VR_Audio_Tools.uproject and select Generate Visual Studio project files. After that completes open the project. A popup that says “Missing Intel_VR_Audio_Tools Modules” will appear. Click Yes to start the rebuild, this should take less than 20 seconds. This is needed because of how we are dynamically finding .wav files that have been added to the project, which will be explained in the Custom C++ Class section.
Setting up VR player:
We started with Unreal’s Virtual Reality template and chose the MotionControllerPawn as our pawn which has motion control setup and allows movement by teleporting.
Motion Controller Interaction:
Before the motion controller can interact with 3D widgets a Widget Interaction component needs to be added to BP_MotionController, which is located in the VirtualRealityBP folder. Also added was a scene component for the sound selector widget, called soundScene.

Press and Release Pointer keys were attached to the event called when right trigger is pulled. This was added to the MotionControllerPawn also located VirtualRealityBP.

Custom C++ Class:
The reason you had to rebuild the project was because early during the making of this tutorial the issue of knowing the names and locations of the sounds and dynamically updating a widget to match all those files sounded daunting. Luckily, Unreal Engine has some stuff to help us out.
The IntelSoundComponent is a C++ class that can be added to any blueprint for an easy way to dynamically locate and load a .wav file into a USoundWave which is how Unreal loads a sound file.
First, we had to right click in the content browser and create a new C++ class which we named IntelSoundComponent. This action created an IntelSoundComponent.cpp file and an IntelSoundComponent.h file.
Next, we added some includes which are needed to locate and manage files.
Includes added in IntelSoundComponent.cpp are Paths.h, FileManager.h and Runtime/Engine/Classes/Sound/SoundWave.h (which for some reason needed everything before SoundWave.h).
Image (IntelSoundComponent.cpp)
We began by creating a bool named exists, 2 FString variables named dir and SoundDir and a TArray of FStrings named soundFiles. Since soundFiles is a TArray we are able to call soundFiles.Empty(); which empties the TArray. We believe it’s also the fastest way if new wave files are added. Then, we set FString dir to FPaths::ProjectDir();(which gives the root location of the project). Now, we set FString soundDir to dir + “Content/Sounds” because that is the folder we are putting our .wav files into. FPaths has another method that can check if a directory exists so we set our bool to that .(exists = FPaths::DirectoryExists(soundDir);)
Image (IntelSoundComponent.cpp)
On Begin Play we start by instantiating IFileManager by using IFileManager &fileManager = IFileManager::Get();. This was done to debug and test if the wave files were being found with fileManager.FindFiles which are searching for .uassets instead of the .wav files we were using before as .uassets are more reliable when sharing projects.
Image (IntelSoundComponent.cpp)
Lastly in the .cpp, we create two functions that will be exposed as blueprint nodes. SoundArray which passes the soundFiles TArray into blueprints and setWavToSoundWave which honestly took a while to figure out because we had to find a way to dynamically reference a .wav file in a way which Unreal could understand which is a USoundWave. For this problem we discovered LoadObject
In the IntelSoundComponent.h we created two UFUNCTIONS as a way to make the two functions in the .cpp blueprint callable.
Image (IntelSoundComponent.h)
Blueprint function to expose sound files into blueprint.

Blueprint function passing a wav converted in USoundwave into blueprint.

Setting up UI:
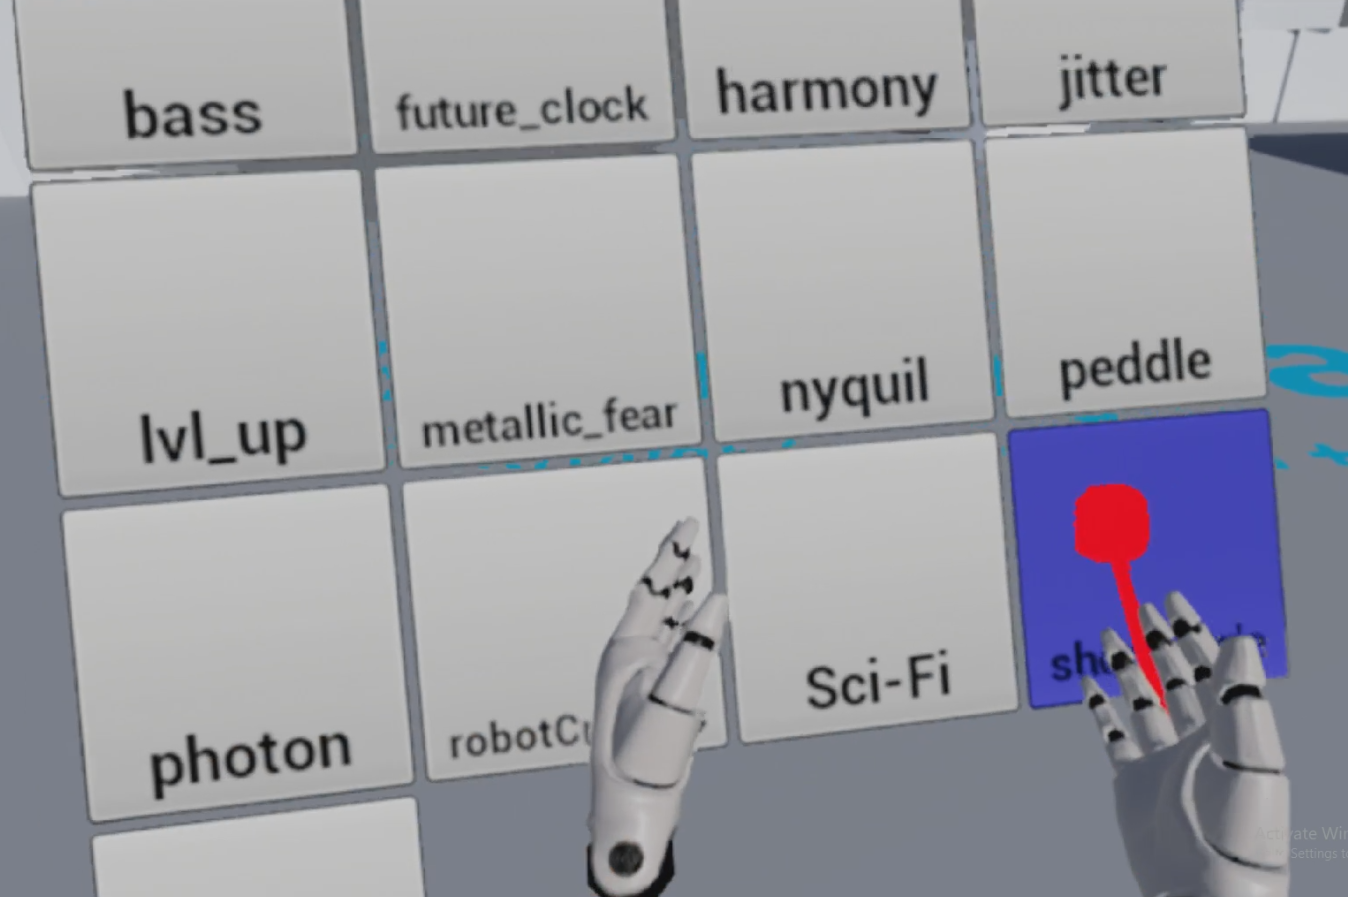
Three UMG widgets we need to create

Create the blueprints needed to manage those UMG widgets

We have a couple of widgets for this project. AudioParamsSliderWidget is the widget that pops up when you select a sound. soundButtonWidgetBP is just a button widget for the sounds in the Content/Sounds folder. soundSelectorWidgetBP is the widget, which i put in the level by having an actorBP we created called IntelSoundWidgetBP (you could do this dynamically but then you would have to get a reference to the newly spawned actor everytime you began play.), gets the sounds from the SoundArray C++ node and populates soundSelectorWidgetBP with soundButtonWidgetBPs. All this happens in the IntelSoundManagerBP which was also placed in the level from the start.
Image (IntelSoundManagerBP)
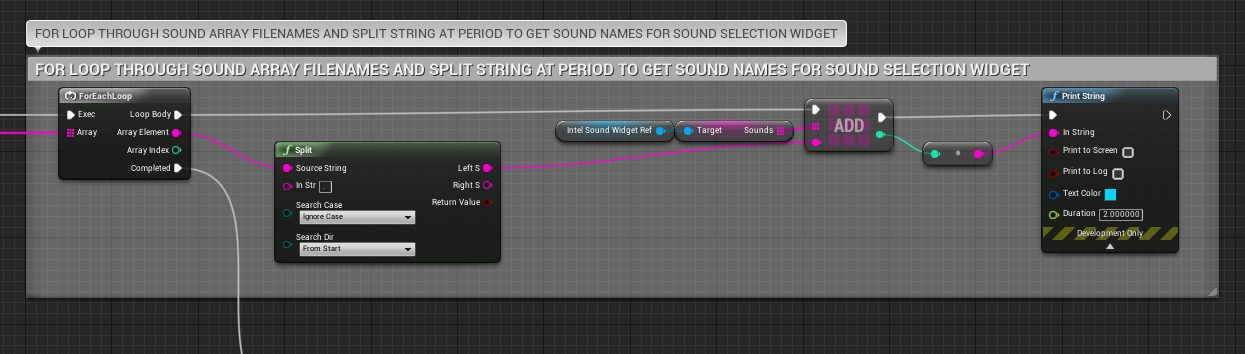
In the image above we get the soundFiles TArray of FStrings and split at the period in the name of the (name of sound).wav. We send that string into an array of strings in IntelSoundWidget to name the buttons being dynamically populated.
Image (IntelSoundWidgetBP)

In the IntelSoundWidgetBP we spawn the soundUI,
add sounds,
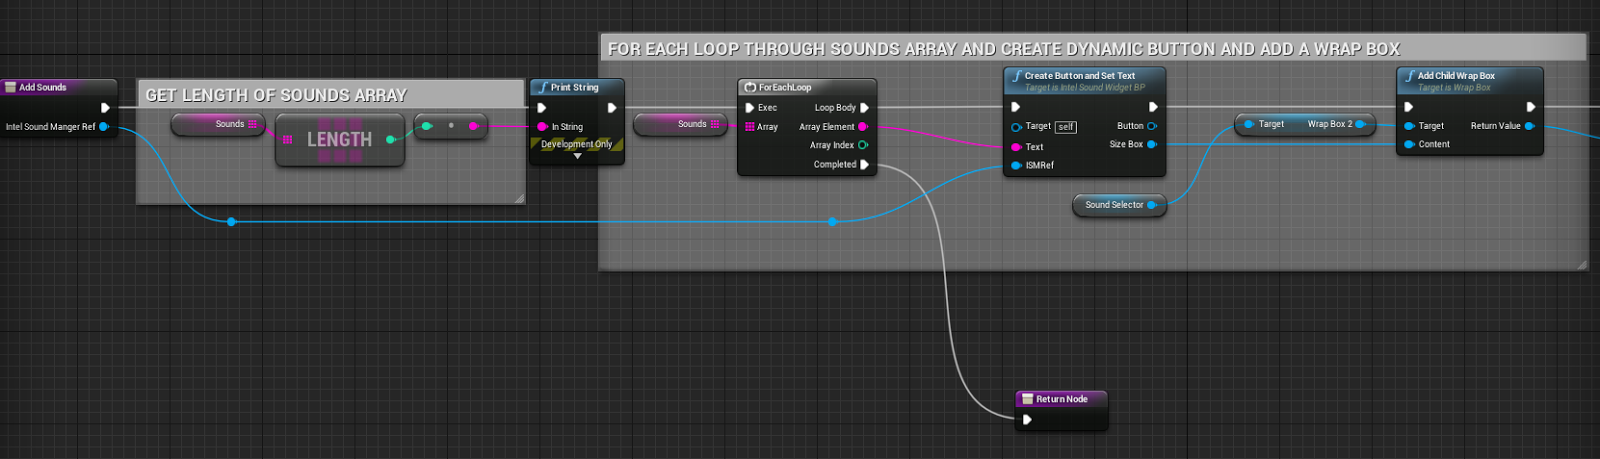
and if we didn’t use the Set Widget node the widget would spawn but not be visible in game.
Sound Parameters:
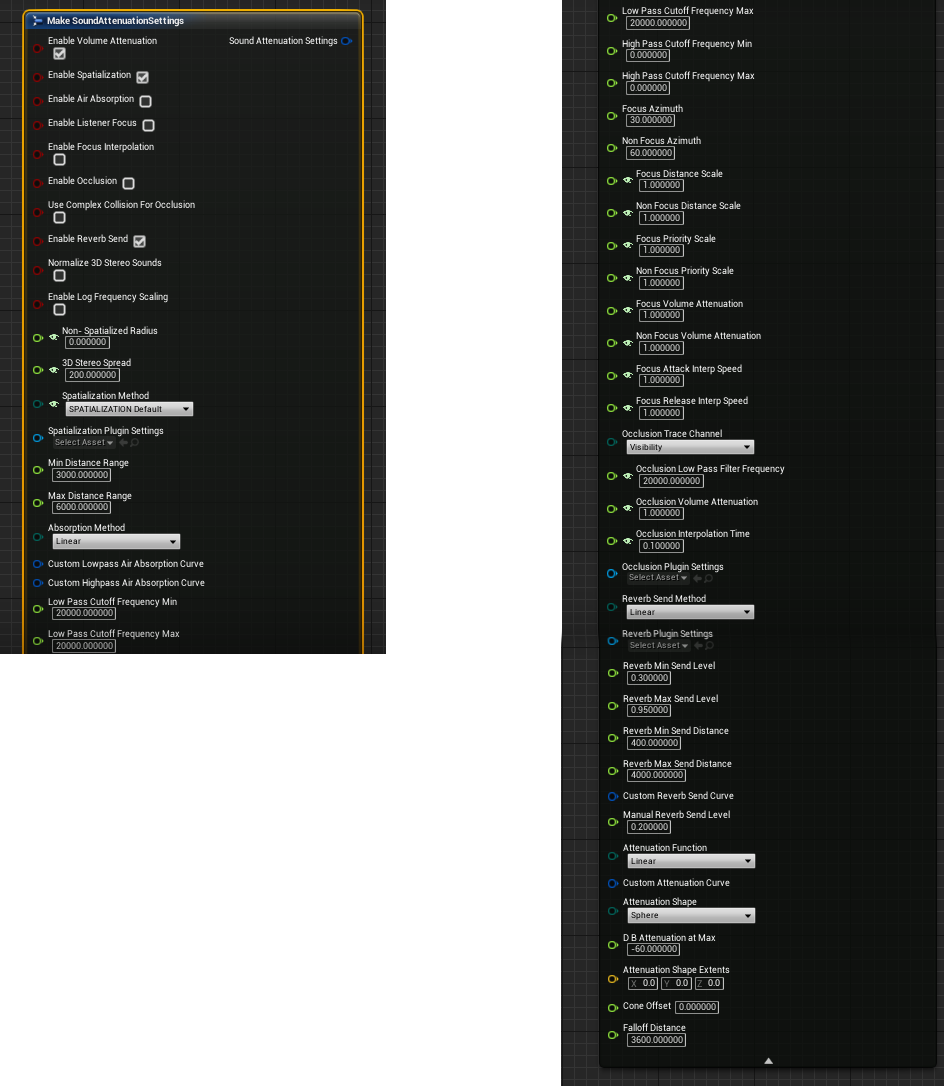
Once the player selects a sound from the widget. An IntelSoundAudioActorBP actor will spawn. In this actor you will see the AudioParamsSliderWidgetBP and if Spatialize? is clicked 3 attenuation settings exposed to be changed through the widget..

Sound Attenuation is essentially the ability of a sound to lower in volume as the player moves away from it.
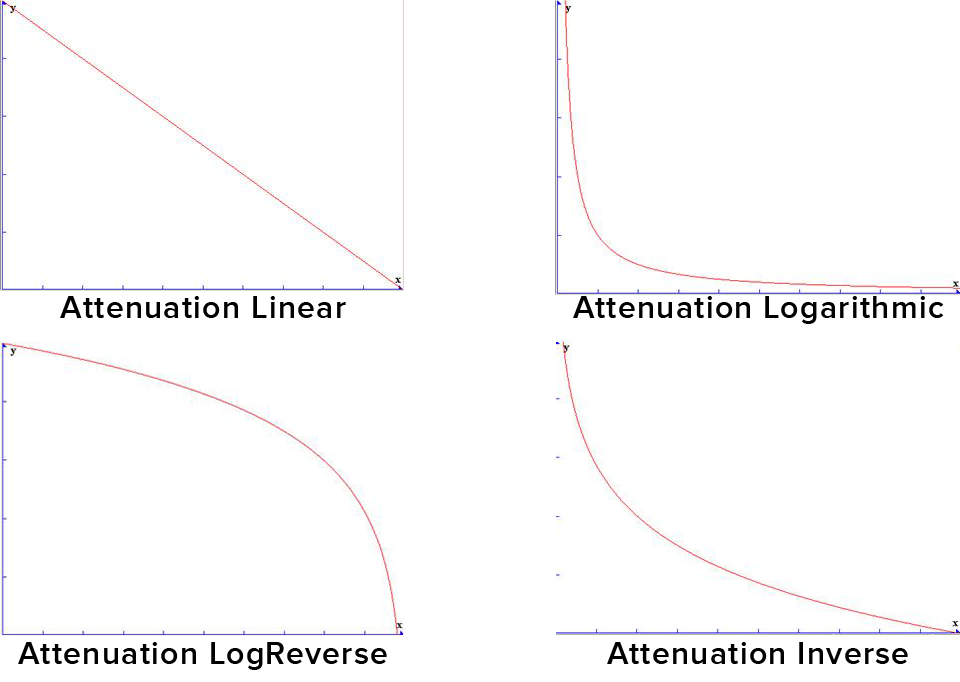
The 3 settings exposed are Attenuation Function, Attenuation Shape and the Falloff Distance.
There are plenty more settings that could be exposed with more time. Here are images of the Attenuation Setting struct in Unreal.
We believe the 3 we chose are the most basic and fundamentally needed settings. Showing debug lines when you are changing settings is something we are working on. We were looking for a way we could use the attenuation setting debug lines Unreal uses to show attenuation in editor in game, but we have not found that answer. So, we might get the shape extents of the attenuation shape and function chosen and use Unreal built in draw debug lines nodes.
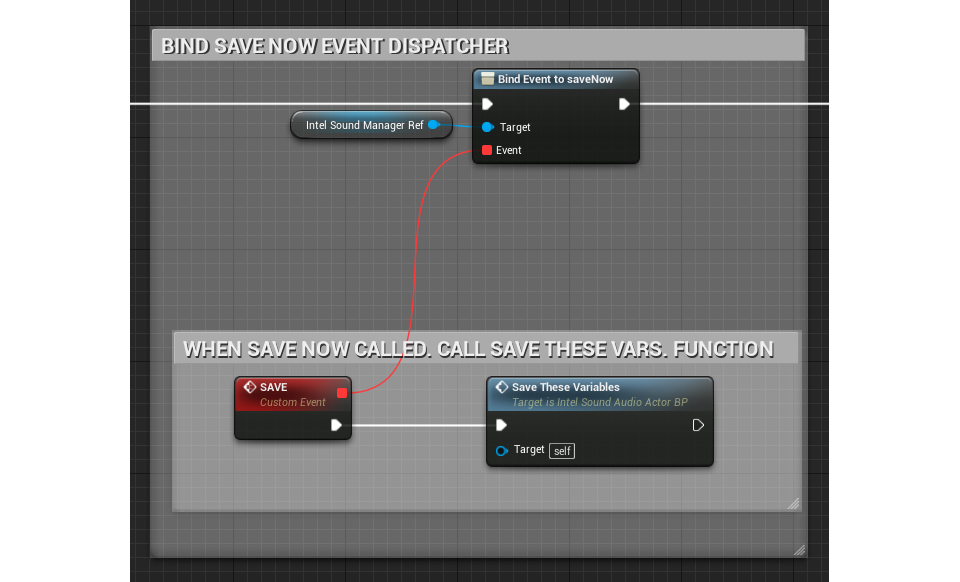
Saving on Exit:
When you exit the game and have spawned sounds, moved them around and played with the audio parameters we save all the variables we believe are important using IntelSaveGameBP through IntelSoundAudioActorBP.
Image (IntelSaveGameBP)

Image (IntelSoundManagerBP)
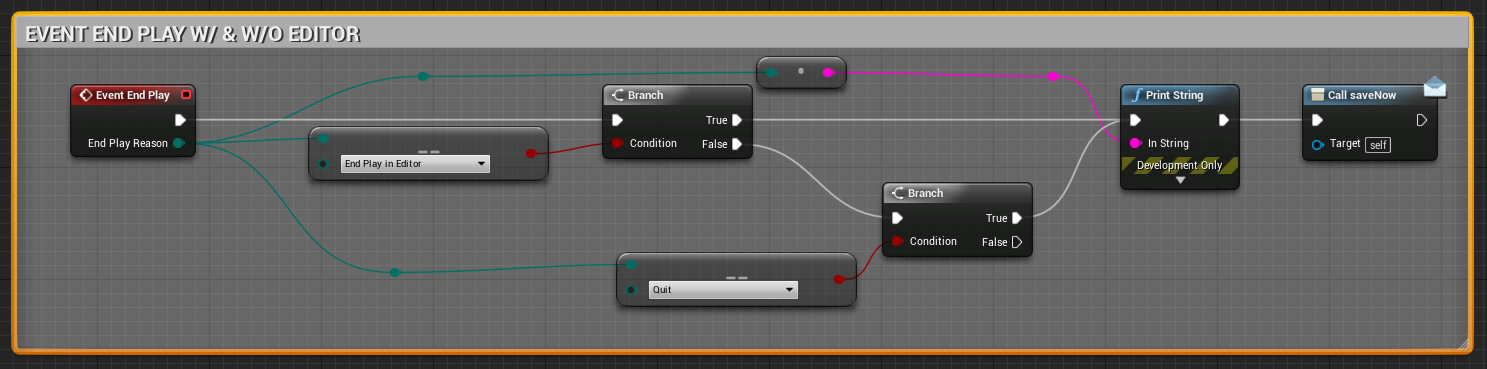
Image (IntelSoundAudioActorBP)
Now if everything worked correct you should be able to edit any sounds in your folder inside VR.
Tutorial written and developed by Rob Meza
Posted in thelab | Leave a comment2017-09-28/23-14-46.jpg
September 29, 2017
2017-09-28/22-59-49.jpg
September 29, 2017
2017-09-28/22-49-43.jpg
September 29, 2017
2017-09-28/21-56-08.jpg
September 29, 2017
2017-09-28/21-30-06.jpg
September 29, 2017
2017-09-28/21-11-29.jpg
September 29, 2017