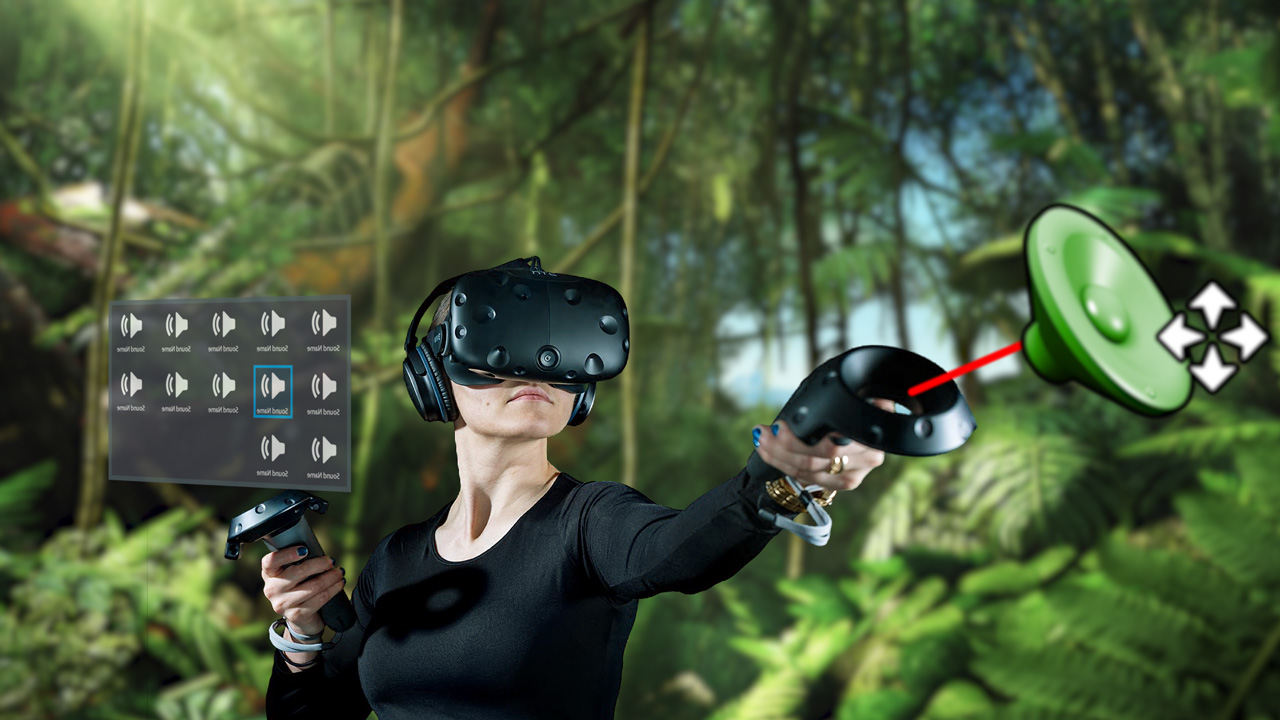
A simple tool that lets you place, edit and spatialize sound in VR
Posted on October 19, 2017 by Adam Amaral
We were asked by Intel to create a useful tool for VR devs that leverages the power of intel CPU’s. Unreal Engine has a powerful virtual reality editor option, but something they did not include is the ability to edit and place sounds while inside VR. It can be troublesome constantly having to restart the editor after adjusting a sound to test what it sounds like in VR. So we decided to create a sound editor that allows game devs and sound designers alike to quickly place, edit, and test spatialized sound inside VR! This will prevent the user from having to constantly enter and exit the editor.
Requires:
-Unreal engine 4.18.1 or greater
-Visual Studio 2017
-HTC Vive
What you’ll learn:
-Motion Controller interaction
-How to create custom C++ class
-VR UI
-Saving editor changes
-Sound spatialization parameters
Below is a step by step tutorial outlining the details of how we made this from start to finish:
After you have downloaded and unzipped the project folder, you will have to do a couple of things to get started. We’re assuming you have at least version 4.18.1 of Unreal Engine installed.
First, right click on Intel_VR_Audio_Tools.uproject and select Generate Visual Studio project files. After that completes open the project. A popup that says “Missing Intel_VR_Audio_Tools Modules” will appear. Click Yes to start the rebuild, this should take less than 20 seconds. This is needed because of how we are dynamically finding .wav files that have been added to the project, which will be explained in the Custom C++ Class section.
Setting up VR player:
We started with Unreal’s Virtual Reality template and chose the MotionControllerPawn as our pawn which has motion control setup and allows movement by teleporting.
Motion Controller Interaction:
Before the motion controller can interact with 3D widgets a Widget Interaction component needs to be added to BP_MotionController, which is located in the VirtualRealityBP folder. Also added was a scene component for the sound selector widget, called soundScene.

Press and Release Pointer keys were attached to the event called when right trigger is pulled. This was added to the MotionControllerPawn also located VirtualRealityBP.

Custom C++ Class:
The reason you had to rebuild the project was because early during the making of this tutorial the issue of knowing the names and locations of the sounds and dynamically updating a widget to match all those files sounded daunting. Luckily, Unreal Engine has some stuff to help us out.
The IntelSoundComponent is a C++ class that can be added to any blueprint for an easy way to dynamically locate and load a .wav file into a USoundWave which is how Unreal loads a sound file.
First, we had to right click in the content browser and create a new C++ class which we named IntelSoundComponent. This action created an IntelSoundComponent.cpp file and an IntelSoundComponent.h file.
Next, we added some includes which are needed to locate and manage files.
Includes added in IntelSoundComponent.cpp are Paths.h, FileManager.h and Runtime/Engine/Classes/Sound/SoundWave.h (which for some reason needed everything before SoundWave.h).
Image (IntelSoundComponent.cpp)
We began by creating a bool named exists, 2 FString variables named dir and SoundDir and a TArray of FStrings named soundFiles. Since soundFiles is a TArray we are able to call soundFiles.Empty(); which empties the TArray. We believe it’s also the fastest way if new wave files are added. Then, we set FString dir to FPaths::ProjectDir();(which gives the root location of the project). Now, we set FString soundDir to dir + “Content/Sounds” because that is the folder we are putting our .wav files into. FPaths has another method that can check if a directory exists so we set our bool to that .(exists = FPaths::DirectoryExists(soundDir);)
Image (IntelSoundComponent.cpp)
On Begin Play we start by instantiating IFileManager by using IFileManager &fileManager = IFileManager::Get();. This was done to debug and test if the wave files were being found with fileManager.FindFiles which are searching for .uassets instead of the .wav files we were using before as .uassets are more reliable when sharing projects.
Image (IntelSoundComponent.cpp)
Lastly in the .cpp, we create two functions that will be exposed as blueprint nodes. SoundArray which passes the soundFiles TArray into blueprints and setWavToSoundWave which honestly took a while to figure out because we had to find a way to dynamically reference a .wav file in a way which Unreal could understand which is a USoundWave. For this problem we discovered LoadObject
In the IntelSoundComponent.h we created two UFUNCTIONS as a way to make the two functions in the .cpp blueprint callable.
Image (IntelSoundComponent.h)
Blueprint function to expose sound files into blueprint.

Blueprint function passing a wav converted in USoundwave into blueprint.

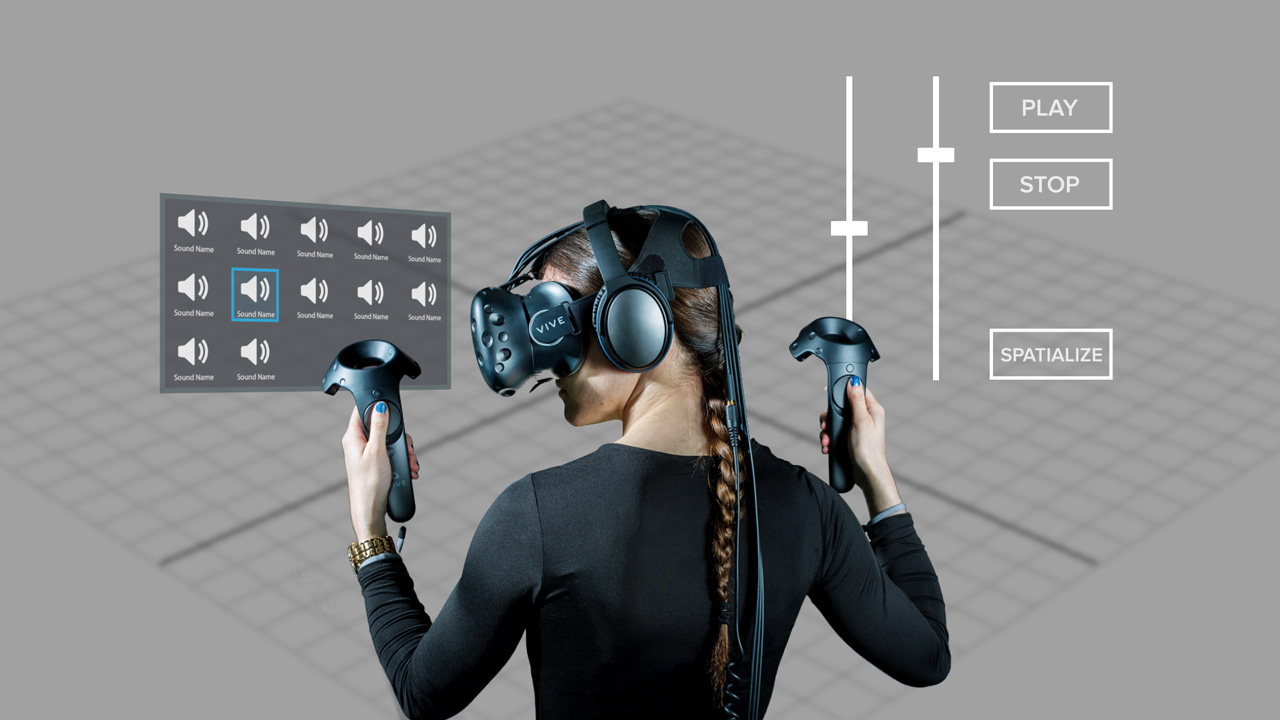
Setting up UI:
Three UMG widgets we need to create

Create the blueprints needed to manage those UMG widgets

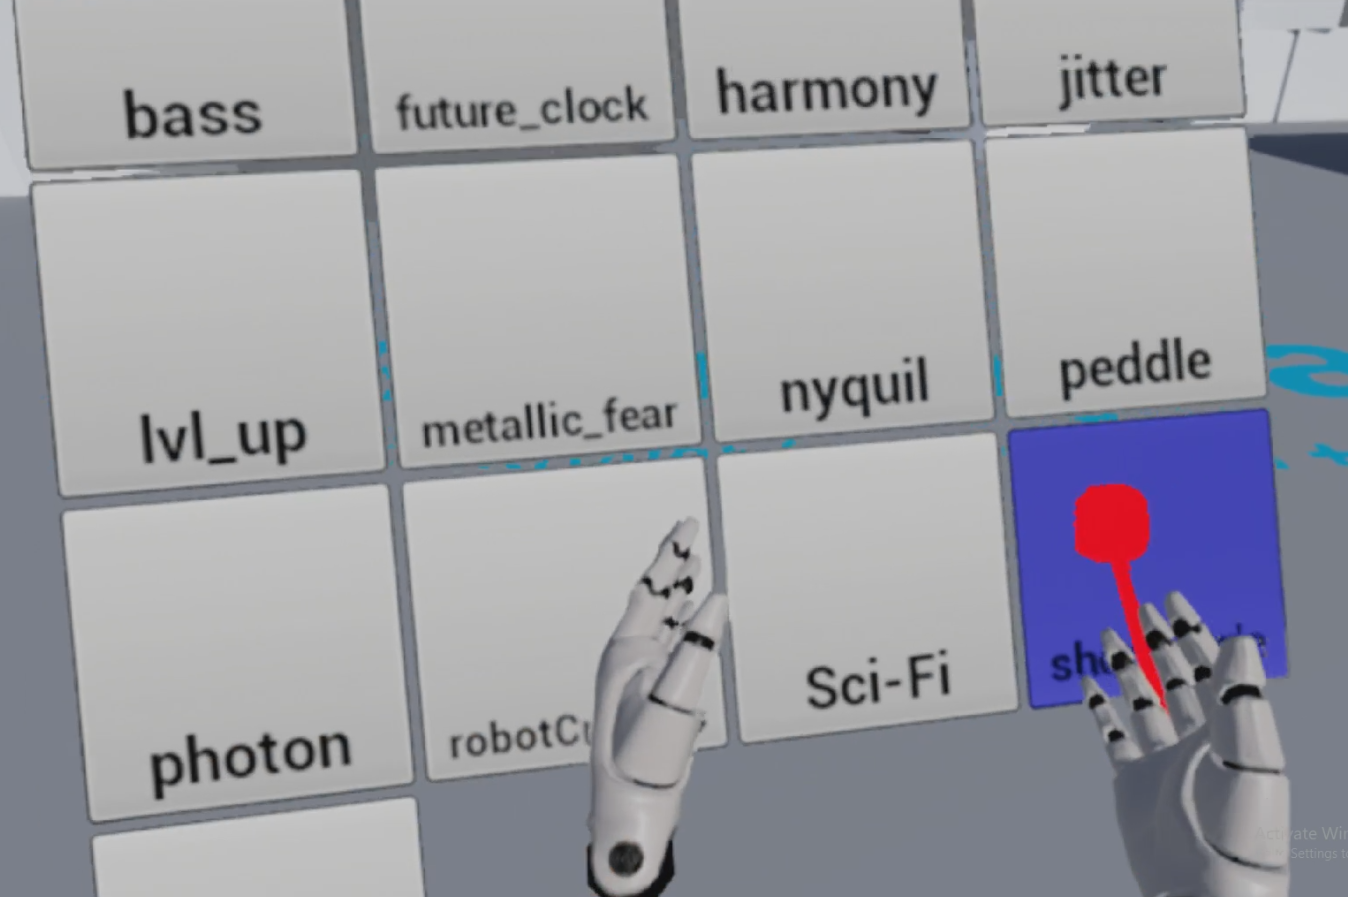
We have a couple of widgets for this project. AudioParamsSliderWidget is the widget that pops up when you select a sound. soundButtonWidgetBP is just a button widget for the sounds in the Content/Sounds folder. soundSelectorWidgetBP is the widget, which i put in the level by having an actorBP we created called IntelSoundWidgetBP (you could do this dynamically but then you would have to get a reference to the newly spawned actor everytime you began play.), gets the sounds from the SoundArray C++ node and populates soundSelectorWidgetBP with soundButtonWidgetBPs. All this happens in the IntelSoundManagerBP which was also placed in the level from the start.
Image (IntelSoundManagerBP)
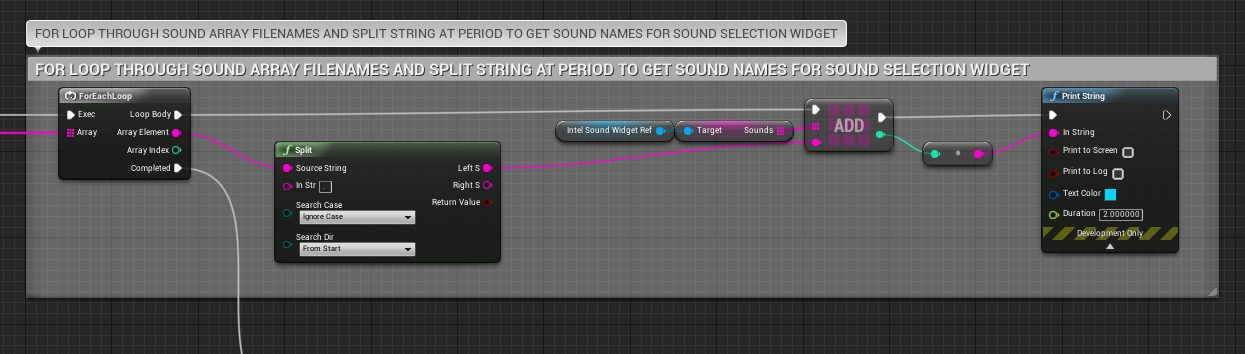
In the image above we get the soundFiles TArray of FStrings and split at the period in the name of the (name of sound).wav. We send that string into an array of strings in IntelSoundWidget to name the buttons being dynamically populated.
Image (IntelSoundWidgetBP)

In the IntelSoundWidgetBP we spawn the soundUI,
add sounds,
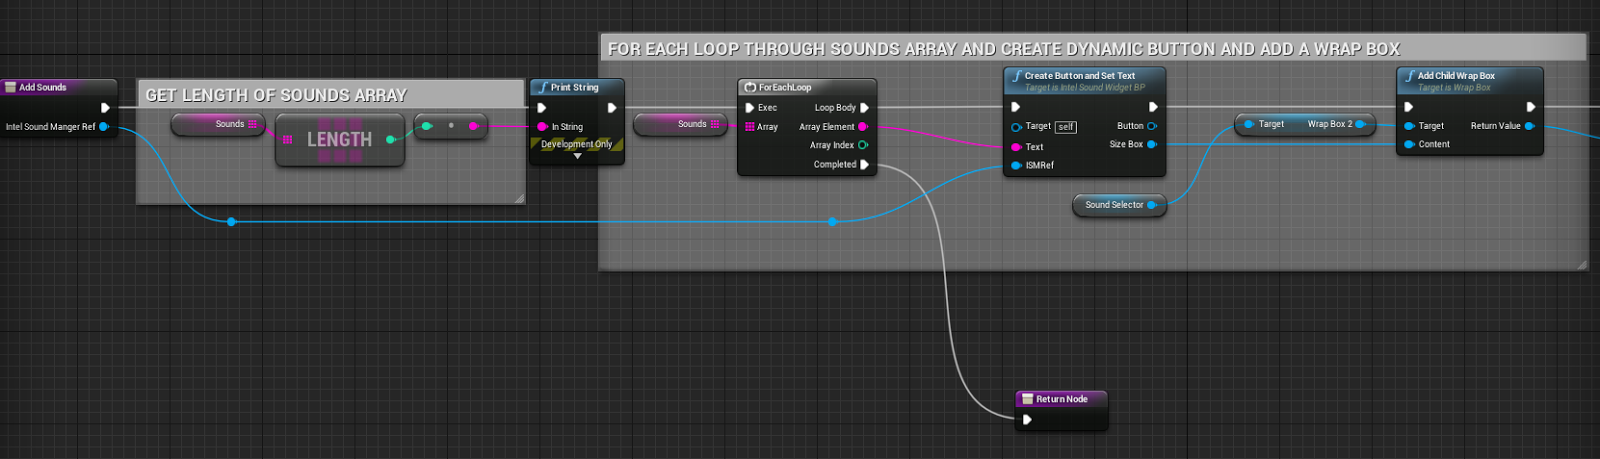
and if we didn’t use the Set Widget node the widget would spawn but not be visible in game.
Sound Parameters:
Once the player selects a sound from the widget. An IntelSoundAudioActorBP actor will spawn. In this actor you will see the AudioParamsSliderWidgetBP and if Spatialize? is clicked 3 attenuation settings exposed to be changed through the widget..

Sound Attenuation is essentially the ability of a sound to lower in volume as the player moves away from it.
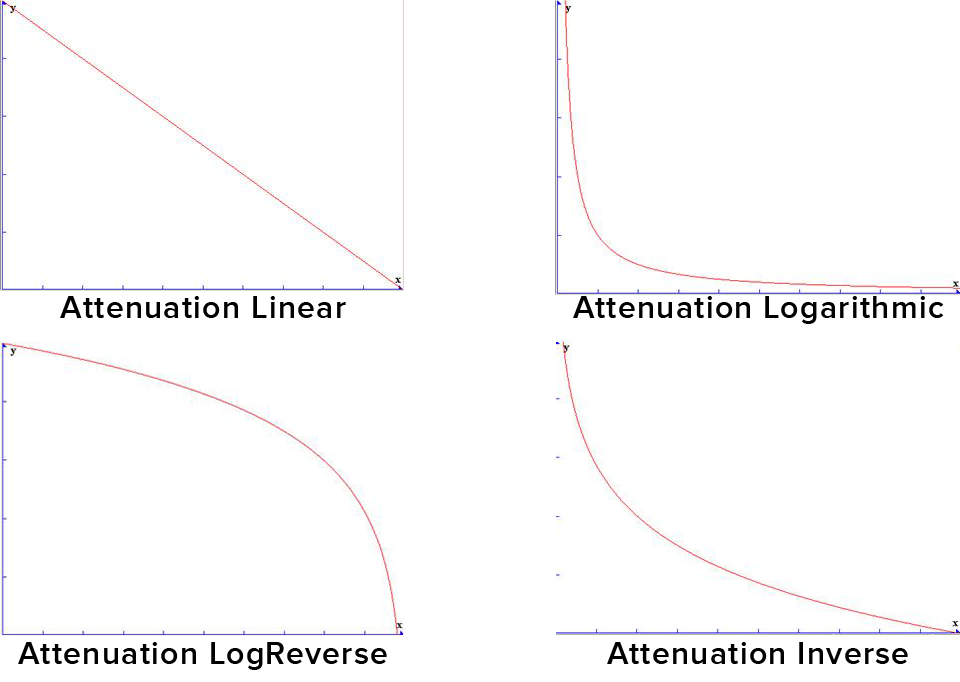
The 3 settings exposed are Attenuation Function, Attenuation Shape and the Falloff Distance.
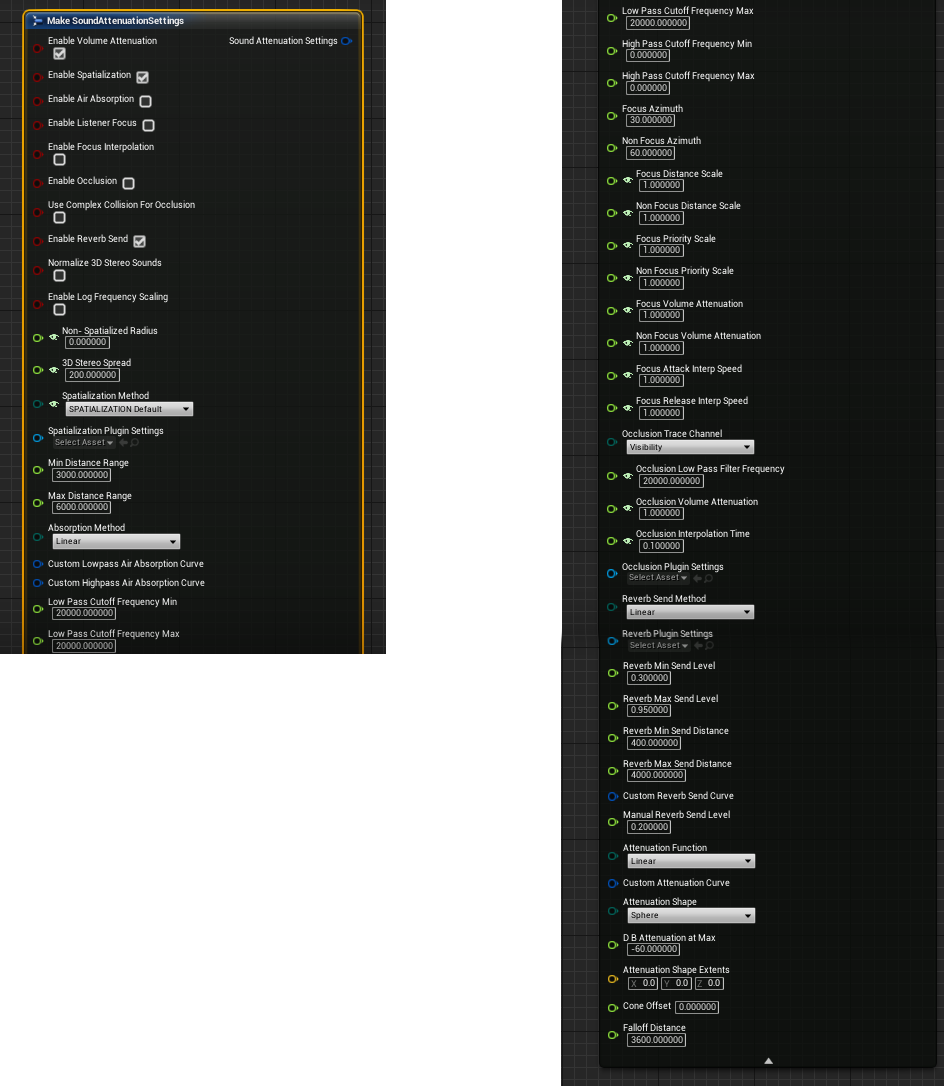
There are plenty more settings that could be exposed with more time. Here are images of the Attenuation Setting struct in Unreal.
We believe the 3 we chose are the most basic and fundamentally needed settings. Showing debug lines when you are changing settings is something we are working on. We were looking for a way we could use the attenuation setting debug lines Unreal uses to show attenuation in editor in game, but we have not found that answer. So, we might get the shape extents of the attenuation shape and function chosen and use Unreal built in draw debug lines nodes.
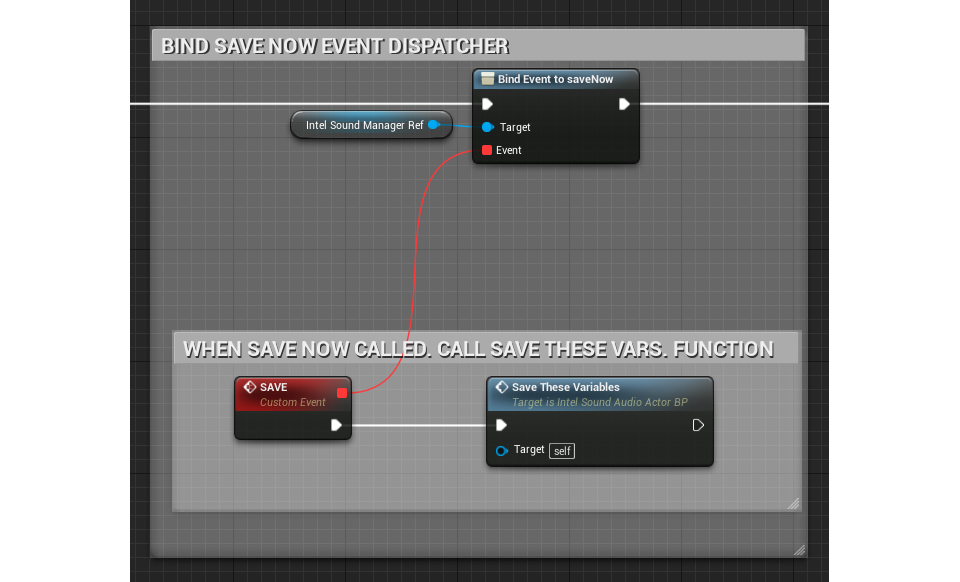
Saving on Exit:
When you exit the game and have spawned sounds, moved them around and played with the audio parameters we save all the variables we believe are important using IntelSaveGameBP through IntelSoundAudioActorBP.
Image (IntelSaveGameBP)

Image (IntelSoundManagerBP)
Image (IntelSoundAudioActorBP)
Now if everything worked correct you should be able to edit any sounds in your folder inside VR.
Tutorial written and developed by Rob Meza
© 2025 MASTER OF SHAPES INC. ALL RIGHTS RESERVED.